If there is no convenient wall to put an upright locker against or you want something less prominent to store tools, a horizontal locker might be preferable. If you paint it green or allow it to weather to a natural color, it will be inconspicuous. The locker shown in figr. 3-4 has a sloping lid to shed water and part of the front opens for easy access to the tools inside. The bottom is raised clear of the ground.
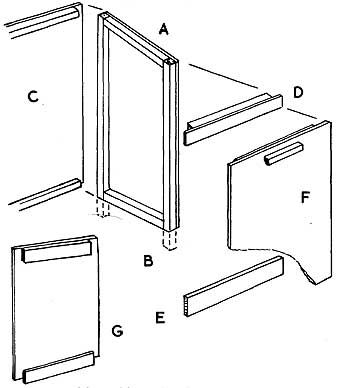
figr. 3-3. Constructional details of the upright garden-tool
locker.
You can use solid wood throughout, but these instructions assume the skin is made of ¾-inch-exterior plywood, with 1½- or 2-inch-square framing. As with the first locker, check the space you need for your tools. The sizes suggested should suit most needs (figr. 3-5).
Make the pair of ends (figr. 3-5A and 3-6A). Nail the plywood to the framing, preferably with the crosswise pieces overlapping the uprights. The back (figr. 3-6B) overlaps the ends and you should stiffen it at the top and the bottom with pieces which fit closely between the ends.
Form the front by hinging two pieces (figr. 3-5B) together. Make the lower part with a stiffened bottom edge, in the same way as the back. Before nailing the lower part on, make the bottom (figr. 3-6C) to rest on the four bottom framing pieces, with notches around the uprights. Nail in the bottom and the front.
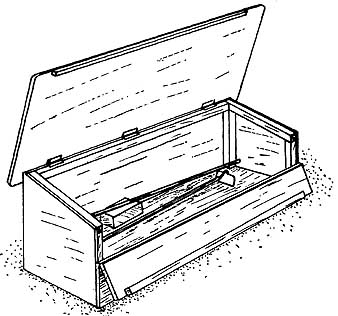
figr. 3-4. The horizontal tool locker has a lifting lid and a
fall front for easy access.
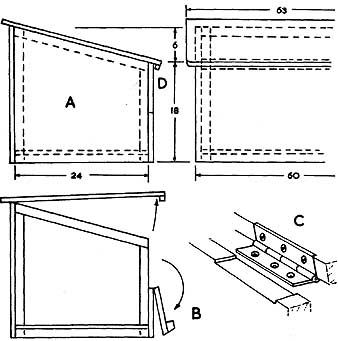
figr. 3-5. Sizes of the horizontal tool locker.
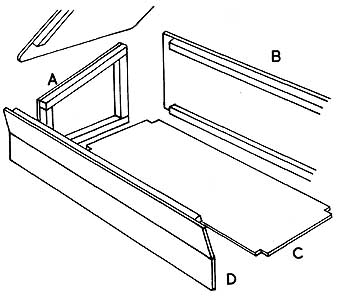
figr. 3-6. The framed parts of the horizontal tool locker.
The meeting edges of the front (figr. 3-6D) should be stiff enough to take three hinges (figr. 3-5C). If you are doubtful about them holding their shape, put strips along their inner edges. Make the top part with framing along its upper edge to match the slope of the lid.
Make the lid with about 1½ inch overlap all around it. Round its corners and edges. If it's necessary to stiffen the lid, put pieces across inside so they clear the framing when you close it. The front strip (figr. 3-5D) should hold that edge in shape. Hinge the lid to the back. Be sure it rests on the ends and the flap at the front. If necessary, plane these parts for a reasonably close fit, then there should be no need for fasteners or handles. The weight of the lid will keep the flap closed, but a slight lift at the front allows you to pull open both hinged parts.
Materials List for HorizontalGarden Tool Locker:
2 ends 1 back 2 fronts 1 lid 1 bottom 6 frames 2 frames 4 frames 1 lid edge |
¾- x -24-x -24 plywood ¾- x -24-x -60 plywood ¾-x- 9-x-60 plywood ¾- x -30-x -65 plywood ¾- x -24-x -60 plywood 1½ x 1½ x 25 1½ x 1½ x 18 1 x 1½ x 60 ¾ x ¾ x 60 |