Several small buildings, or structures sometimes almost too small to be called buildings, might be useful on your property. A common need is for storage of garden tools, possibly some distance from your garage or main storage place, if your garden is extensive. Other items might not need much space, such as loose boating equipment near a dock or barbecue items that you prefer to keep apart from other things.
Construction can be similar to any other small building, although some parts might be smaller and the work simpler. If your experience of constructing wood en buildings is slight or you are a beginning woodworker, one of these smaller assemblies will make a good introduction. It is unlikely you will go wrong, but if you do, you will not waste much material.
A very compact assembly is attractive, but make sure it will hold all you expect it to, and probably a little more. If you are preparing for garden hand tools, you do not want to have to force in something with a long handle diagonally, when you can plan for a few more inches to allow it to go in straight and cause less of an obstruction to other tools. Gather the equipment you plan to store and check to make sure you are allowing adequate internal measurements.
UPRIGHT GARDEN TOOL LOCKER
You can make a storage unit quite simply with framed plywood. The locker shown in figr. 3-1 is made mostly from ½-inch-exterior plywood on 1½-inch- square strips. It could fit against a fence or stand as an independent unit. As shown, it's assumed that it has a dirt floor, but a plywood bottom could rest on the lower framing. The door lifts out, which allows the maximum access to the inside, but you could hinge it at one side.
Check the sizes of your equipment, but the locker shown in figr. 3-2 should hold most gardening hand tools and lighter power tools.
Make the pair of sides first (figr. 3-3A). Cut the plywood to shape and nail it to the framing strips. There is no need to cut joints between the framing parts.
If you wish, allow extensions at the bottom (figr. 3-3B) to go into the ground. The back (figr. 3-3C) goes over the sides and has stiffening pieces at top and bottom. Plane the top-ply edge and its strip to match the shape of the roof.

figr. 3-1. This tool locker stores most tools upright.
At the front strips, go across above and below the door (figr. 3-3D,E). They could be solid wood or plywood. Inside each put stiffening strips.
Check squareness in all directions, then add the roof. If the locker will come against a wall, stop the roof level with the back, but otherwise you can overlap it a small amount. Allow a good overlap on the other edges and around all corners.
Make the door to overlap the sides and fit easily between the front strips (figr. 3-3F). Put a stiffening strip inside the top and one at the bottom to hook over the front piece (figr. 3-3G). These strips should fit easily between the locker sides so you can put the door in or take it out without trouble.
You could drill two finger holes at the top of the door or cut a wooden block as a handle. Make two strip-wood turn buttons to hold the door closed. Alternatively, fit a hasp and staple for a padlock or add an ordinary door lock.
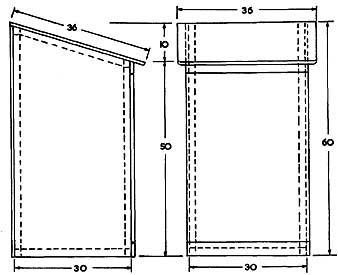
figr. 3-2. Sizes of the upright garden-tool locker.
Materials List for UprightGarden Tool Locker:
2 sides 1 back 1 top 1 door 2 frames 2 frames 8 frames 2 front strips 2 door strips |
½- x -30.-x -60 plywood ½-x-31-x-60 plywood ½.- x -36-x -36 plywood ½- x -31-x -44 plywood 1½x1½x60 1½ x1½ x 52 1½ x1½ x 30 ½ x 3 x 32 ½ x 3 x 29 |