If a tool locker is too small for your storage needs, you can make a simple shed. It would be just big enough to walk in, but not large enough to work inside. It need not have windows and the headroom might be minimal. If these are your needs, the shed in figr. 3-7 is easy to make and the materials cost much less than for a larger building.
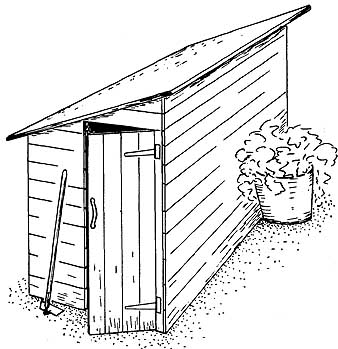
figr. 3-7. The walk-in garden shed allows you to get into the
storage unit.
The suggested sizes shown in figr. 3-8A are for a sectional building that you can make elsewhere and assemble in position, or you can disassemble it if you wish to move it. You can use plywood completely for the cladding, or you can board the walls and the roof or make the roof of plywood. In either case, cover the roof with roofing felt or other waterproof material. Framing might be nearly all 2-inch-square sections. Board the door or make it of plywood.
The pair of ends control other sizes. Allow for the door in one end (figr. 3-8B and 3-9A). At the other end, the upright might be central. If the covering is plywood, it might provide sufficient strength at the corners for the framing pieces to abut against each other, but otherwise, you should join them in one of the ways described in Section 2. Locate all joints away from the corners with notches (figr. 3-8C). Make sure the doorway will finish square. Horizontal boarding is shown in figr. 3-8, but you could nail on vertical boards. At the high side of the door panel put a vertical board (figr. 3-8D). Finish the boards or plywood covering level with the framing all around.
Frame the back and front in the same way, with corner and intermediate joints similar to those of the ends. Use the ends as a guide to heights, and bevel the top members of both panels to match the slope of the ends. Two intermediate uprights (F 3-9B) should provide sufficient stiffness.
Allow for the boards on the back and the front to overlap the ends, so the end uprights are set back sufficiently (figr. 3-8E). Drill for ¾-inch bolts. A bolt near the top and the bottom and two spaced between the top and the bottom should be enough on each corner.
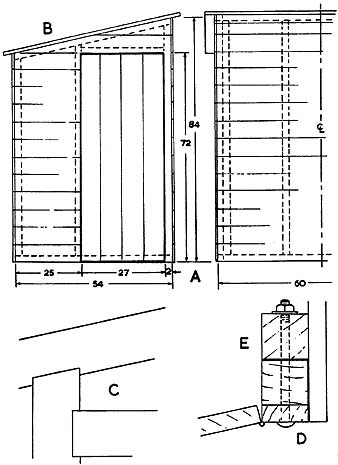
figr. 3-8. Sizes and structural details of the walk-in garden
shed.
For a boarded door (figr. 3-10A), three ledges should be level at the hinge side, but set back a little at the other side. One brace should be enough to prevent sagging. Position the top and bottom ledges so you can screw into them from the hinges, which might be I hinges on the surface, or you can let in ordinary hinges between the door and its post. A metal loop handle would be suitable or you could make one out of wood or turn a knob on a lathe. The simplest fastener is a strip-wood turn button, but you could fit a lock on the door. The door will close against the bottom framing strip. That strip might be sufficient, but you could put a short stop piece near the top as well.
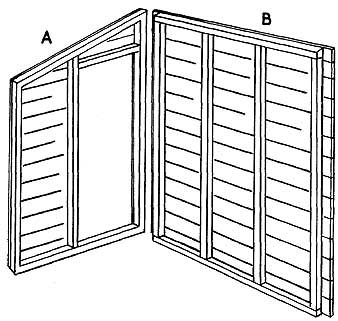
figr. 3-9. Two walls of the walk-in garden shed.
Materials List for Walk-inGarden Shed:
Ends:
- 2 uprights 2 x 2x86
- 4 uprights 2 x 2 x 75
- 2 bottoms 2 x 2x56
- 2 tops 2 x 2x59
- 1 door rail 2 x 2x30
Back:
- 4 uprights 2 x 2x75
- 2 rails 2 x 2x60
Front:
- 4 uprights 2 x 2x86
- 2 rails 2 x 2x60
Roof:
- 3 strips 2 x 2x54
- 2 panels ¾- x -35- x -66 plywood
Wall covering could be ½-inch or ¾-inch plywood or ¾- inch boards, with the lengths needed depending on widths available.
The roof is larger than you can make from a normal-size, single sheet of plywood. You might have a joint at the center (figr. 3-10B). Make the size sufficient to give an overhang of about 3 inches all around. Three strips across should fit easily between the shed back and front. Those at the ends come inside the shed ends. They will hold the building square and you should bolt them through in a similar way to the corners—three bolts on each end should be sufficient.
Although you might let the plywood roof with just a paint finish, it will be better if you cover it with a waterproof material. This covering should be the last job after you erect the building, bolt it down to its foundation, paint all the woodwork or treat it with preservative. For the best protection, paint inside the corners before bolting them together.
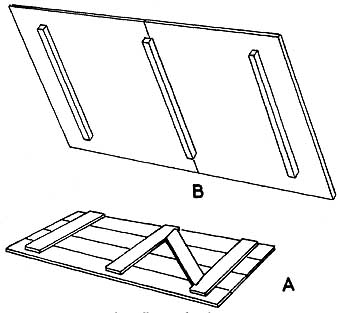
figr. 3-10. Door and roof for the walk-in garden shed.