Tops, doors, and toes make your project work and look better. How? Toes make an easy job of leveling the case when you place or install it. Doors enclose the volume, simplifying the visual effect. And tops add rigidity, cover exposed plywood edges, and create a finished counter surface all at the same time.
Still, these elements reach beyond the strictly utilitarian; each adds a special rhythm and line to your project’s overall effect. The materials you select, how you join them, and how you combine the elements in your project these are the design details that bring your craft to the sphere of art. Yet you don’t need an artisan’s skill or sophisticated tools to make details that delight the eye. Consider the simple options below. Use the basic construction themes and have fun concocting your own variations.
Tops
— Cut your material to size.
— Edge it using glue and nails.
— Set nail heads, putty the holes, and sand.
— Fasten the top down with counter fasteners.
— Trim out the undersurface if you choose.
— Finish the unit.
Doors
— Cut the doors to size, and make any detail cuts.
— Putty; sand all surfaces; apply any trim or moldings.
— Mount the hinges to the doors; then mount the doors in their openings.
— Apply the finish.
— Install pulls and catches.
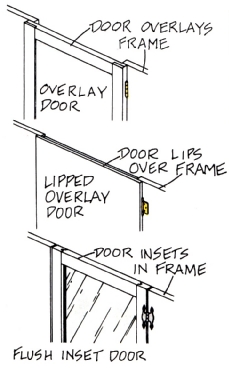
There are three door mounting styles: overlay, lipped overlay, and flush inset. The hinge mechanisms for each type differ; choose among them according to your door mounting style first, then according to the look you want to create.
Toes
— Cut your material to size. Butt or miter lumber joints and miter or edge plywood joints.
— Cut foot details as you like.
— Assemble using glue and nails.
— Set nail heads, putty the holes, and sand.
— Finish the pedestal, then set it under your case.
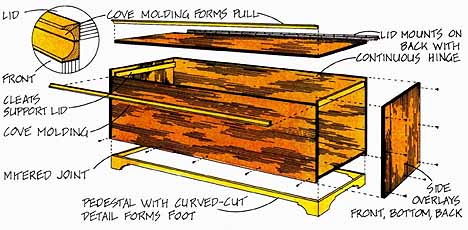
Chests
Chests are versatile, long-lived components. In fact, they’re probably the oldest and most enduring storage “system.” A front-opening chest works like a low cabinet: build a face frame instead of the single plywood front in the project below, and mount doors or full-face rollouts in the opening. The key advantages to this type of chest are convenient access, since what you set on the chest-top can remain there when you get things out of it, and easy organization, since all manner of things can be stored on shelves or rollouts.
A top-opening chest, like the project shown below, functions like a big, deep, hinge-lidded box. This is the easiest type of chest to build. Design yours as a coffee table, or tailor its dimensions to a size you can sit on or nap on.
Use the interior space to store large, regularly shaped things, or items that stack easily. Bagged pet food, canning kettles and jars, backpacks, sleeping bags, and camping equipment, slide screen and projector, boxed items and seasonal decorations, blankets and pillows stow naturally in lidded chests. Installing friction-type lid supports will make your chest safer and easier to use.
Construction: Cut your materials to size. Make both sides the same, and make the back the same height as the sides. The front is 1-1/2 inches narrower than the sides and back; the bottom and lid are both 1-1/2 inches narrower than the sides. Make the bottom, back, front, and lid all equal in length to each other. Then cut two pieces of 3/4-inch cove molding, each to the length of the lid. With contact cement, apply veneer tape to the chest edges that will remain exposed—the front, lip, and back edges of both side pieces, and the top edge of the back.
Now you’re ready to assemble. Pre-drill, countersink, and screw the back, sides, and front together, taking care to keep the butt joints square and flush. Measure and mark the placement for the chest’s bottom, so that a 1/4-inch-deep recess is formed below it; this will house the pedestal, which you’ll build separately. Position the bottom, pre-drill, and countersink. Screw the bottom to the sides, back, and front. Attach the cove molding to the front’s top edge, using glue and finishing nails. Then repeat the process for the lid’s front edge.
Mount a continuous hinge to the lid, then fasten it to the back.
Give the lid extra support by cleating the sides with 1 by 2 strips; screw them in 3/4 inch below the top edge. Plug all the countersunk holes; when dry, chisel and sand the plugs flush with the surface. Working in the direction of the grain, sand all surfaces; first use 120- grit, then 180-, and 220-grit sandpaper. Build the pedestal to suit, and finish it along with the rest. Hand-rub 400- grit wet/dry sandpaper over oil, then wax for a very glassy finish.