Racks are rough constructions—sturdy but not elegant. Two distinguishing traits describe their real beauty—speed of construction and durability. They differ from the other projects in this guide in that they are less finished—you use inexpensive construction materials, leave plywood edges and screw-heads exposed, and need apply no finish. Build and install any of them in a day, then take advantage of their serviceable strength for years to come.
Lumber and plywood work in concert here. The concept is this: the lumber forms the skeleton, or frame, and the plywood forms the skin, or sheathing; the frames support the sheathing and the sheathing stiffens the frames. The result is a lot of sturdy storage surface using light, simple construction techniques.
If your skills are still developing, hone them on a rough construction project. Basement, attic, garage, or carport sites might welcome the improvement and you’ll be ready to take on other component projects with new confidence.
Hanging Racks
Either exposed or unexposed joists and rafters make natural surfaces for mounting hanging racks. In the garage or carport, mount these racks over the hood of the car to put that space into active service. Hanging racks are also excellent components in basements where water seepage occurs; they can hang close to the floor, yet not touch it. The verticals can be as short or as long as you like. For more shelf surface on a rack, make longer verticals, add intermediate cross-members, and insert plywood shelves.
The same simple construction techniques are also used in building floor-standing shelves.
Construction: Measure the space you plan to use and record the dimensions on a freehand sketch. Note the existing structure— distance between joists or rafters, for instance. Plan to space your hangers 32 inches to 36 inches apart. In an attic space, where the roof slope will make one set of verticals shorter than the other, determine the lengths they need to be. Mounted on floor or ceiling joists, the verticals will be of equal length.
Cut 1 by 4 softwood to length, two verticals and one horizontal for each hanger. Pre-drill and screw or nail the cross-member to the face of the verticals, squaring each corner with a combination or framing square. Locate and mark the mounting positions on the sides of the rafters or joists, making sure that each hanging frame will be lined up with the next. With a hammer, blunt the points of the nails (so they won’t split the wood), start them at the top of each vertical, and nail the frames in place.
Cut the shelving to size out of ¾-inch plywood; the shelf surface should be as wide as the opening between verticals, less 1/8-inch for clearance, and can be cut long enough to overhang the frames by a foot at either end. Position the shelving and nail it down in one or two places along the length of each cross-member.
If the space has a finished ceiling, you can still mount hanging racks. Lag-bolt lengths of 2 by 4 to the joists or rafters and side-nail the racks to these 2 by 4 cleats.
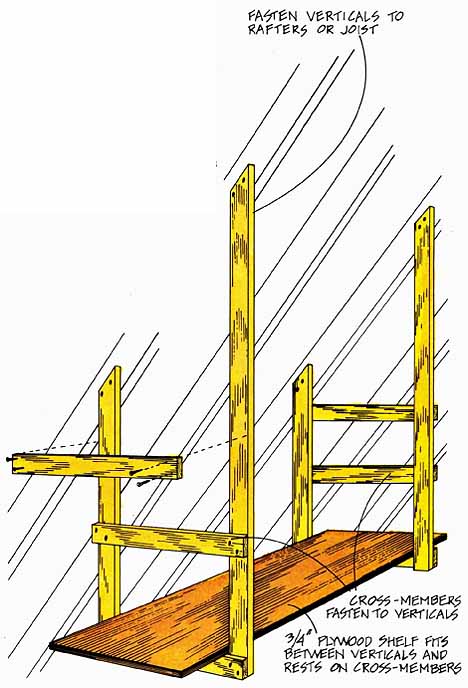
Floor-Standing Shelves
Floor-standing shelves are a variation on hanging racks; refer to those construction steps at left. Build support frames out of 1 by 4 softwood lumber; make one for each 3 feet of shelf length you plan, not including the 1-foot overhang you can allow at each outside edge. Cut the lumber to length. Pre-drill and screw or nail the cross-members to the uprights, making sure the joints are square.
To assemble the unit, space the frames according to your plan and tack them together with a nailer made of a length of 1 by 4 nailed across the back at the frame’s top edges. Nail another 1 by 4 twelve inches above the floor, fastening it securely to each frame’s edge. Stand the assembly up in place; through the 1 by 4 nailers at the back, fasten the unit to the wall. Measure and cut your shelves to size out of 3/4-inch plywood. Position and nail them securely to the cross-members, squaring the frames to the shelves as you proceed. When you’re finished, they’re ready to go to work.

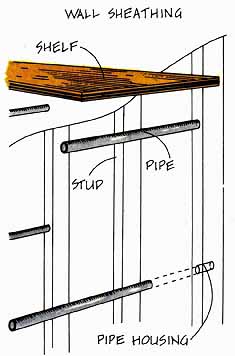
Pipe-Supported Shelves
Shelves supported by pipes are easy to build and will carry a great deal of weight. If you plan your design ahead, you can have your materials cut to size where you purchase them. Shelves of 3/4-inch plywood up to 24 inches wide will carry average loads well; for very heavy loads, make the shelves no more than 18 inches wide. You’ll install one 1/2-inch pipe support in every other stud; plan to have pipe lengths cut the width of the shelf, plus 2-1/2 inches—the depth to which the pipe penetrates the stud.
Your wall’s stud spacing will determine the length of shelf you can use. Where studs are located 2 feet on center, drill a hole in each stud to house a pipe support; four pipes will support an 8-foot shelf. If studs are on 16-inch centers, drill and house pipe in every other stud; three pipes will support an 8-foot shelf.
Construction: First, locate the studs and mark the ones you’ll use with an “X.” Measure and mark the pipe support placements on the center of each working stud; take care to make the supports of each shelf in the same level plane and level with the floor. Centered in the stud face, and square to the wall surface, drill a hole 2-1/2 inches deep for each pipe support (mark the drill bit’s shank with a felt pen or piece of tape). The hole should just barely house the pipe, so that you have to lightly hammer it home. Install the pipe lengths, lay the shelving over each support, and fasten it from underneath using pipe brackets.