Cases and chests, siblings in a sense, are components that do double duty. They give you new storage capacity and function as furniture at the same time. Designing your component to serve you equally well in both ways is challenging and fun. Take a moment to discover some of the options below.
Both cases and chests can be built easily and attractively out of softwood lumber or plywood, with or without face frames and backs, with or without doors, counter surfaces, and pedestals, and painted or sealed with a natural wood finish. That gives you plenty of opportunity to mix and match the elements according to your own scheme.
Design Guidelines
Where do you start? Begin in the area where you plan to place the component. Measure existing factors: wall and floor space available for use; electrical switches or outlets that may have to remain accessible; trim and furniture height-lines nearby. Record the dimensions on a freehand sketch.
Now consider these ideas: as furniture, your project should enhance the space you put it in. Plan it to be compatible with the other elements in the room in style, finish, and proportion. For instance, the height of door or window trim might suggest a pleasing height for a wall case; baseboard or toe-space heights might guide you in determining a pedestal height for a chest-seat. You may want to add a face frame. As a storage unit, your component should be shaped by the things you plan to store there. Make a sketch, establish dimensions, purchase the materials, and you’re ready to build.
Basic Lumber Case
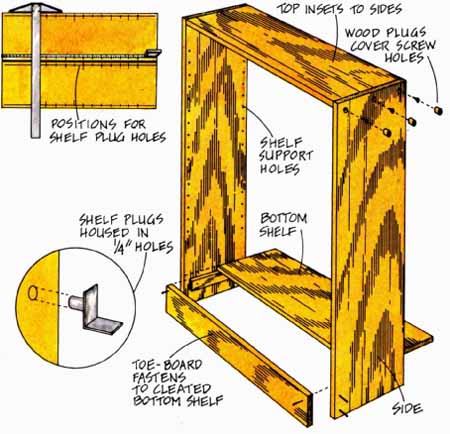
Construction: Cut your materials to size. On the uprights, mark off placements for shelf-support holes at 1-inch or 2-inch intervals; position them in a line 3/4 inch in from the long edges of each of the uprights. These holes are for plug-type shelf clips. Drill the holes 3/8 inch deep, using a 1/4-inch drill bit; be sure to keep it perpendicular to the board’s face. To mark the bit’s penetration, wrap its shank at 3/8 inch with masking tape. Sand the shelves and the inside faces of the case parts, first with 80-, then with 120-grit sandpaper.
To assemble the case, set one side in position against the case top and pre-drill, countersink, and screw the parts together from the outside face of the upright. Repeat this process for the top and other side, and then the bottom piece, taking care to make the case square. Plug the countersunk screw-holes by putting a few drops of glue into them, inserting plugs, hammering the plugs home, and letting them dry. Then chisel the plugs not quite flush with the case sides to avoid the risk of gouging; they’re easy to sand off with 80- or 120-grit paper. Finish sanding the case, the shelves, and the exposed face of the inset toe- board with 180-grit paper followed by 220-grit paper.
To mount the toe-board at the foot, screw or nail on cleating 1 inch from the face of the sides and bottom shelf as shown. Nail the board to the cleats, set the nails, and putty the nail holes. Finish your case and shelves as desired: oil and wax make an attractive finish that is easy to apply and can be renewed as needed.
Basic Plywood Case
Plywood gives you design options that lumber doesn’t offer. Plywood is relatively inexpensive; easy to cut and fasten; resistant to warping, twisting, and cupping; and commonly available in a wide variety of surface veneers and standardized thicknesses, and in wide pieces.
On the other hand, plywood has less rigidity than lumber. It also requires more cutting. And, although plywood is a fine building material, it won’t look it unless you cover its exposed edges.
These problems are easily solved, however. Adding a 1/4-inch back will give a plywood case extra strength and rigidity. Veneer tape, which you can purchase, or lumber edging, which you mill, are easy to apply to exposed edges. When you build with plywood, how your project functions and looks are very much matters of your choice.
Construction: This case uses the same basic construction process as the lumber case shown with three added steps: ripping the plywood sheet to shelf widths, covering the exposed plywood edges, and mounting a ¼-inch plywood back.
Cut your materials to size, the top and bottom pieces the same width as the uprights. At the back, inside edge of each of these parts, mill a 3/8-inch by 3/8-inch rabbet to house the back. Cut the adjustable shelves 1/2 inch narrower than the uprights. If you plan to use lumber strips for edging, rather than veneer tape, cut sufficient 1/4-inch by 3/4-inch lumber strips (or decorative molding) to cover the uprights’ front and top edges and each of the cross-members’ front edges. Apply lumber strips with glue and brads, veneer tape with contact cement; let dry. Mark and drill the shelf support holes. Sand all surfaces in the direction of the grain. For plywood, you can begin directly with 120-grit paper; be careful not sand through to the veneers below.
Assemble the case, cleat-mount the toe-board, and nail in a 1/4-inch plywood back; take care with each step to keep the case square. Sand all exposed surfaces with 180-, then 220-grit paper. Finish the case and shelves as you choose; either apply paint to paint-grade plywood, or apply plastic oil sealer or lacquer over natural or stained wood finishes. Either of these makes an attractive, durable choice.