Rollouts do what shelves do—only better. A cabinet encloses a certain amount of space. You can hang any number of shelves in it. The problem: the more shelves you hang, the less space you have between them, which means less visual and physical access to the things on them.
The rollout—essentially a platform on slides—strikes the perfect balance between capacity and accessibility. Anywhere you have or can create two parallel stationary mounting surfaces, you can build a rollout.
Form a Storage Plan: What do you want to put on the rollout? What sizes and shapes are the things you want to store there, and how heavy or light are they?
Size Up Your Space Resources. Is your space wide, or is it tall? Will you use a horizontal rollout or a vertical one?
Define the Look You Want: What do you want the visual effect to be? Do you want the rollout concealed behind existing doors, or should its finished face be exposed? Do you want to match existing cabinetry details?
Choose the Way You Want the Rollout to Work: Do you want full-extension slides, or will partial-extension slides be sufficient? Do you want a single-shelf rollout, or do you want a whole unit of shelves to slide out at once? Would you like to be able to reach things from both sides?
Selecting Slide Hardware
Choosing slides for your rollout is the first step toward your finished product. Slides come in standard lengths from 12 inches to 36 inches. There are two basic types: partial and full extension.
Partial-extension slides consist of rollers and runner channels that work together to glide all but the last 4 inches of the roller unit beyond its enclosing space. They are relatively inexpensive, easy to install, and they support light and average loads well. Light loads (to 25 pounds) would consist of such items as small cooking utensils, spices and cereals, paper products, folded clothing and linens. Average loads (to 50 pounds) might consist of small hand-held equipment or appliances, food staples and condiments, pots, pans, and cleaning supplies.
Full-extension slides can do more for you than partial-extension slides, because their roller-runner mechanisms interlock and telescope out in sections. That means they can glide the rollout forward those extra 4 inches, giving you total access to what’s on the rollout. Full-extension slides can support heavy loads (to 100 pounds—such things as counter appliances, cans, filed papers, and stereo components) and even extra heavy loads (to 150 pounds—a microwave oven or a television, for example) extremely well. Hence their extra cost and the extra-careful preparation necessary for their installation.
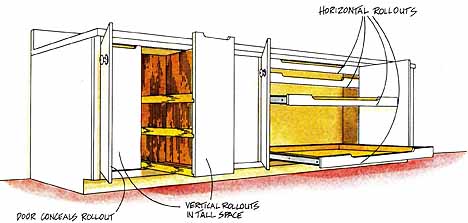
Slide Mountings

Slides can be mounted in lots of different configurations,
as long as they are fastened to stable, parallel surfaces. The mounting surfaces
need not be existing ones; you can create sturdy slide-mounting surfaces
where you need them simply by adding cleats. Keep your own storage plan and
space resources in mind as you look over some of the options illustrated
in the schematic diagrams at right.
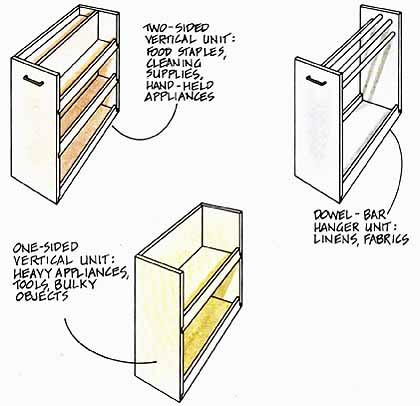
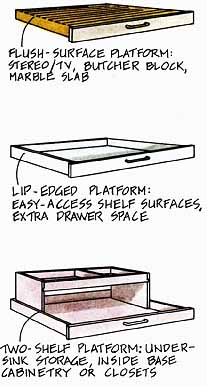
Platform Designs
Your design should grow out of your storage plan. Start the design process by deciding what you want to store in your space and how you want to reach these things—from above the platform? From both sides of a vertical unit or from only one side? Think about the sizes and shapes of the items and about how you will organize them for the most convenient access and use.
The sketches below show some basic platform shapes and suggest some possible applications. Let them spark your imagination to design just the right rollouts for you.
Construction Pointers
Keep the following things in mind. They can help you plan, assemble, and install successful rollouts.
Buy your slides first; different makes require different clearances and installation processes. Purchase a slide length that is less than, or exactly equal to, your cabinet’s interior depth.
If there will be no door in front of the rollout, shim out your slide- mounting surface so that it is flush with the enclosure’s opening.
If you’re concealing rollouts behind doors, shim out the cabinet interior so that each slide-mounting surface extends a full 1/2 inch into the enclosure’s opening. This allows the rollout to clear the open door.
Rollouts operate smoothly and freely only when the slide-mounting surfaces are parallel to each other. If necessary, make them parallel by inserting sandpaper or thin scrap behind the shims as you install them. Similarly, the slide-fastening surfaces on the rollout itself must also be level with each other. Be sure you position them carefully.
To plan your rollout’s outside dimensions:
— the width of a side-mounted rollout is equal to the distance between the slide-mounting surfaces less the manufacturer’s required slide clearance.
— the height of a top-and-bottom- mounted rollout is equal to the distance between the top and bottom mounting surfaces, less the manufacturer’s slide clearance.
— the body of any rollout should fit entirely within the interior depth of the cabinet.
Horizontal Rollout
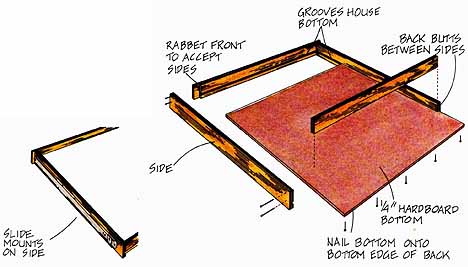
Construction: Buy 3/4-inch softwood lumber of stock width for the rollout’s perimeter—the front, the sides, and the back. The perimeter can be as shallow or as deep as you like. The bottom will be 1/4-inch plywood or hardboard for average loads, and up to 3/4-inch plywood for heavier loads. Cut the front, sides, and back to length: the sides should be the same length as your slide. The front is rabbeted to 3/4 inch by 3/8 inch to accept the sides; the back butts between them. Dado the front and sides to house the bottom. To give the rollout rigidity, make the bottom overlap the back; rip it to a width equal to that of the sides above their grooves. Now sand all surfaces smooth.
Using glue and finishing nails, join the sides to the front, making sure the grooves line up. Then glue and nail the back between the sides, taking care to make their top edges flush with each other.
Now that you’ve assembled the perimeter, accurately measure for the bottom and cut it to size. Slip it into its grooves; make sure it seats fully in the front one.
With the rollout upside down, check it to be sure it is square. If it isn’t square, push on the corners of the longer diagonal until it is. Then nail the bottom securely to the back with 1-inch box nails. Finish the rollout as desired. Mount and adjust the slides according to the manufacturer’s instructions, and you’re ready to install the rollout.
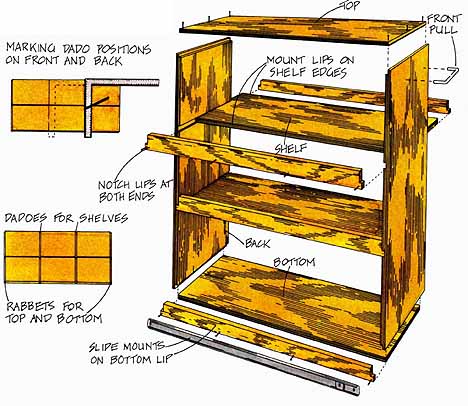
Vertical Rollout
Construction: Buy your materials. The front, top, bottom, back, and shelves are all made of 3/4-inch plywood; the edge lips are 1 by 3 softwood lumber. Before cutting the materials, check the clearance requirements on the slide package. Then cut the parts to size. The front and back are the same. The top is the same width as the front and back; the shelves and bottom will be 1-1/2 inches narrower than the top to account for the thickness of two edge lips per shelf surface.
Because you’ll rabbet the top and bottom and dada the shelves into both the front and back to a depth of 3/8 inch, all these cross pieces are cut to the same length. Setting these pieces in grooves in the uprights will give your rollout the rigidity it needs.
With their long edges together and their inside faces up, lay the front and back on a flat work surface. Measure and mark the placement of top, shelves, and bottom; cut all rabbet and dado grooves 3/4 inch by 3/8 inch. Sand all surfaces of the rollout smooth.
To assemble, put glue in the shelf grooves; seat each shelf centered in its groove so that 3/4 inch is left at each edge for the lip. Clamp the assembly with bar clamps, or secure the unit with finishing nails through the front and back into the ends of each shelf. Glue and nail the top and bottom into place.
Cut the lumber lips to length and notch the ends so that they butt snugly between the front and back. Glue and nail the lips to the exposed edges of the shelves; then nail through the front and back faces to fasten the ends of the lips. Set the nails and putty the holes, and allow the assembly to dry. Sand, and finish as you desire. Mount the slides according to the manufacturer’s instructions. The unit is ready to roll.