It is usual for the door to require some height and width adjustment for a perfect fit. This is achieved by temporarily holding the door in place and measuring for fit. Get someone to help you lift the door, or else use a board lifter. Once you are satisfied with the fit of the door, the next task is to attach the hinges. For information about hinge choices, and deciding on the number required, see this page. In the example shown here, standard butt hinges are being installed.
Tools and Supplies needed:
Basic tool kit and items on this page.
1. Adjusting the Door to Fit
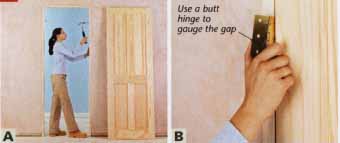
A. Drive two temporary nails into the jamb head and two in the sides, to the exact door depth. Position the door against
the nails in the jamb. B. There needs to be a gap of
if inches (3 mm) between the hinging edge of the door and the jamb. (This
is the thickness of most butt hinges.)
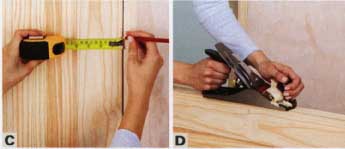
C. Move to the closing edge. Measure a gap of 1/4
inch (3 mm) between the door and the jamb. With a level, draw a line
down the door. D. Remove the door from the jamb. Place
it on the floor, with its closing edge facing upward. With a plane,
take the wood down to the line.
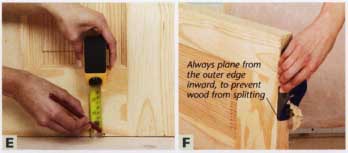
E. Reposition the door to check that the sides fit
with the clearances of 1/4 inch (3 mm). Repeat the measuring process
for the base of the door. F. With a level floor, 1
inch (25 mm) is needed, but any undulations may require more. Plane
off the required amount and check for clearance. Always plane from
the outer edge inward, to wood from splitting.
2. Fitting the Hinges and Hanging the Door

A. Place the door on the floor, hinge- side up. Make a pencil mark
6 in (150 mm) down from the top of the door. Place the hinge below
the mark, and trace around it. Repeat for the lower hinge, but this
time position it above the mark. Position the top butt hinge below
the mark. B. At each hinge position, mark the thickness of the hinge
onto the door’s front edge. Use a chisel to remove the marked-off
depth of wood. C. Cut across the grain first, so that you do not
split the wood at the next stage. Make cuts every 1/4 in (3 mm).

D. Now use the chisel blade along the guide line on the door’s front
edge. Gently remove the cut wood from inside the hinge guide lines.
E. Holding a hinge in each hinge area, mark off the screw holes.
Pilot drill and test a hole with one screw to make sure it fits.

F. Repeat the layout process on the door jamb. Repeat steps A through
E on the jamb and screw the hinges to the door. G. Wedge the door open and screw the hinges to the jamb. The latch and handle can now be
installed.