Installing pre-hung doors is the most popular method of hanging new doors or replacing old ones. All you have to do is install the unit into a rough opening. When ordering a pre-hung door, you will have the choice of a right- or left-hand swing, as well as having the manufacturer drill the holes in the door for the locksets. If the unit arrives with a brace to keep the door and frame aligned, leave the brace on until the door unit is plumbed, shimmed, and secured into place.
Tools and Supplies needed:
Basic tool kit and items on this page.
Hanging an Interior Pre-Hung Door
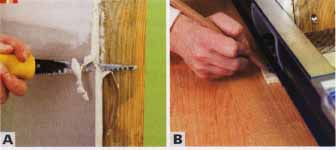
A. Trim any excess drywall around the doorway to make sure the new
door will hang plumb. B. Check that the floor is level, marking for
any shims that are needed under the level.

C. Measure and mark against the jamb where any shims
are needed. D. Cut the door to the appropriate length.
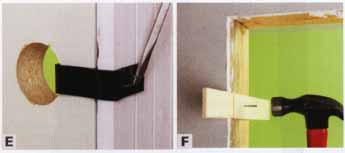
E. Remove the plug that comes on the pre-hung door, as well as the
temporary trim on the bottom of the door. F. Tack one nail on a shim
in the doorway to get started.
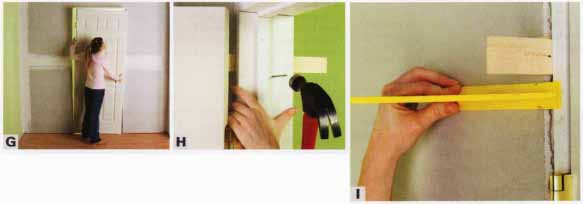
G. Place the door inside the opening. Position the door so it's plumb, and the door is able to swing open. H. Secure the jamb with nails along
its length. I. Use a straight edge to check the door opening, ensuring
that it has room to open and close.
J. with the door closed, place a shim by the bottom hinge to accommodate
any adjustments from the previous step. K. Check the top gap above
the door, and check the door again to make sure it's level.
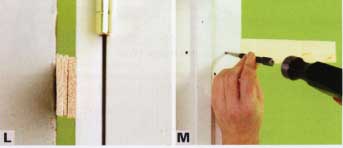
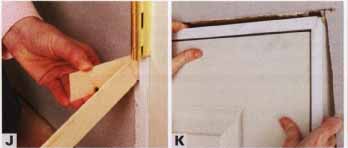
L. Check the center shim and the gap to make sure the door is plumb.
Nail the door in place, from the jambs through the shims. M. Use a
nail set to set the nails beneath the wood, creating a smooth finish.
Fill the holes with spackle.
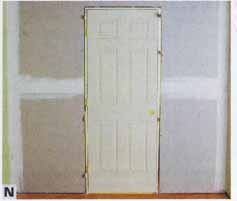
N. Check the door to make sure it opens and shuts properly.
Making Adjustments

A. Place a level on the vertical surface to check that the door is
plumb. B. If you need to adjust the door, try using a sledgehammer
with a very gentle tap.
Fitting a Mortise Lock
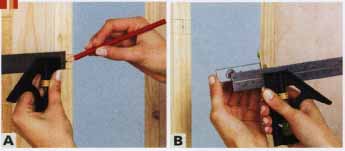
A. Mark the top, bottom and end of the latch case. Draw a vertical
guide line through the horizontal guide lines at the mid-point. B.
Measure the distance from the center of the spindle’s position on the
latch to the latch plate.
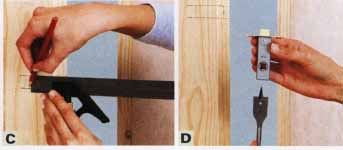
C. Mark, on the appropriate line, the distance from the front of the
plate to the center of the spindle position on the door. D. Select
an auger bit or flat bit that's slightly larger than the latch casing
(in this case a flat bit is used). Mark off the latch depth with
tape.
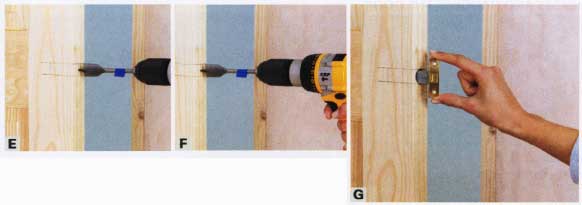
E. Position the point of the bit on the vertical guide line between
the horizontal guide lines showing width. F. Start drilling slowly.
It is essential that the drill bit enters the door at a precise right
angle to the door edge. If it does not, the latch will not sit flush
in position. You may also split the door face if the bit is misaligned.
G. Drill to the depth of the latch. Push the latch into the hole,
positioned precisely vertical. Draw a guide line around the latch plate.
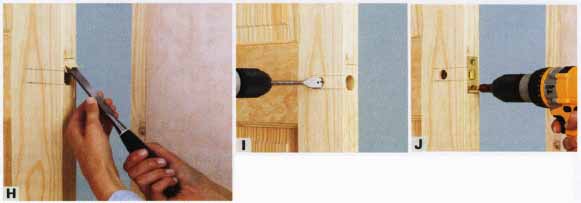
H. Remove the latch and chisel out the wood from inside the guide
line, to a depth equal to that of the latch plate. I. For the marked-off
spindle position, gently drill into each face of the door, taking
care not to split the wood surface. J. Push the latch into position.
Drill pilot holes for the screw positions on the latch plate. Secure
it with retaining screws.