Making a Sketch: A Place of Your Own Making -- How to Build a One-Room Cabin, Studio, Shack, or Shed
| Home | Wiring | Plumbing | Kitchen/Bath |
|
Experimenting on paper is less cumbersome than experimenting on lumber, and , what with all the many factors that will influence the project, the best time to account for them is at the planning stage. Clearly your sketch will depend to an extent on your intended site, on how you plan to use the outbuilding, and on how your preferences in secondary shelter run. Since you’ll be drawing windows and doors, it will also depend on what materials you plan to use. Those will vary with both budget and taste, and two more mercurial concepts may not exist. On a per-square-foot basis, doors and windows are likely to be the most expensive materials you’ll buy, and their prices range much more widely from brand to brand and vendor to vendor than the price of ordinary lumber. Real bargains can be had, but you’ve got to shop for them, and , predictably enough, they generally come at the expense of quality. Then again, you probably won’t want to impose the same quality standards on an outbuilding that you’d impose on a main dwelling. Outbuildings have an aesthetic all their own, and it’s appropriate that even new ones look a touch trouvé, in the manner of restored antiques. So, necessarily, your drawing will be a many-layered entity. If its manifest subject is the plan for the outbuilding, its subtexts are your taste, your budget, perhaps your willingness to scavenge at the dump, perhaps your luck at finding windows at whatever your local version of Salvage City is, and certainly your ability to keep your ambitions for the project in line with what you can actually accomplish and afford. And if all that makes the prospect of doing the drawing seem forbidding, a pair of mitigating factors brings it down to size. The first is that in most cases the drawing need only be a sketch and not a blueprint. Whereas building departments want to see signed and stamped architect’s plans before they issue a building permit for a house, they seldom require more than a loose rendering for an outbuilding. The second factor is that you can alter the drawing whenever you like. In the end it’s really just a memorandum to the builder (in this case you), not a contract with destiny. Actually, so great is the likelihood that you’ll change the design as you go along that for now the only part of the drawing we’ll go into in any real detail is the deck. Sketch the rest—walls, roof, doors, and windows—however you like. And when you do sketch them, try to arrange with yourself not to become inextricably attached to what you’ve drawn. Putting up the deck (with all the deeply edifying trips to the lumberyard that that entails) will almost undoubtedly alter your perceptions of the building, of the materials that go into it, of the money you want to spend, and even of yourself as a builder-designer. By the time you’ve built the deck you’ll have learned a whole lot through sheer experiential osmosis, and , just as important, you’ll be able to walk the floor of the outbuilding for real, not just in your imagination. Lines of sight through intended windows will come clearer, and so will the way ingress and egress are affected by the surrounding landscape. You’ll also have had some time to browse the door and window catalogues at the lumberyard and perhaps look around for castaway doors and crippled windows. And once you’ve built the deck you’ll begin to see how a battered but interesting-looking old door can be restored or how a window that’s been left for dead might be interestingly rehabilitated. If I use the word “imagination” often, it’s because building anything substantial has a way of conditioning your imagination, and after the deck is done you’ll al most certainly want to adjust your plans for entryways and fenestration and maybe other things as well. In fact, I’ll go so far as to say that you should change your plans at least a little. To refrain from taking advantage of everything you’re learning would be downright foolish. If you don’t have much money to spend and your local dump is a forager’s paradise, it may also be foolish not to take ad vantage of free materials. Poking around at the dump is definitely one of the more dignified forms of scavenging, even if it means you have to redesign a bit to accommodate what you find. Determining the Size of the Outbuilding To begin getting your design down on paper you’ll have to decide how big your outbuilding will actually be. Again, the one whose construction is illustrated in this guide is 16’ long and 12’ wide, but yours can be bigger or smaller. In line with what we’ve said about modularity, I strongly suggest that you choose dimensions which are multiples of 4’. And if the avail ability of helpers is likely to be sporadic (even the best-meaning people tend to become listless and unfocused when working on someone else’s project), you’ll be wise to keep the outbuilding on the small side. Handling big boards begins to get hard if there’s no one around to grab the other end. If you use the deck as a giant work table to frame your walls on, you’ll find that a 16’ wall frame is about as long a one as you can raise yourself. (Notice that I didn’t say “comfortably raise” and I certainly didn’t say “safely raise.” Standing up a 16’ array of 2x4s without any help may be possible, but under no circumstances can it be said to be comfortable, and it definitely isn’t safe.) Building wall frames on the ground—actually the deck—and then standing them up after they’re put together is sometimes called “Western-style” framing. For the novice it’s probably the easiest way to go about things, but it isn’t the only way. If you’re troubled about the prospect of nailing gigantic wall frames together only to find that you can’t raise them up, you can always assemble them vertically in place and then not have to move them at all. (That approach may or may not be called “Eastern style”; construction lexicography is a fuzzy field.) Building walls in place is a little more demanding of your technique with a hammer, in that you have to do more toenailing—driving nails at an angle to the board—as opposed to the more familiar face- nailing. But it’s standard practice with a lot of carpenters, and it’s certainly an available alternative. Besides, you’ll have to do a fair amount of toenailing anyway, and the more you do the easier it gets. Of all the factors that constrain the size of the outbuilding, though, the one that most merits serious consideration is the difficulty of putting up long roof rafters. Especially if you’re inexperienced and working by yourself, it simply doesn’t feel good to be up on a ladder trying to set into place and then nail rafters—even the relatively light 2x6s we’ll be working with— across a horizontal span much greater than 6’. And since the horizontal span between the centered ridgepole and the side walls of a 12’-wide outbuilding is 6’, I’d suggest limiting the width of your structure to 12’ unless you’re pretty sure you’ll have a strong, patient, competent, empathic collaborator around when you’re framing the roof. If you are sure, then you can safely go to 16’. Past that, building codes would require you to use 2x8 rafters, and long 2x8s are cumbersome devils to work with. The remaining limits on the building’s size are really structural ones imposed by the basic deck design. The deck, and thus the entire outbuilding, will rest on three parallel 6x6 girders, each running the full length of the building. There’ll be one girder under each of the long outer edges and a third girder midway between. Each of the three girders will in turn be sup ported by three 6x6 posts, one at the center of the girder and one near each of its edges, making a total of nine posts for the building to rest on. Running at right angles across the tops of the girders will be 2x6 floor joists on 16” centers. So, if you take a moment to think about it, you’ll see that the limits on the size of the building are functions of (1) the maximum permissible span between posts along a 6x6 girder and (2) the maximum permissible span along 2x6 floor joists between girders. Observing those maxima ensures that the girders don’t sag too much between the posts and that the floor doesn’t sag between the girders. Current standards hold that, for normal floor loads, the maximum girder span between posts is about 10’, while the maximum span along 2x6 floor joists on 16” centers is about 8’. (What I mean by “about” is that the actual maxima vary somewhat with type of lumber; the spans I’m giving you should be safe for virtually any construction-grade lumber you can buy.) Doing some simple arithmetic, we can conclude that the practical maximum size of the outbuilding is 20’ by 16’. Roughly Estimating Cost Now, knowing what you know, deliberate about the factors we’ve discussed. Think about the number of trees you’re willing to cut, the amount of lumber you’re realistically prepared to move to the site, the longest 2x6 rafters you’re willing to juggle around up on a ladder (as a crude rule of thumb, figure the rafters to be a third longer than the horizontal distance they’ll span, making the rafters for a 12’-wide outbuilding, which have to span 6’ horizontally, around 8’ long), and of ‘course how much money you’re ready to spend on lumber, roofing, siding, and the like. On this last point I’ll give you another crude rule of thumb. Excluding windows and doors, figure the lumber bill for a 12’ by 16’ outbuilding at $1,000, although, depending on where you live, that amount may vary by as much as 50% or even more. Proximity to trees and mills, cost of transportation and warehousing space, and the vagaries of the lumber market all play so significant a role in your actual bill that there’s little point in my telling you what it’s likely to come to. But calculate the square footage of the outbuilding you want to build by multiplying its length by its width, then compare it to 192 square feet (12 times 16). In fact, obtain a percentage by dividing your square footage by 192 and then multiplying by 100. Now take that percentage of $1,000 and you’ll have the barest rudimentary inkling of how much your lumber will cost. Starting Your Sketch Finally, having brooded upon all those issues and digested them as best you can, pick a length and width that are both multiples of 4’ and draw a rectangle proportioned more or less accordingly. You now have the outlines of your drawing. (Incidentally, the terms “length” and “width” can become confusing if you’re putting up a square building, which is a perfectly reasonable thing to do. To avoid confusion, therefore, we’ll adopt the following convention: for a square building, the ridgepole atop the roof and the girders beneath the building run along the length of the structure, while the floor joists run along its width.) Now proceed with your sketch by superimposing an aerial view of the three girders onto your rectangle. Don’t worry about sketching exactly to scale quite yet (if ever), but from the size of your rectangle and the dimensions you’ve assigned to the deck you can eyeball the equivalent length of a foot in your sketch, and if you take half of that you’ll have an approximation of the thickness of the girders (they being 6x6s). Draw one girder going the long way down the middle of the deck and the other two, parallel to the first, along each of the edges. The girders run the full length of the building, but the sides of the outer girders don’t have to come out to the edges of the subfloor. You can safely set them in up to a foot from the long edges of your proposed floor without incurring structural problems. The floor joists will simply cantilever out over the girders to support the extra foot of floor, and then the outsides of the girders will ultimately be less visible to the outbuilding’s envious beholders. It’s a look you may or may not want, and the choice rests entirely with you. Now that you’ve sketched the girders, mark their centers and superimpose a little square, half a foot on each side, where the center posts will support them. Then do the same for the tops of the outer six posts. If you like, the outer posts can also be inset up to a foot from the ends of the girders. This time it will be the girders that do the cantilevering; 6x6 girders can comfortably cantilever one foot of outbuilding. It’s really a question of how much post you want to expose to the outside world. A foot of cantilevering is one look, six inches of cantilevering is another look, three inches of cantilevering is, curiously enough, a quite different look, and no cantilevering is still a different look. What’s more, I offer no suggestions. Like matters of budget, labor, and time, questions of aesthetics are ones in which this man’s piddling nuance is the next man’s gross disparity. You’re on your own. Having chosen where the posts will go, you’re ready to draw the floor joists. The joists are nailed across the tops of the girders and in your drawing will run along the full width of the building on 16” centers—almost. Your 2x6 joists are, as we said, 1 thick, and if you obey the 16”-centers rule to the letter your bays will have exactly 14½” between each joist. Assuming the length of your outbuilding is a multiple of 4’, you’ll find when you start drawing the joists that the last one just falls off the edge of the girders. (The distance across four 2-by-anythings on 16” centers is 49½” and 4’ stubbornly remains 48”.) Therefore, in order to squeeze the last joist back on, you’ll need an extra 1 of girder, which you’ll get not by lengthening the girders but by shortening two of the bays. Why two? You want all the edges of your sheets of plywood decking that run parallel to the joists to fall on solid wood so you’ll have something to nail them to. And if you shorten the two outer bays—i.e., the bays at either end of the subfloor—by ¾”, everything will tumble nicely into place. Any distance that’s an exact multiple of 4’ will, if measured along the length of the building from the edge of the subfloor, fall on the center of a joist, which means that the seams between your factory-cut subfloor sheets will likewise fall on the centers of joists, allowing you to nail their butted edges to the same joist. Moreover, when the deck is long done and you’re putting up plywood siding, you’ll reap the same advantage all over again. Since your 2x4 wall studs will stack directly over your joists and therefore be spaced the same way, the factory-cut edges of the siding will similarly fall on the centers of studs, allowing you to nail their butted edges—well, actually the edges of plywood siding are lapped and not butted, but don’t concern yourself with that for now—to the same stud. And all you need to do to make that happen is shave “ off the bay at either end of the deck, so that the space between the joists is 13¾” instead of the usual 14½”. That done, draw a board of indeterminate thickness running the full length of the building along each side. This pair of boards will box in the ends of the joists, and although it’s simplest to make them 2x6s like the joists themselves, they can also be lengths of 1x6 shelving. You don’t have to decide what they are right now, but make a note to remind yourself to cut the joists so that the total distance across the deck, boxing included, equals the multiple of 4’ that you’ve settled on. (If you’re grumbling about having to cut joists at all, perhaps because you’ve decided to make your outbuilding 12’ wide and happen to know that your lumberyard stocks the very 12’ 2x6s you’ll be using, you can stop grumbling. Twelve-footers can usually be relied on to be at least 12’ long, but rarely are any two exactly the same length. You’ll have to trim them in any event.) 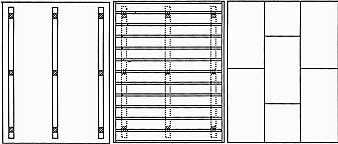
Complete the overhead drawing of the deck by sketching in the plywood subfloor. Place the 4x8 sheets so that their long sides run across the joists. Even plywood has grain, and , like most wood, it bends less easily along its grain than across it. As we mentioned before, don’t forget to alternate the sheets in a brickwork pattern. And make sure your pattern lets you use as many whole sheets as possible. 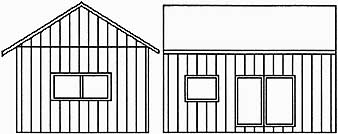
Now that the deck is a known quantity, make a few simple elevations of the sides of the building too. (Elevations are full- on side views.) You’re still just imagining, not forging a commitment. Keep the roofline simple and symmetrical, don’t put in too many more windows than you can afford, and , since small buildings tend to be annoyingly short of wall space for shelves, furniture, coat hangers, and the like, try to make do with only one door. Be generous with yourself, but be circumspect too. Even if you can afford to treat yourself lavishly, don’t do it at the expense of practicality. Lots of windows are fine, but people who live in glass outbuildings frequently have no place to hang a picture. And speaking of wall space, if you plan to put in a woodstove or a wall-mounted gas heater, work out how much wall space you’ll need. It’s disheartening to trim out a window with a flourish of craftsmanship only to watch your woodstove slowly—or suddenly—turn your trim to charcoal. Generally speaking, this is the time—while there are still no nails to pull or framing members to pry apart—to assess your needs and provide for them in your sketch. Then, when you’ve finished drawing, take what you have to your local building department. If they laugh in your face, see if you can penetrate the mirth long enough to find out what you have to do to be in compliance, and redraw or re-site so you can try again. If they tell you it’s acceptable and either give you a building permit or tell you that you don’t need one, go to your proposed site, stoke up your imagination, and plunk the pro posed deck down onto it. Surround yourself with the proposed walls and live for a few moments in the proposed structure. If you think you want to keep living in it, go on to the next section. Also see: Do-it-Yourself Log Home / Cabin |
| HOME | Prev: Preparations | Next: |