Making Interior Changes: A New Stairway
| Home | Wiring | Plumbing | Kitchen/Bath |
|
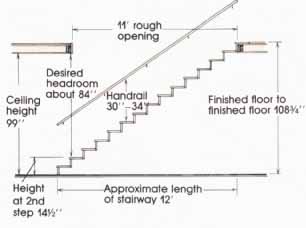
Installing a new stairway isn't a casual weekend project. The job demands thorough planning, numerous mathematical calculations, and careful carpentry The degree of craftsmanship required to build an elaborate, decorative stairway can enter the realm of fine cabinet work, which is beyond the scope of this guide. This section does describe, however, the basic procedure for building a conventional, straight-run stairway suitable for at tic or basement access. Before you decide to build the stairs yourself, investigate some options and compare prices. It’s possible to provide a stair manufacturer with specific dimensions and have a complete set of stairs prefabricated and delivered. The manufacturer can install the stairs, or you can do this yourself. A second option is to hire a con tractor to install prebuilt stairs or to custom build stairs on the site. A third possibility is to take your dimensions to a building supplier or stair manufacturer and order many of the parts precut. This is especially true for finishing details such as hardwood balusters, posts, and railings. As with many other projects, you should begin by checking the local building code. If the stairway is considered to be main stairs, most codes require a minimum 32-inch width between the handrails. Minimum head room is 6 feet 8 inches. For stairs serving fewer than 10 people, the minimum width is usually 30 inches and the headroom 6 feet 4 inches. But keep in mind that these are minimum requirements only. If you have the space to spare, increase the dimensions for convenient and comfortable use. Two people can pass safely on stairs 36 inches wide; headroom of 7 feet to 7 feet 4 inches generally allows plenty of access for moving furniture up and down. A handrail is required on at least one side of the stairway—on both sides for stairways wider than 4 feet. It should be a consistent 30 to 34 inches above the nosing of each step. (The nosing is the edge of the tread that extends beyond the riser. The amount of overhang varies, depending on the thickness of the tread.) The hand rail should be terminated at both ends in such a way that cuffs and loose clothing will not catch on it. There should be a 1½-inch clearance between handrail and wall. If a doorway is planned at the top of the stairs, swing it away from the stairs or include a 3-foot landing. Plan a minimum of 3 feet between the top or bottom steps and an adjacent wall. This provides room for entering and leaving the stairs and for moving furniture. Where to Locate the Stairway One logical place to locate a stairway is directly above an existing stairway For example, a new set of stairs to the attic can often be located above the main stairs or basement stairs. If this isn’t practical, position the stairs so the length is parallel to the direction of the joists. This greatly simplifies the framing process. If the stairs must run perpendicular to the joists, it’s preferable to position them along a bearing wall, or to add posts or a new wall to support the trimmer joists. If you don’t have the space for conventional stairs, consider prefabricated circular stairs. The units come in a kit, with complete assembly and framing instructions provided by the manufacturer. Diameters range from 4 to 6 feet. Check the code first to find the minimum size allowed. One obvious liability with circular stairs is difficulty moving large pieces of furniture. But in some situations you may have no choice. Determining Rise and Run The local code specifies the acceptable depth and height of the steps. To define some basic terms, the tread is the horizontal step; its depth is called the unit run. The riser is the vertical member between the steps; its height is called the unit rise. The correct relationship between these two is absolutely essential for proper stair construction. If the ratio is incorrect, the stairs will be either too steep or too shallow, and consequently uncomfortable and unsafe. For main stairs most codes specify risers between 7 and 7½ inches; the tread should be 10 to 11 inches. For secondary stairs the maximum allowable rise is usually 8 inches; the minimum tread is 9 inches. Added together, the tread and riser should total 17 to 18 inches. To determine the proper rise and run, measure accurately from finish floor to finish floor. This distance includes the floor-to-ceiling height, plus the depth of the joists, subfloor, and finish floor. If no opening exists, drill a small hole through the ceiling and floor material. If the finish floor isn't installed, find the proper depth and adjust your measurement. (For attic stairs add the depth of the finish floor; for basements subtract it.) In the case of an attic conversion, be sure to use the depth of the new floor system, not the existing ceiling joists. Next convert this measurement to inches and divide by 7. Let’s say the floor-to-floor height is 108 ¾ inches. Dividing by 7 yields about 15 1/2. Because you must have a whole number of risers, drop the fraction. Now divide 108 ¾ inches by 15 risers to get the exact riser height. The answer is 7 1/4 inches. We know that the tread and riser must total 17 to 18 inches. So to determine the tread size, subtract 7 1/4 from 17 1/2 to get 10 1/4. Because the last riser leads to the finish floor and not another tread, there is one more riser than tread. In this case you will have 14 treads. To find the total run, or length of the stairs, simply multiply the number of treads by the unit run (14 times 10 1/4 inches). The total length is 143 1/2 inches, or approximately 12 feet. Preparing the Rough Opening Carefully study the sketches illustrating the proper framing for the rough opening. If possible, position the opening along existing joists. If the joist spacing and the de sired width won’t allow this, add one or two sets of double joists to achieve the proper size. In calculating the width of the rough opening, take into account the width of any handrails required by the code. Also include the thickness of any finish material to be applied later, such as wallboard or paneling. The length of the opening depends on the minimum headroom. To continue the previous example, let’s assume the ceiling height is 99 inches. If the desired head room is 7 feet (84 inches). you have 15 inches to work with. With a riser height of 7 1/4 inches, the minimum headroom is reached over the second step (7 1/4 times 2 equals 14 1/2 inches). The rough opening will extend from the top of the stairs to the edge of the second step. If a shorter opening is desired, lower the minimum head room and recalculate. Begin framing the rough opening by installing the trimmer joists. In a basement location these should be the same size and length as the existing joists. If necessary, plane the lower edge of the trimmer slightly to get it in position. Then shim the ends so the top of the trimmer is tight against the subfloor. Nail to the existing joist by driving 16d nails every 12 inches or so. To add two new trimmers, it’s generally easier to lift and install one at a time. Blocking should be nailed between the ends of the joists and in the middle of the span. For an attic location the trimmers should be the same size as the new floor joists. The process of installing the new floor system and framing the stair opening can be done at the same time. Mark the edges of the rough opening by drilling corner holes up through the subfloor or down through the ceiling. Add the width of the double headers to be installed at both ends of the opening. Four headers, each 1 1/2 inches wide, will add 6 inches to the cut.
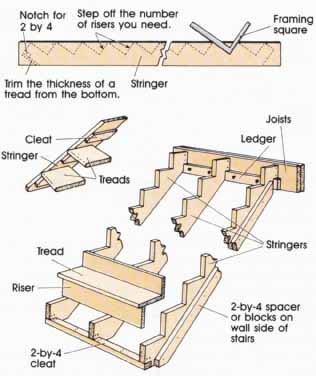
Remove the ceiling or floor material within the opening, Once the joists are exposed, but before they are cut, build two temporary supports to carry the load. If the stairs run parallel to the joists, short lengths of 3 feet or less generally don’t need bracing. If the stairs run perpendicular to the joists, it may be necessary to cut through six or seven joists. So provide temporary braces on both sides with the studs shimmed tightly between the plates. Position the supports about 12 inches from the edge of the opening. If a new wall is to be built flanking the stairway, erect the wall now instead of temporary supports. (Follow the procedure described earlier for building a new partition wall.) With a square, mark the joists to be removed and cut with a handsaw or reciprocating saw. If possible, use these cut portions for the double headers. If not, cut new headers to fit snugly between the trimmer joists. Nail two headers together and secure them to the trimmers and the cut tail joists with joist hangers. With this done the rough opening is complete. Cutting Stringers Stringers for the stairs described here are generally cut from 2 by 12s. To allow for trimming, order them 24 inches longer than the finish length. The simplest stair way has two stringers with l-by-3 cleats nailed or screwed to the sides. Then treads, but no risers, are nailed to the cleats. Or the stringers can be to accept the thickness of the tread. The dado cuts should not be deeper than one-third the thickness of the stringers. An alternative technique that creates a strong closed stairway calls for cutting the stringers into a sawtooth pattern. The risers and treads are supported by the cut outs and nailed to the stringers. Treads are usually precut 1 1/8-inch hardwood or Douglas fir. The nosing extends over the riser an inch or so. Risers are generally 3 matching stock. If the stairs are to be carpeted, however, the treads can be 2 by 12s cut to lit, and the risers 3 plywood. Use a framing square to mark the cuts for the first stringer. Measure off the tread dimension along one edge and the riser dimension on the other. With these two marks directly over the edge of the stringer, mark the outline with a sharp pencil. Continue the process until all risers and treads are laid out. This demands care because the finish steps must meet a 1/4-inch tolerance to pass the building inspection. Double check all markings and then cut the first stringer with a saw. When using a power saw, finish each cut with a handsaw to get it square. To ensure that the first step will be the same height as the others, trim the bottom of the stringer by the thickness of one tread (see illustration). Also mark the bottom edge for a 1½ -by-3½-inch notch. This is for a 2-by-4 kicker that anchors the stringers to the floor. If the stringers are to be supported at the top by a 2-by-4 ledger, cut a second notch. Place the stringer in the rough opening to see if it fits properly. Once it does, use it as a pattern for the other stringer. For stairs over 36 inches wide, a third stringer is required to provide additional support in the center. It is advisable even for narrower stairs. A simple option is to run a 2 by 4 under the middle of the stairs in lieu of a cutout stringer. If on one or both sides stringers are being attached to wall studs, fasten a 2-by-4 spacer to the studs. That way there is room to slip wallboard and a 1-by-12 finish stringer between the cutout stringer and the studs. Now install the stringers. At the top, nail a 2-by-4 ledger to the header with 16d nails and fit the notched stringers over it. Or butt the stringers directly up against the header and secure with metal joist hangers. Secure the stringers to the side Walls by driving 16d nails into the 2-by-4 space. Nail the kicker to the floor and toenail the stringers. If the floor is concrete, drill holes for expansion shields and attach the kicker with lag bolts. Any wood in contact with concrete should be pressure-treated or coated with preservative first. Once the stringers are secured, install the treads and risers, allowing clearance for applying wallboard and finish stringer later. Starting from the bottom, nail two or three risers to the stringers with 8d finishing nails. Apply construction adhesive to each joint before nailing. Then nail corresponding treads to the stringers. From the back, nail each riser to the tread with 8d nails spaced about every 8 inches. It the tread and riser are hardwood, pre-drill the holes with a bit slightly smaller than the nail size. Otherwise the wood will split. Alter you have finished the wall surface, you can install a railing. Use milled stock and standard brackets that can be attached to the studs with wood screws. The top of the railing should be a consistent 30 to 34 inches above the nosing of each step.
|

| HOME | Prev: Converting an Attic | Next: Making Exterior Changes |