Making Interior Changes: Adding Insulation
| Home | Wiring | Plumbing | Kitchen/Bath |
|
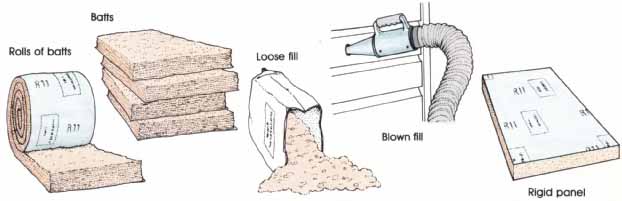
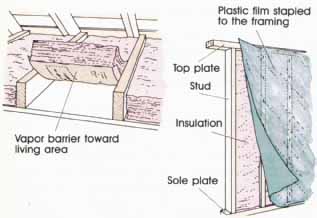
Unless you live in a mild climate, a number of the projects in this guide require adding insulation. An attic or garage converted to living space, for example, should be adequately insulated once the framing is complete and before the walls and ceilings are finished. As long as the studs and joists are exposed this is an easy job to do yourself. Choosing Materials Insulation is available in several different forms. The table below compares blankets, batts, loose and blown fill, and rigid panels. Insulating materials are rated according to their resistance to heat flow, expressed in an R-value. The higher the number, the greater the insulating value. For example, 3 1/2 inches of fiberglass is rated R-11; 6 inches is rated R-19. The rating varies not only with the thickness of the material but also with the type. The right P-value for the job depends on: • The climate. The weather in Miami is obviously different from the weather in Minneapolis, and so are the recommended R-values for insulation. • The surface to be insulated. R-value requirements differ for walls, ceilings, and floors. • The local building code. As a result of the energy crisis in the late seventies, a number of states and counties have adopted rigorous energy-saving standards for new construction and remodeling. To find the proper R-value for your project, check with the building department. In some situations compliance with the code is mandatory; in other cases the standards are intended as guidelines and compliance is optional. Research the requirements thoroughly before you begin. Along with the insulation, you should plan to install some type of vapor barrier. The interior of the average house contains a tremendous amount of moisture. II warm, moist air from the inside of the house meets cool air from the outside, condensation results, Condensation within the exterior walls of your house can create a number of problems, ranging from a fungus called dry rot to paint that perennially flakes and peels. Excess moisture can also cause some types of insulation to compact, which lessens their effectiveness. Installing a water-resistant vapor barrier combats this problem. Asphalt-impregnated kraft paper or aluminum foil often faces one side of the insulation. Or you can add the barrier separately in thin plastic sheets. Types of Insulation:
The cardinal rule to remember is that the vapor barrier always goes toward the warm or heated side of the house, that's , toward the inside. This means that in an attic ceiling the vapor barrier faces down, along the exterior wall it faces in, and between the basement floor joists it faces up. It’s essential to heed this simple rule— otherwise you’ll only make the moisture problem worse. Installing Insulation You should follow a number of safety precautions when installing insulation. • Dress appropriately. Minute particles of insulation can be irritating to the skin and lungs, so protect yourself. This means wearing long sleeves, gloves, and a hat. Goggles and a respirator are extremely important. Alter the job is done, take a shower right away and launder your work clothes. • Keep insulation at least 3 inches away from hot objects. Install a sheet metal baffle around problem areas such as recessed light fixtures, chimneys, and flues to minimize the danger of fires. • Don’t block any vents or ducts. This is especially true in attic spaces where good ventilation is needed to prevent condensation buildup. If the attic floor is being insulated, make sure there are eave vents, gable vents, or roof vents to provide air circulation. For rafter installations allow at least 2 inches between the insulation and the roof sheathing so air can circulate freely from the eaves to the ridge of the roof. • Keep aluminum loll vapor barriers away from knob and tube wiring. As the fabric insulation on this older wiring ages and begins to fray, the aluminum could cause a short circuit. Blankets and batts. To cut through blankets and batts. place the insulation on a stable cutting surface. A wide piece of plywood or wallboard on the floor is best. With the vapor barrier toward you, compress the insulation with a scrap piece of wood as a straightedge. Make the cut with a sharp utility knife. As a rule, pieces should be cut an extra inch long so the insulation will fill the space. Push the insulation into the cavity between the studs or joists. It’s more efficient to cut and place several pieces and then secure them. Spread the flanges of the vapor barrier and staple every 6 inches or so along the edge of the stud or joist. Use a 3 heavy-duty staple gun. Set the insulation back from the face of the wood to create U 3 dead air pocket between the insulation and the finish wall. Don’t compress the insulation tightly because its R-value depends on its thickness. An alternate technique is to overlap the flanges on the face of the stud and then staple. This technique creates a better seal but can interfere with the application of the finish surface, such as wallboard. It also eliminates the desirable dead air space between insulation and finish wall. Make sure the flanges and staples lie flat against the studs. When you install insulation from under the house, the stapling flanges will be out of reach because the facing goes toward the floor. To hold the blankets in place, staple wire, nylon string, or chicken wire across the bottom of the joists or wedge spring clips between them. Whenever possible insulation should be placed be hind the plumbing lines. It may be necessary to split the insulation and run some front and back. If the insulation fits easily behind the wiring, fine. If this creates a problem or requires too much compression, cover the wiring. Fill any small openings by cutting scrap pieces to fit. Any rips or tears should be patched with duct tape. For the best possible job, joints between batts should be taped as well. If the insulation is unfaced, you must add a vapor barrier. The insulation is generally wide enough to stay in place once it’s pressed snugly between the studs or joists. Alter the wall or ceiling spaces are filled, cover the entire surface with a thin sheet of plastic, This can be 2-mil polyethylene, but 4-mil is easier to use and tears less frequently. Start at the top and work down, stapling to the wood as you go. Keep the surface taut and the staples flat because a finish material must be added later. Seal any seams or tears with tape. Some con tractors recommend this technique even if the batts or blankets are faced with a vapor barrier. It’s faster than patching the joints and cuts and results in a superior seal. Rigid panels. Rigid panels are cut with a utility knife or saw. Follow the manufacturer’s recommendations for proper installation. Some panels are secured with mastic applied to the back. If the panels are used for an exposed beam ceiling, quarter round molding around the edges can hold them in place. Pressed fiberglass panels are available with a prefinished vinyl surface. Other materials such as polystyrene are flammable and must be covered with a fire-resistant material such as 1 wallboard. Loose fill. First be sure any vents or flues are safely baffled. Next you will need to add a vapor barrier. Cut strips of 4-mil plastic wide enough to fit between the joists with enough extra to lap up the sides several inches. Smooth the plastic in place and staple to the sides of the joists. Repair any cuts or holes with tape. Then pour in the insulation between the joists to the proper thickness. Keep the fill loose and fluffy, not packed down. |
| HOME | Prev: Building a Wall | Next: Installing Wallboard |