Flooring Installation: Ceramic Tile
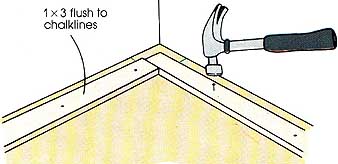
The procedures illustrated and described in these tour pages are appropriate for uniformly colored tile floors and rooms with no special problems. For special situations-and for a general review of planning and lay out-see above. Snap chalklines. Tile installation usually begins along the most visually prominent wall and proceeds toward an exit so you can avoid walking on freshly laid tiles. Since the wall may not be straight, or may be out of square with the side walls, it is necessary to snap chalk lines to work from. Begin by removing all baseboards and trim. Then measure out from the starting wall, at both ends, a distance equal to one tile width plus two grout lines. Make marks to indicate this distance and snap a chalkline between them. Repeat this procedure for the other three walls, squaring each line to the previous chalkline by holding a framing square at each corner or using a 3-4-5 triangle. When you have snapped all four lines, double-check for square by measuring both diagonals. You now have perimeter guidelines that will ensure a straight row of tiles against the starter wall and will keep the starting end of each new row squared to the previous rows. Try out the layout with a test run. Lay rows of loose tiles along each working line, from wall to wall. Set spacers between them for the grout spaces. Some tiles have lugs molded into their edges. If not, use special tile spacers available in a range of sizes, and sold at tile stores. The spacers should equal the thickness of the grout width you accounted for when you snapped the chalklines. This test run tells you whether tiles will need to be cut at the walls, and allows you to decide where you want to use cut tiles. You may be able to avoid cuts at one or all of the walls by simply altering the width of the grout spaces. The more you alter the grout width in one direction, however, you'll need to do the same in the other direction as well. By experimenting with the test run you can find the layout that will be the most pleasing to look at and require the fewest cuts. Nail down straightedges. To ensure perfect tile placement along the working lines, nail straight pieces of 1 by 3 material, or straight strips of plywood, to the subfloor on the side of the lines closest to the wall. They needn’t butt into each other at the corner, but their in side edges should align perfectly with the chalklines. If you do not have grout spacers, you could also use these straightedges for layout sticks. Measure and mark the exact tile locations and grout widths along the length of each stick. As you set tiles further away from the stick, you can hold a framing square against the edge of the stick at each layout mark to align tiles out in the field.
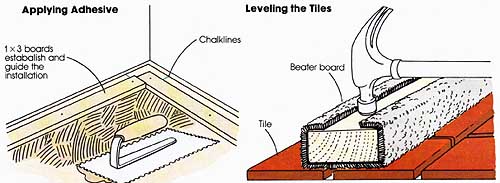
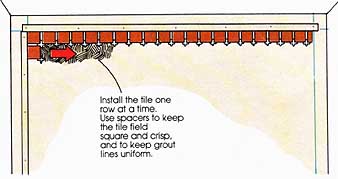
Set the first row of tiles. Consult the adhesive package instructions to determine the troweling method and the recommended area for each application of adhesive, and use the type of spreading trowel recommended by the adhesive manufacturer. Spread no more than a square yard at first, until you get a sense of how quickly the adhesive sets up. Spread the adhesive right up to the straightedges and working lines, but do not cover them, If you are working with epoxy, be sure to wear gloves to protect your hands. Set the first tile at the corner where the s: abut. Place the tile down onto the adhesive with gentle twisting motion, but do not slide it into place 3utt it tightly against the straightedge. Complete the starter row, placing grout spacers between the tiles as you go. Molded plastic spacers can be left in place until you grout, but wooden or cardboard shims should be re moved after the adhesive begins to set. Immediately clean off any adhesive that oozes onto the tile surface, using an appropriate solvent. Remove excess adhesive between tiles with a cotton swab or thin stick. Finish setting the tiles. Start the second and all succeeding rows at the same end as the first. Butt each starting tile against the straightedge, and each succeeding tile in the new row against the installed row adjacent to it. Use molded spacers or shims wherever tiles meet, and check placements regularly with a framing square. “Beat” the tiles in as you go with a carpet- covered board and hammer to level the tiles -with each other. Occasionally check the surface with a straight edge to make sure that it is even.
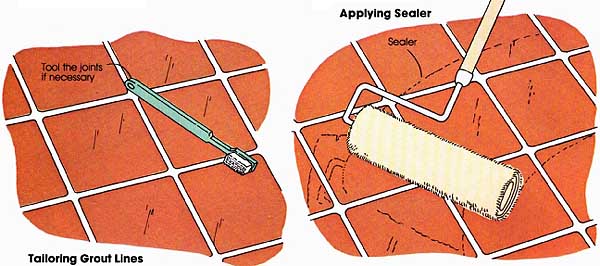
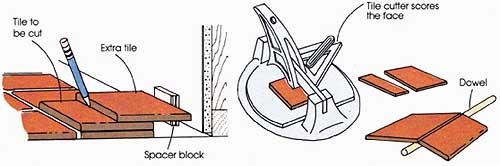
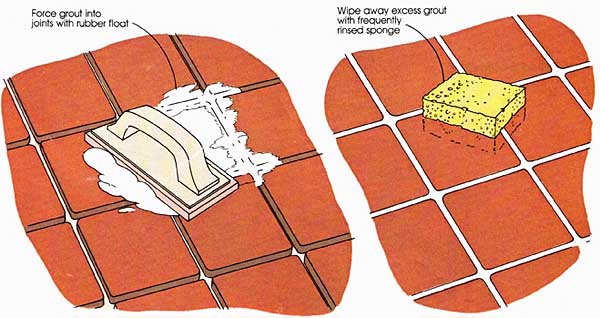
You may have to cut tiles at the end of the row. If the layout is regular and perfectly square, and the tile spacing is consistent, cut several tiles ahead of time. Postpone any irregular cuts until the full row of tiles is set. Often, the dealer from whom you purchased the tiles will make the cuts for you. If you have to kneel or walk on set tile, lay a small piece of plywood down to distribute your body weight more evenly across the surface. Finish the installation by removing the two straightedges and setting the remaining border tiles. Start at the original corner, and guide their placement from the existing installation, not the walls. Beat them into place and clean off any adhesive or dust. Grout the joints. Remove any spacers and excess material from the cracks. Stay off the tiles as much as possible, since their edges are brittle and subject to chip ping before being grouted. Mix the grout to a mayonnaise-like consistency, according to the manufacturer’s instructions. Wear gloves to protect your hands. Dump a batch of it onto the tile surface and spread it into the joints with a rubber float, a tool you’ll find at tile stores. Be sure the joints are tightly filled, with no voids or air pockets. If necessary, use an old toothbrush handle or similar object to pack the grout into the joints. Work the float diagonally across the field in both directions to scrape away excess grout. Alter 10 to 15 minutes, use a moist sponge to remove any remaining grout residue, rinsing and wringing it frequently as you go. When you have removed as much excess as possible with the sponge. let the grout dry for about 30 minutes. Cutting Border Tiles: Spacer block, Tile cutter scores the face; Grouting the Floor: Wipe away excess grout with frequently rinsed sponge.
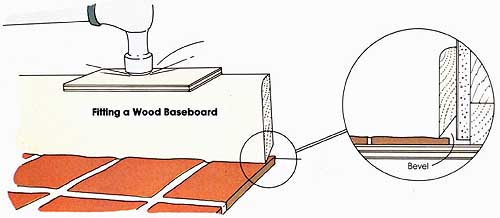
Alter a film of dry grout appears on the surface of the tiles, wipe it off with a soft sponge or cheesecloth. This process also polishes the tiles. Use the toothbrush handle to tool and finish any joints that are not smooth. Allow the grout to cure according to the manufacturer’s instructions. For best results, cover the freshly grouted installation with plastic sheeting for the first 24 hours. This way it will not dry too fast which can cause it to crack. Apply the sealer. Some types of tile and/or grout re quire a final coat of sealer two or three weeks after grouting. This is painted on, according to the manufacturer's directions. If you are sealing the tiles, use a large brush or paint roller to speed the process. If only the grout is being sealed, apply it to the joints carefully, with a small brush, and immediately wipe it off any tile surfaces with a damp cloth. For a superb finish, give the floor a final buffing with a rented floor polisher, Install baseboards or other trim. Alter the tile is in stalled, grouted, and sealed, you can nail wood trim around the wall edges. If the tiles are all level and the surface straight, the trim should snug tightly to the floor and leave no unsightly gaps. If you are using floor tiles, such as large pavers, which have an irregular top surface, you can shape the bottom of the trim to follow the profile of the tiles The easiest way to do this is to sharply bevel the bottom edge of the trim along the back, so that the bottom edge of the front surface is tapered to a thin wedge. Then set the trim piece in place and tap it down onto the floor. The bottom edge will crumple against the high spots of the tiles and conform to the exact profile of the tile floor. Check to see that the top edge of the trim is level, and nail it to the wall. If you want a tile base around the floor, apply the tiles to the wall with adhesive at the time you install the floor. Use special cap tiles, or bull-nosed tiles, Place grout spacers or shims between the floor tiles and wall tiles, and between all the wall tiles. Grout and seal them using the same techniques used for the floor. See following section for more on installing tile borders. Prev.: Resilient Tile Next: Conventional Carpet |

Wednesday, 2011-05-11 12:02