Flooring Installation: Resilient Tile
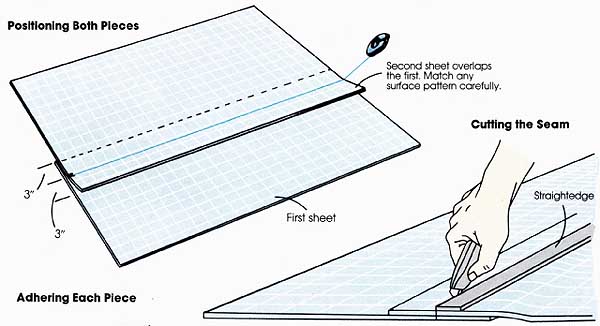
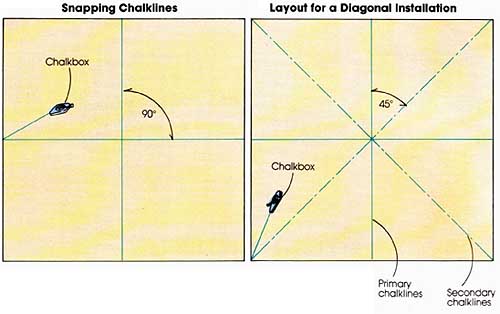
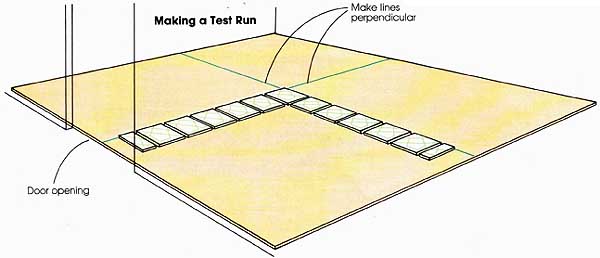
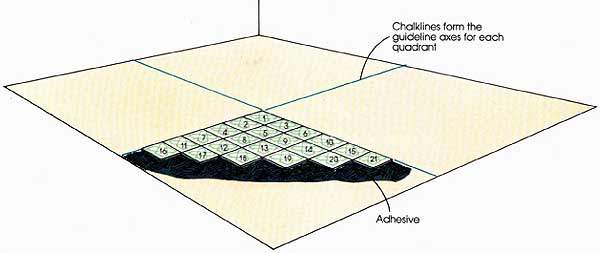
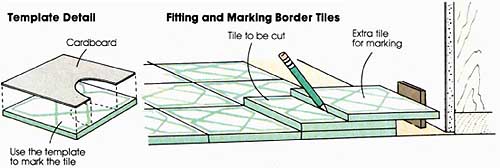
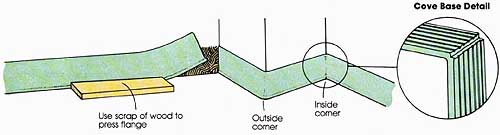
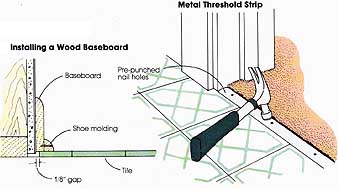
Install both sheets. If it is necessary to seam two sheets of resilient flooring together, use the following procedures after establishing a location that will not be too visible and that is not across a heavily trafficked area. Cut out, fit, and trim the first sheet, but leave a 3-inch margin along the edge to be seamed. Then glue (or staple) this sheet in place, stopping 8 or 9 inches short of the actual location of the seam. Next, cut and fit the second piece; let it overlap the first sheet's seam edge by 3 inches. (If the flooring has a design or pattern, be sure to align the second sheet so that the pattern matches the first piece perfectly.) Then apply adhesive to within 5 or 6 inches of the first sheet's edge and press the second sheet into place, leaving its unglued edge overlapping the first sheet. Cut and glue down the seam. To cut the seam, use a chalkline or a straight line in the flooring pattern for a guide, and run a sharp utility knife against a steel straightedge, cutting through both layers of flooring. Remove the scrap pieces and glue down the seam by pulling back both edges of flooring and spreading a band of adhesive along the floor. Then join the two edges together and press the seam into the adhesive. Immediately wipe off any adhesive that oozes up, and clean the seam with a compatible solvent. Seal the seam. Alter the adhesive's specified setup time, seal the seam with a special solvent that melts the seam edges enough for them to fuse together. The solvent comes in a bottle that includes a special applicator spout. Run the spout along the seam, according to directions, so that the sealer is applied only to the seam, not to the flooring. The seam should now be waterproof. Before beginning the installation, remove baseboards and sweep the subfloor clean. If the room has an irregular shape or several protruding obstacles, you’ll find it easiest to install the tile if you use the largest rectangular portion of the room to lay out the guidelines. Lay out and snap the chalkline. Measure and mark the midpoints of the two opposite side walls and snap a line between them. Then do the same for the two end walls; but before snapping the second chalkline, be sure it is squared to the first. To check for square, use the 3-4- 5 triangle and adjust the chalkline accordingly. If you are laying out a diagonal pattern, first establish guidelines, as illustrated below. Then measure 5 feet out from the lines’ intersection along each axis and make a mark. Find the midpoints between these marks, and snap a chalkline through two opposite so that the line also intersects the center. It should extend in both directions to the walls. This line should be at a 45-degree angle to the original quadrant lines. Now stretch the chalkline across the remaining two mid points, and make sure it is perfectly squared to the first diagonal. Make adjustments as needed. Try out the layout with a test run. Lay dry tiles along both axes of one quadrant, starting at the center and working toward the walls. If the space between the last tile and the wall is less than half a tile’s width, adjust the centerline to provide enough room for at least a tile of half-width against the wall. Continue testing layouts with dry runs until the borders have a satisfying look. For the sake of durability and appearance, borders that front an opening or door areas should have full tiles. Begin the first quadrant. Sweep and vacuum all dirt from the floor. Read the label's instructions to see if the adhesive is applied with a roller, brush, or toothed trowel. All adhesives have a particular "open time” which is the period during which tiles can be laid before the adhesive becomes too dry to make a good bond For some adhesives, you'll only have enough time to set six or seven tiles; for others, you'll have enough time to set most of a quadrant in one application, Begin in the center of the room and spread a specified amount of adhesive into one quadrant, being careful not to cover up the chalklines. Avoid spreading it too thick, which will cause oozing of adhesive between tiles; or too thin, which will prevent a good bond. Carefully position the first tile so that it is perfectly aligned with both chalklines. Set the next few tiles along each axis and then fill the area between the axes as you work your way to the walls. As much as possible, avoid sliding the tiles into position-set them into place instead. Work very carefully, since minor errors can cause major alignment problems later on. Finish the first quadrant. Continue laying tiles along each axis and filling in the area between them. If you come to any obstructions, such as corners, pipes, or posts, cut tiles to fit around them. Make a template out of cardboard and trace its shape onto a tile. Use dividers to duplicate intricate shapes. Resilient tiles can be brittle when cold. They are easier to cut if you briefly warm them in an oven or over a furnace. Finish the remaining quadrants. Finish each quadrant in the same manner, starting in the center of the room and fanning out along both axes. As you proceed you will find that you have to walk or kneel on newly laid tiles. Lay a 2-foot by 2-foot piece of plywood over them to prevent displacing any tiles, Be particularly careful about adhesive oozing out of the joints. Wipe it up immediately as you go, using a rag and compatible solvent. When you complete the floor, avoid walking on it until the adhesive has set. Check the manufacturer's instructions for setup time. Cut border tiles. If you need to cut tiles to fit against a wall, mark each one in its place. First, set the tile to be cut directly on top of the last full tile in its row. Place a second tile on it and butt it up against the wall so that part of it overlaps the first tile. Mark the first tile by scribing along the second tile's edge with a pencil or blade. Cut the first tile with a knife, or score it and break it if it is too heavy to be cut. Then apply adhesive and install the tile. When the entire flooring field has been completed, install the finish details. Vinyl cove base is an easy and attractive way to finish a resilient floor. Cove base is sold by pre-cut lengths. Each strip is fitted, cut to size if needed, and adhered to the wall individually. At inside corners you'll need to v notch the flange and score the back of the strip so that it will bend to fit snugly to the walls. For outside corners, simply work the base around the corner; the flange will stretch enough to allow the material to wrap neatly around the projection. Apply adhesive to the grooved back only; don't adhere the flange to the floor itself. Wood baseboards are a second option for finishing out the floor. If the baseboard material isn't thick enough to cover the tile-to-wall expansion gap, an added shoe molding will conceal it neatly. Metal threshold strip finishes door openings or other areas where the tile meets an adjacent flooring surface. Simply nail it down to the subfloor taking care to avoid denting the strip as you hammer down the nails.
Prev.: Resilient Sheet Goods Next: Ceramic Tile |
Wednesday, 2011-05-11 11:47