Flooring Installation: Conventional Carpet
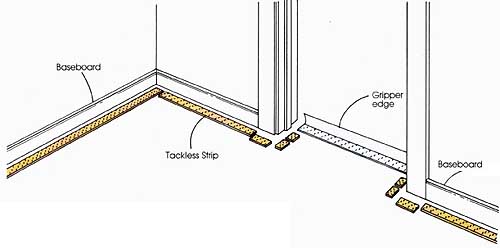
For most carpet installations, you don’t have to remove baseboards, although you may later have to touch them up with paint or finish, Remove any doors that will be in the way of your work, after first marking trimming lines if the carpet will raise the floor level. Before you start, make sure that you have all the necessary tools and accessories needed for your installation. Install the tackless strip. Use the type of strip specified for your carpet backing—type C for heavy backing, type D for Wilton and Axminster carpet, and type E for heavy latex or tufted carpet. If the strip will be anchored to a wood surface, use tackless strip manufactured with wood nails; if the surface is concrete, use tackless strip with masonry nails.
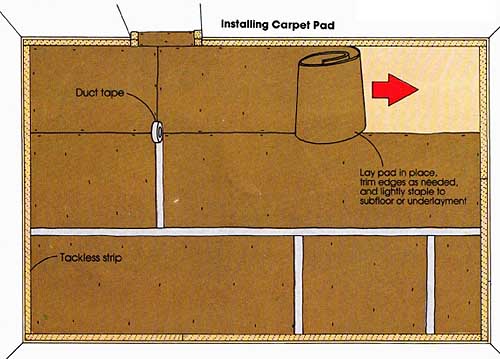
Starting in one corner, nail strip around the room’s perimeter. Its pins should point toward the wall. Leave a gap between strip and wall equal to two-thirds the carpet’s thickness. Cut pieces to length with a saw, shears, or strip cutter. Each piece should have at least two nails holding it down; have extra nails on hand to fasten short lengths of strip. Follow all angles carefully, such as those around door casings or trim, and fit pieces around the perimeter of the room. If you plan to nail tackless strip to concrete, test its holding power first. Drive a few nails into the slab around the edge. If they don't hold well, plan to glue the strip down with a special adhesive. Whether you are nailing or gluing strip to a concrete floor, there may be sections of strip you suspect may not hold. Add another row of strip in front of the first row in those areas. If you are nailing into concrete with resilient flooring glued to it, the nails may not hold well, since the thickness of the flooring will reduce the nails' penetration and bite. If so, try tackless strip with longer nails, or scrape away a 2-inch margin of tile around the edge of the room and install a thicker tackless strip directly on the concrete. To lay carpet over ceramic tile rough up the glazed surface with sandpaper to break the sheen and make a better bond. Then, glue down tackless strip in lengths equal to the tile unit. Install the pad. Using a utility knife, cut a piece from the roll of pad, long enough to cover one end of the room. Position the piece just short of the tackless strip along its long edge. It should overlap the strip at both of its ends. Use a staple hammer to fasten it down every 6 to 12 inches around the edge of the entire piece. Staples should hold the pad firmly to the subfloor, but be sure that the staple tops do not puncture all the way through the pad. If the pad is waffled, staple into the depressions. Pull out any loose staples; they can work themselves up through the carpet later. To install a pad on concrete floors, fasten special paper tape around the edge of the pad so that it laps onto the pins of the tack less strip. Continue cutting and fastening the pad until the en tire floor is covered. Butt the edges; don't overlap them. To trim the excess at the edges, run a utility knife along the edge of the tackless strip; hold the knife at a slight angle to bevel the edge toward the strip. Increase the angle for a foam pad. This makes sufficient space at the edge so that the pad won't ride up onto the tackless strip during installation of the carpet.
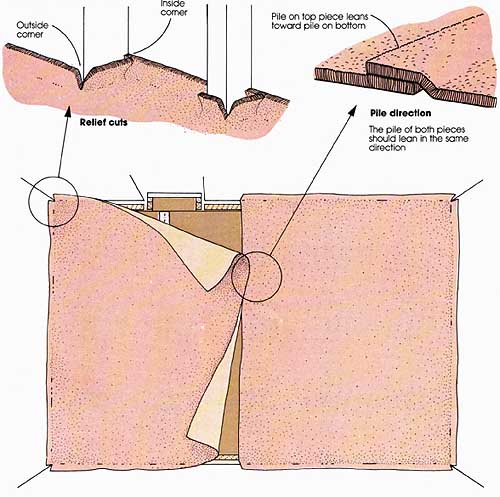
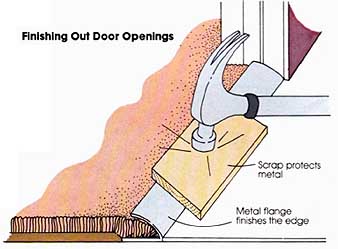
Over Concrete Slabs: If the subfloor is concrete, nail a special gripper edge across the doorway using concrete nails to fasten it down. The teeth bite the carpet, and the curved metal flange is hammered down over the edge to bind the car pet's edge. Over Nailable Surfaces: If the subfloor is a nailable surface, this type of metal strip makes a clean binding where the carpet you're in stalling butts an adjacent floor surface. Nail down the strip as shown in the illustration above. This type of binding, and the one shown at left, are both visible. Invisible Binding: If you do not want a visible strip to bind the edge, and if your installation will accommodate this type of binding, consider using a special Z-bar. Nail it under a length of tackless strip installed in the door opening. The car pet wraps over the "Z" and is clinched by it. Cut the carpet. Unroll enough carpet for the first piece that you will be cutting in an area where it can lay out flat. Be sure the cutting surface is clean and dry. If you need to protect the carpet from soil or moisture, lay down a sheet of plastic first. When you make the rough cuts, leave wall and seam allowances of 2 or 3 inches; these will be trimmed to fit later. Before measuring the first cut, square the carpet end by folding it back 3 or 4 feet so that the side edges line up over each other. Measure the distance from the front corner back to the fold at both sides. These distances will be equal if the end is cut square to the side edges. If the measurements are not equal, square the carpet by measuring along the longer edge, starting at the fold, a distance equal to the shorter edge. Make a mark, and then make all measurements along that edge from the mark rather than the corner Notch the mark so you can see it from the carpet’s face. If the carpet has loop pile in straight rows, cut it from the face side, using a row cutter or utility knife. Before making the cut, use a screwdriver to clear the cutting path by separating the pile rows. Many carpets can be cut from the back. First, mea sure on its face along both edges and mark the points from which you will cut with a small notch or slit. Roll back the carpet far enough to snap a chalkline across its back between the two notches. Using a straightedge, cut with a utility knife just deeply enough to sever the backing. Separate the pieces carefully, cutting any pile yarn that holds the two pieces together. Set the pieces in place. Unroll each piece so that its pile leans in the proper direction, with the first edge lapping slightly up the wall. At corners and obstructions make relief cuts by slitting vertically through the 2- to 3- inch waste portion of the carpet, just to the depth that allows the carpet to lie flat. Overlap pieces that will be seamed by an inch or so. Check to see that the pile of each piece is leaning in the correct direction.
Cut the seam edges. On both pieces, cut the seam edges to be sure they are perfectly straight and parallel, For a loop pile carpet, position the pieces so that the edges are parallel, the pile of both pieces leans in the same direction, and the edges overlap at least 1 inch. The pile of the overlapping piece should lean toward the bottom piece. Using the edge of the overlapping piece as a guide, cut the bottom piece with a row cutter. Finish the cut with a utility knife at the edges where the carpet laps up the wall. Note. If the seam is in a door way or other location where exact placement is necessary, stretch the first piece of carpet into place before trimming and making the seam. Seam the pieces together. Cut a length of hot-melt seaming tape to the exact length of the seam. Center it under the seam with the adhesive side up, by lifting one of the carpet edges and sliding the tape into place, Heat the tape with a special seaming iron or an old clothes iron warmed to 250°. Slip the iron onto the tape at one end of the seam and let both pieces of carpet the top of the iron. Glide the iron slowly along the :ape, about a foot every 30 seconds, pressing the caret edges tightly together along each just-heated section. Move the iron with one hand while holding the edges together with the other. Keep pile out of the adhesive and check to see that the backings butt tightly together. As you move away from each heated section, place some books or flat heavy objects on it to hold the seam together. Continue seaming until you get as close as you can to the far wall. Let the seamed carpet set and cool for 5 or 10 minutes before rolling the edge back to expose the tape. Heat it and finish the seam. You may be able to avoid this delay by running the iron up the wall on the first pass, but if the seam edges do not abut perfectly at that time, the seam will be weak. Go back over the seam and groom it by cutting off any stray backing threads or loose pile ends with a small scissors.
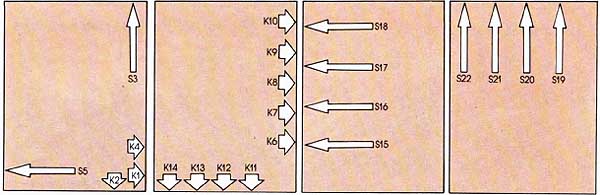
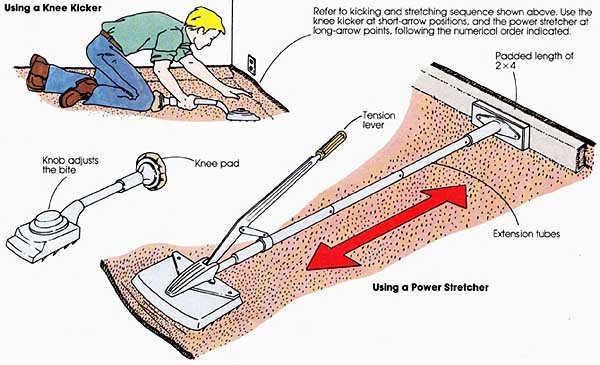
Kick the first edge into place. Choose the wall you will be stretching the carpet away from and secure the car pet to the tackless strip by using a knee kicker. Before you start, adjust the kicker tooth bite on a piece of scrap carpet so the teeth just penetrate the backing when you kick against the cushion with your knee. To secure the first edge onto the tackless strip, bite the kicker’s head into the carpet about an inch from the wall. Lean on the arm handle and swiftly kick its cushion with your knee. As you proceed, kick by kick, hold the secured carpet down onto the strip with your hand so it won’t unhook. You may need to force it a bit with a stair tool or stretching paddle if the carpet is very stiff and won’t fold tightly against the wall.
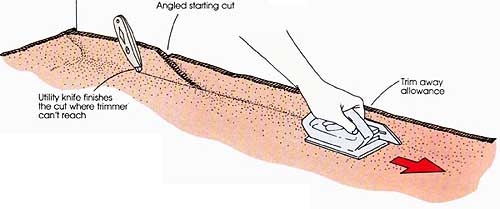
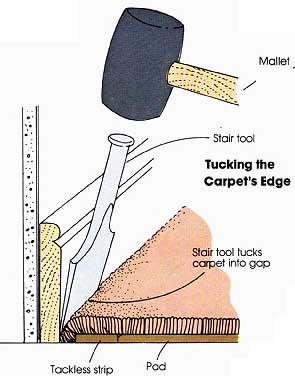
Stretch the carpet. See the diagrams for kicking and stretching patterns. For short distances, such as across hallways or small bedrooms, you can use the knee kicker to stretch the carpet into place. Use a power stretcher for full-size rooms. It has extension tubes that make it possible to stretch carpet across a room of any dimension. Adjust the stretcher’s teeth to your carpet’s thickness. Set the head of the stretcher 6 inches from the wall and adjust its extension tubes so the foot presses against the opposite wall. Then press down on the lever to stretch the carpet toward the wall at the stretcher’s head. The lever should lock down into place with a gentle and easy push. If the carpet does not move easily, lift the head and lower the handle a bit before biting into the carpet again. With the handle locked and the carpet stretched, fasten the section of carpet held by the stretcher’s head down onto the tackless strip. Use the trowel-like paddle that comes with the stretcher or the side of a hammer to push the carpet down onto the pins. Then release the stretcher's head, move it over 18 inches, and repeat the operation. You or a partner will have to move the toot of the stretcher along the opposite wall as you proceed. Protect the baseboard or a weak wall with a piece of 2 by 4 long enough to span three or four studs. For added protection, cover the 2 by 4 with a piece of scrap carpet. Set it between the stretcher's foot and the wall. Trim and tuck the edges. Trim the excess carpet around the edges with a wall trimmer adjusted to your carpet's thickness. Start at the lapped end of the carpet, slicing downward at an angle until the trimmer is flat against the floor. Then hold the trimmer against both the wall and floor, and plow along the carpet's edge. Carefully trim the last few inches with a utility knife. Tuck the trimmed carpet edge down into the gap between the tackless strip and the baseboard. Use a broad screw driver or stair tool, pushing it into the narrow section of carpet lapping over the gap rather than down onto the very edge of the carpet itself. Otherwise, the carpet will bulge and lift of f the strip pins. For stiff carpet, you may need to hit the screwdriver or stair tool with a rubber mallet to tuck the carpet into the gap. At doorways, trim the carpet edge so that it centers under the closed door. If you installed a gripper edge on a concrete floor, flatten the metal flange over the carpet with a rubber mallet or a wood block and ham mer. If you are covering the edge with a flat bar on wood floors, nail the loose edge of the carpet down first with tacks or 1-inch lath nails.
Prev.: Ceramic Tile Next: Cushion-Backed Carpet |


Wednesday, 2011-05-11 12:29