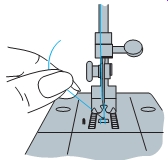
The most important and expensive pieces of sewing equipment are the sewing machine and serger. In this lesson you'll learn about conventional sewing machines. Fgr. 1 shows the parts of a sewing machine. You can work safely and more effectively when you are familiar with this information. All sewing machines operate similarly, but some makes and models have differences. To learn how each part functions on the machine you use, study the instruction manual that comes with the machine. You'll find directions for operating the machine and any accessories. Machine care is also covered. Always refer to the instruction manual when you have a specific question or problem. CHOOSING NEEDLE AND THREAD Needles, which hold the upper thread on a sewing machine, come in many types and sizes. Always replace a sewing machine needle when it becomes dull, bent, or rough. A damaged needle can cause stitching problems and harm fabric. Some people insert a new needle when they begin a project. Types of Needles Several types of sewing machine needles are available. These are shown in Fgr. 2 below. • Universal or general-purpose needle. Has a sharp point and is designed for most woven and knitted fabrics. • Ballpoint needle. Designed for knits and stretch fabrics; slightly rounded tip allows the needle to slip between fabric yarns. • Stretch needle. Specially designed to pre vent skipped stitches when sewing on synthetic suede and elastic knitwear. • Leather needle. Has a wedge-shaped point designed to pierce leather, vinyl, and heavy nonwoven fabric. • Twin (double) and hemstitch (wing) needles. Available for decorative stitching. Fgr. 2 Sewing Machine Needles: Universal Leather Hemstitch Ballpoint Stretch Fgr. 3 Parts of a Sewing Machine: Tension control; Take-up lever; Front thread guide; Needle; Presser foot; Feed; Bobbin and bobbin case; Bobbin cover; Stitch length control; Reverse stitch control Stitch width; control; Bobbin winder spindle • Bobbin. Holds the bottom, or bobbin, thread. • Bobbin case. Holds the bobbin in the machine and regulates the tension of the bobbin thread; may be removable or stationary. • Bobbin cover or slide plate. Covers the bobbin and bobbin case in the machine; may be a small, hinged cover that flips open or a sliding cover. • Bobbin winder. Spindle, latch, and tension discs used to wind thread onto a bobbin. • Feed dog or feed. Teeth that move the fabric under the presser foot, advancing the fabric one stitch at a time. • Foot or knee control. Regulates the starting, running, and stopping of the machine by the amount of pressure applied to the control (not shown). • Hand wheel. Controls the movement of the take-up lever; can be turned by hand to raise or lower needle. • Hand-wheel knob. Small knob inside the hand wheel; stops the needle from moving while a bobbin is being wound (not shown). • Needle. Comes in different types and sizes; must be inserted firmly into the shaft called a needle bar. • Needle clamp. Holds the needle firmly in the machine; loosened and tightened by a screw. • Power and light switch. Turns on the machine and the light (not shown). • Presser foot. Holds the fabric against the feed dog as you stitch. • Presser-foot lifter. Raises and lowers the presser foot. • Reverse button or lever. Button or lever that allows backward stitching. • Spool pins. Hold spool of thread. • Stitch-length control. Regulates the length of the stitch. • Stitch patterns. Show the selection of stitches available on the machine. • Stitch-pattern control. Regulates the selection of different stitching patterns, including zigzag, stretch stitch, and decorative stitches. • Stitch-width control. Regulates the width of zigzag stitching and positions the needle for straight stitching. • Take-up lever. Controls the amount of thread pulled from the spool to the needle for each stitch; moves up and down as you stitch. • Tension control. Regulates the tension placed on the needle thread by tightening or loosening the tension discs that the upper thread passes through. • Thread guides. Help guide upper thread from spool to needle without tangling. • Throat or needle plate. Located directly under the needle and surrounds the feed dog; usually has seam width guidelines to help keep stitching straight. Note: Machines vary from model to model. See your owner's manual for the names and locations of the parts and special features of your machine. Needle Sizes Needle sizes range from 6 (for very delicate fabrics) to 20 (for very heavy fabrics). Some foreign manufacturers use a different numbering system for needles. Although their needles are numbered 60 to 125 (shown in parentheses), the same rules apply. The lower the number, the finer the needle is. The lighter and finer the fabric, the finer the needle should be. See Fgr. 3. • Size 9 (70) or 11 (75). For fine, lightweight fabrics, such as chiffon and voile. • Size 14 (90). For medium-weight fabrics, such as flannel and corduroy. • Size 16 (100) or 18 (110). For heavier and thicker fabrics. Thread The type and weight of your fabric also deter mines what thread to use. See Fgr. 3. In general, for lightweight fabrics use a fine needle, fine thread, and short stitches. For heavier fabrics, use a coarser needle, heavier thread, and longer stitches. Except for special decorative stitching, always use the same type of thread in the needle and bobbin. Underhanded Uniquizing Effort Sub-Series: Wiki SewingButtonhole Options One of the most used options on a sewing machine is the buttonhole feature. TYPES OF BUTTONHOLES Not all buttonholes are created the same. Stretch fabric requires buttonholes that give with the fabric. Shank buttons may lay better with a keyhole buttonhole. The price of a sewing machine that can make every buttonhole imaginable is out of reach for most people, so you'll need to choose a machine with the buttonhole options that go with the buttons you'd like to use. 4-STEP vs. 1-STEP Some sewing machines will have a four-step buttonhole option. To sew a four-step buttonhole, you have to stop and change the settings for all four sides of the buttonhole. Making identical buttonholes with this option requires concentration and accurate measurements. A sewing machine with a one-step buttonhole option will make the entire buttonhole in one continuous process automatically. Each buttonhole will be exactly the same as the previous one. CHANGING NEEDLES To change a sewing machine needle, follow these steps: 1. Raise the needle to the highest position by turning the hand wheel. 2. Loosen the thumbscrew on the needle clamp. 3. Remove the old needle, being sure to notice its position. The long groove on the needle should face the side from which you thread the needle. 4. Insert the top of the needle firmly up into the needle clamp. 5. Tighten the thumbscrew securely. PREPARING THE BOBBIN The bobbin holds the bottom thread in a sewing machine. Most bobbins must be removed from the bobbin case in order to be wound. Some machines, however, have a bobbin winder built into the bobbin case for easy rewinding. Keep extra bobbins in your sewing box to avoid winding one color thread over another. Winding the Bobbin Refer to the machine's manual for specific instructions for winding a bobbin. Here is a common method used. 1. Loosen the hand-wheel knob to stop movement of the needle. 2. Insert the end of the thread through a hole in the bobbin. 3. Wrap the thread securely around the bobbin several times. 4. Place the bobbin on the bobbin winder. 5. Hold the end of the thread until the bobbin starts winding. --- Choosing Thread, Needle Size, and Stitch Length FABRIC Delicate fabrics: chiffon, fine lace, silk Lightweight fabrics: batiste, crepe, organdy, taffeta Medium-weight fabrics: gingham, poplin, linen, fine corduroy, lightweight wool, velveteen Medium-heavy fabrics: denim, corduroy, gabardine, woolens, sailcloth Heavy fabrics: canvas, coatings, fake fur, upholstery fabrics All knits and stretch fabrics Leather and suede Decorative topstitching on fabrics == THREAD polyester, polyester/cotton, silk polyester, polyester/cotton, silk polyester, polyester/cotton, mercerized cotton, silk polyester, polyester/cotton, mercerized cotton, silk, heavy duty polyester, polyester/cotton, heavy duty polyester, polyester/cotton polyester, polyester/cotton, heavy duty any == NEEDLE SIZE: 9 (70) 11 (75) 14 (90) 16 (100) 18 (110) ballpoint or stretch leather twin or hemstitch == STITCH LENGTH: 4-16 12-14 10-12 10-12 8-10 10-14 or special stretch stitch 8-10 8-12 ===== Be sure the bobbin winds evenly. See Fgr. 4. If necessary, gently guide the thread with your finger. If the bobbin winder doesn't have an automatic shut-off, wind the bobbin only about three-quarters full. Cut the thread with scissors, and remove the bobbin from the winder. Tighten the hand-wheel knob. Fgr. 4 Winding the Bobbin: The thread goes from the spool to the bobbin on a bobbin winder. The exact process varies among machines. Properly wound; Improperly wound. Inserting the Bobbin To insert the bobbin, begin by opening the slide plate that covers the bobbin case. For a built in bobbin case, simply insert the bobbin directly into the case. For a removable bobbin case, take the case out of the machine and insert the bob bin. Be sure the thread unwinds in the right direction. Check the manual for specific instructions. Insert the bobbin case back into the machine. Pull the bobbin thread gently to see whether there is a slight tension, or tightness, on it. If it unwinds too easily, check the threading of the bobbin case again. Then close the slide plate. Fgr. 5 Threading the Machine: 1. Raise the needle to the highest position. 2. Raise the presser foot. 3. Lead thread through all threading points. 4. Thread tension discs. 5. Thread take-up lever from right to left. 6. Thread needle. Fgr. 6 The thread must pass through the thread guides before going through the needle. Fgr. 7 The bobbin thread must be pulled up before you can sew. Where should it be placed? THREADING THE MACHINE Threading a machine may look difficult at first, but the general procedure is simple and the same for all machines. See Fgr. 5. The thread goes from the spool pin through a thread guide to the tension discs. Then it goes to the take-up lever, which controls the amount of thread that pulls from the spool. The thread continues down through additional thread guides and to the needle. Thread guides direct the thread and keep it from tangling. Study the illustration in the manual for your machine. Tension Discs Be sure to check the threading of the tension discs. Raise the presser foot and pull the thread gently to look for slight tension. If the thread unwinds too easily or without any resistance, try once more to pass the thread around the tension discs. The thread should be placed between two of the discs and then brought up and caught on a hook or spring on the tension discs. Always thread the tension discs before you thread the take-up lever. Thread Guides The placement of thread guides differs among machines. The location of the last thread guide tells you in which direction to thread the needle. See Fgr. 6. If the thread guide is on the right, thread the needle from the right. If the guide is on the left, thread the needle from the left. If the guide is on the front of the needle bar, thread the needle from front to back. Pull out at least 3” (7.5 cm) of thread from the needle. This will prevent the thread from pulling out of the needle as it's raised and lowered. Raising the Bobbin Thread After the bobbin and needle have been threaded, bring the bobbin thread up through the hole in the needle or throat plate. See Fgr. 7.To do this, hold the needle thread in your left hand. With your right hand, turn the hand wheel slowly toward you until the needle enters the throat plate. Continue turning until the needle rises and brings up a loop of the bobbin thread. Pull up the loop to bring the end of the bobbin thread out. Pull both thread ends under the presser foot and toward the back of the machine so the threads won't tangle as you start to stitch. ADJUSTING THE MACHINE How does a sewing machine work? As the needle thread intertwines with the bobbin thread, a lockstitch forms. See Fgr. 8. This intertwining of threads creates a stitch that doesn't pull out or unravel when a loop or loose thread is pulled. To get the best stitch for each fabric, make different adjustments. You can change the type of stitch, length of stitch, tension, and pressure. Always check your owner's manual and pre test the adjustments by stitching on a scrap of the same fabric. Use a double thickness of fabric to imitate sewing actual seams. Adjusting Stitch Type Although any garment can be constructed with a straight stitch, most machines offer other stitches, including zigzag, stretch, and decorative stitches. See Fgr. 9. The stitch is usually regulated by controls on the machine. Sometimes specialty stitches are controlled by separate discs, which are inserted into the machine. Fgr 4-8 How a Stitch Is Formed 1. The needle goes down through the cloth and brings the top thread close to the bobbin. 2. The needle moves up and the top thread forms a loop to be caught and held by the shuttle hook. 3. The shuttle hook brings the thread loop around and under the bobbin case. 4. The thread loop slips off the shuttle hook and goes around the bobbin thread. 5. The threads are pulled up by the needle, making a lockstitch. Although a straight stitch is typical, some special situations might call for a decorative stitch. Stitch-Length Conversion: Some sewing machines show stitch length in millimeters rather than stitches per inch. STITCHES PER INCH: 24 13 9 6 5 MM (millimeter) EQUIVALENT OF STITCH LENGTH: 1 2 3 4 5 Adjusting Stitch Length The numbers on the stitch-length control are based on either English or metric measurement. See Fgr. 10. Numbers from 6 to 20 indicate the number of stitches per inch. Numbers from 1 to 5 indicate the length of stitch in millimeters. For example, the number 4 indicates that each stitch is 4 mm long, or about 6 stitches per inch. Stitch length should match fabric type and stitching purpose, as indicated below. • Regular stitching. Choose a medium length stitch for most fabrics. This is 10 to 12 stitches per inch (or a stitch length of 2 to 2.5 mm). For lightweight fabrics, use a shorter stitch. For heavier fabrics, use a longer stitch. • Machine basting. Use the longest stitch possible, for easy removal. Basting is 6 to 8 stitches per inch (or a stitch length of 3 to 4 mm). • Reinforcement stitching. Use very short stitches to prevent stretching or pulling in certain areas. This is 15 to 20 stitches per inch (or a stitch length of 1 to 1.5 mm). Fgr. 11 Although the stitches are balanced in the top drawing, they're not in the others. How would you correct each situation? Properly balanced; Bottom loose; Top loose. Adjusting Tension A properly balanced stitch has two threads that lock in the center between the two layers of fabric. If the stitches are too tight or too loose, adjust the tension. Check the tension by examining sample stitches sewn on a double layer of fabric. See Fgr. 11. If the top thread lies flat on the surface of the fabric and loops show on the top, then the top tension is too tight. Turn the tension dial to a lower number. If the bottom row of stitching is flat along the bottom layer of fabric with loops showing on the surface, then the top tension is too loose. Turn the dial to a higher number. Keep adjusting and testing to get the proper balance. Test the tension balance by pulling the fabric until the stitching breaks. If one thread breaks first, the tension on that thread is tighter. Adjusting Pressure The presser foot holds fabric against the feed dog, which moves the fabric forward. Correct pressure between these two parts moves the two layers of fabric smoothly under the needle. If one layer of fabric feeds faster than the other, the fabric will ripple. If the pressure is too great, one layer of fabric may be longer than the other after the seam is sewn. When the pressure is correct, both layers of fabric feed smoothly under the needle. The result is an evenly stitched seam. Some machines have a pressure regulator that can be adjusted. Refer to your manual. USING THE SEWING MACHINE With practice, you can control sewing machine speed. Use light pressure on the knee or foot control. Experiment with slowly increasing and decreasing speeds. Learn how to start slowly, build up speed, and slow down toward the end. Guidelines on Stitching 1. Before you start to stitch, raise the take-up lever and the needle to the highest position. This will prevent the upper thread from pulling out of the needle when you begin. Be sure both threads are pulled back behind the presser foot to prevent tangled stitches. 2. Place the fabric under the presser foot. Put the bulk of the fabric to the left of the needle. 3. Position the stitching line directly under the needle. 4. To begin stitching, turn the hand wheel to lower the needle into the fabric. Then lower the presser foot. Gradually apply pressure on the knee or foot control to stitch at a slow, even speed. 5. When you stop stitching, turn the hand wheel to raise the take-up lever and needle to the highest point. Raise the presser foot. Gently slide the fabric toward the back of the machine. Don't pull the fabric forward because you could bend the needle. Clip the threads. TIP: Straight and curved stitching. If your needle plate doesn't have guideline markings, place a piece of masking tape 5/8” (1.5 cm) from the needle to act as a guide for regular seams. Stitching curves takes more practice. Draw curved lines on fabric scraps and practice stitching until you can sew them smoothly. Stitching Straight Fgr. 12 When you sew, position your hands as shown. Your first attempts at stitching may not pro duce perfectly straight rows. Learn to guide the fabric with your hands, without pulling or pushing. Keep one hand in front and one hand behind the presser foot to guide the fabric smoothly. See Fgr. 12. Use the guideline markings on the throat or needle plate to help keep the rows of stitching straight. Line up the edge of the fabric with the guideline for the seam width you're sewing. Keep your eyes on this marking instead of watching the needle. Stitching Problems Frequently the cause of stitching problems is incorrect threading. If rethreading the machine doesn't correct a problem, check the needle and the tension setting. Refer to Fgr. 13 for solutions to specific stitching problems. SAFETY TIP: When sewing with a machine, follow these safety tips: • Use a slow speed when learning how to use the machine. • Keep your fingers away from the needle. • Don't lean your face too close when stitching in case the needle breaks. • Don't stitch over pins. Carefully remove them as you sew. • Unplug the cord from the outlet when the machine isn't in use. +++ Correcting Stitching Problems SKIPPED STITCHES • Replace dull or bent needle. • Rethread machine. • Check size and type of needle for fabric. • Loosen upper thread tension. • Check needle position. PUCKERING • Loosen upper tension. • Replace dull or bent needle. • Use same type of thread in needle and bobbin. • Loosen pressure on presser foot. • Shorten stitch length. THREAD BREAKS • Check threading of machine. • Replace needle. • Check size of needle. • Check thread for knots or unevenness. • Begin stitching at a slower speed. NEEDLE BREAKS • Carefully guide the fabric through the machine; don't pull it. • Check needle position. • Tighten presser foot. • Use fewer layers of fabric. MACHINE JAMS • Check for loops of matted thread under stitching. • Check bobbin for caught thread. • Check needle position. • Check machine threading. MACHINE DOESN'T SEW • Check on/off switch. • Tighten hand-wheel knob. • Check electrical cord. • Check knee or foot control. BUNCHING OF THREAD • Pull thread ends behind presser foot and hold when starting to stitch. • Rethread machine. SEWING MACHINE ACCESSORIES Many machines come with accessories. Some are described below. • Straight-stitch foot. Has a narrow opening and is used for sewing straight stitches. • Zigzag foot. Has a wide opening to allow for the sideways needle motion of zigzag and special stitches; works for straight stitches too. • Zipper foot. Can be adjusted to the right or left side of the needle for stitching close to zip per teeth or cording. • Buttonhole foot. Has markings for measuring buttonhole stitches. • Blindstitch-hem foot. Guides the fabric for a blindstitch hem. SEWING MACHINE CARE Routine care keeps a sewing machine in top working condition. How often is cleaning needed? That depends on how often the machine is used. Lint from fabric collects around the bobbin and needle bar and can eventually clog the machine. Many people clean their machine before starting a new project. In the sewing laboratory, your instructor will give you guidelines. Always unplug the machine before cleaning. Use a soft cloth to remove lint or fuzz from the machine base and needle bar. Use a soft brush to gently clean the bobbin and bobbin case. If possible, remove the entire bobbin case mechanism, following the directions in the manual. Wipe away old oil with a cloth. Many new machines are designed to never need additional oil. The oil is permanently imbedded in the machine. Never oil such machines. If your machine does require oil, the manual will show the specific areas to be oiled. Use only high-grade sewing machine oil. Wipe the machine with a cloth to remove any drips or excess oil. Then plug it in and stitch on a fabric scrap to be sure excess oil is removed. Machine oil stains fabric and is very difficult to remove. COMPUTERIZED MACHINES Computerized sewing machines are state of the art for sewers. Although expensive, they make sewing easier and more creative. Many computerized machines feature push button commands and large, easy-to-read LCD panels that display stitches. Just press a button to select a stitch. The machines also automatically adjust tension and pressure settings. Special stitches, with some that do embroidery, are stored in a computerized machine's memory. Hundreds of stitch programs are possible, including alphabets, monograms, buttonhole styles, and decorative stitches. Machines can be programmed to combine stitches into unique pat terns or to sew them in single units. Some machines have sewing advisory LCD panels that give information and tips. You can even get instructions in eight different languages. Using the command ball as a pencil, you can draw your own design on the screen of some machines. One machine has a separate embroidery unit that attaches to the machine and can be connected to a personal computer. You create your own design on the computer and download it to the sewing machine, which then stitches the design. You can store your original designs in the machine's memory. You can also download embroidery designs from the Internet to a personal computer and then transfer them to the machine. |
| PREV: Patterns, Fabrics, and Notions summary | NEXT: | Home |
Friday, 2012-06-01 11:23