Our asst. was standing in water a quarter-inch deep that covered an entire basement floor. The homeowner asked me in a surprisingly calm voice, “Is there any reason the basement of a brand-new million-dollar home should leak?” “Even if your house cost $100,000, it still shouldn’t leak,” the asst. answered. He also told her that she had lots of company in her misery: A recent survey of 33,000 new- home owners revealed that 44% had leaky, wet basements. It was my guess that most of the basement problems were the result of a builder’s neglect or efforts to cut costs.
As basement-waterproofing contractors, we fix the mistakes of others. Having been a builder ourselves, we can empathize with the emotional struggle to “spend more and be safe” vs. “spend less, make a profit, we should be okay.” However, no matter how much you spend, you shouldn’t end up with a basement that seeps water like a cave; it’s not good for the house or its occupants. Re member that it’s much easier (and cheaper) to build it right the first time than to dig it up later with a jackhammer. To that end, I like to seal foundation walls, drain water away from the foundation’s exterior, and expel the water that does manage to leak into a house’s basement.

Waterproofing, not damp-proofing, seals the foundation
walls. More expensive than asphalt based mixtures, a rubber-based membrane
sprayed onto foundation walls remains flexible and waterproof.
Sealing Foundation Walls
When water saturates the soil surrounding a foundation, it essentially creates a column of water whose cumulative weight increases as it rises in the backfill. This force pressing down is known as hydrostatic pressure; it drives water through joints, cracks, form ties, and other foundation imperfections. The first line of defense is some sort of exterior coating on the foundation walls.
These sealants are categorized into two groups: damp-proof and waterproof coatings. Damp proof coatings are typically thin asphalt-based solutions that are sprayed or painted onto the foundation’s exterior. The asphalt reduces the porosity of the concrete, but over time, it emulsifies in water and won’t seal cracks. Some contractors mix fiberglass fibers with the asphalt to strengthen the mix but still offer only a one-year warranty. The low cost of damp-proofing (about 30 per sq. ft.) makes it attractive to many builders, but the brief or nonexistent warranties (usually only a year) should make consumers wary.
Waterproof coatings, on the other hand, are a mixture of rubber and asphalt or all rubber (sometimes called elastomeric) and can cost three times as much. Like damp- proof coatings, waterproof coatings are sprayed onto the foundation, but the material must be heated before application; it’s also applied in a thicker coat and is elastic enough to bridge X cracks and small holes. The key to the water proofing’s performance is the amount of rubber in the mixture; more rubber means better performance and higher costs.
To protect any coatings’ integrity when the foundation is backfilled, many contractors cover the sealed concrete with what is known as protection board: sheets of fiber glass, rock wool, or extruded polystyrene foam. I use a 1/4-in.-thick foam board that adheres to the fresh layer of waterproofing (photo above); at the very least, it provides a thermal break between the backfill and the foundation. Typical costs for a combination of waterproofing and rigid board can run from $1.10 to $1.50 per sq. ft.; 20-year warranties are common. Recently, a number of waterproofing manufacturers such as Rub R-Wall came out with an extremely resilient coating that doesn’t need protection board. But I still like to have the extra insulation provided by the foam.
When applying waterproofing, I make sure the joint between the footing and the wall is sealed. This means the top of the footing has to be clean before the wall is sprayed. Form ties should be knocked off both inside and out before spraying. It’s also a good idea to determine the finish-grade height and spray to that line. If this elevation is miscalculated, 6 in. or more of untreated wall can end up beneath the backfill, causing leaks when the inevitable shrinkage cracks begin to appear in the foundation.
Recently, a popular alternative to water proofing has been waterproof drainage mats. The dimpled polyethylene sheets are unrolled and nailed onto the foundation wall, caulked at the top, and left open at the bottom. The mat’s dimpled shape creates an air space between the wall and the soil, so if water does leak in at the top or through a joint, it can drain to the bottom.
The problem with these drainage mats is that they must have an open footing drain below. If (or when) the footing drain clogs, hydrostatic pressure forces water up between the matting and the wall. Because the wall was never waterproofed, every crack and form-tie hole is vulnerable to easy water entry. In contrast, if a footing drain fails along a wall that was waterproofed, the form ties, wall cracks, and footing/wall joint are sealed and protected. However, even the best waterproofing guarantees only that water won’t penetrate walls and doesn’t prevent water from coming up around the footings and floor.

Rigid-foam protection board shields the membrane from
backfill damage. Applied while the waterproofing is still tacky, the
1 foam panels also provide a thermal break between the foundation and backfill.
Keeping Footing Drains Clear
To keep a basement dry, you need to channel water away from the house with footing drains. Although most building codes say that foundations must have a drainage system of drainage tile, gravel, or perforated pipe, We always use 4-in.dia. rigid-PVC pipe. (We’ve found that the black coiled, slotted pipe often used is difficult to keep straight; any dips in the pipe cause poor flow and clogs.) Two rows of ½-in, holes drilled at 4 and 8 o’clock positions keep the pipe’s sediment intake to a minimum; slots will clog much faster than holes in most soil conditions. To make sure the pipe doesn’t be come clogged, I wrap the pipe with a succession of filters that resembles a giant burrito.
One starts by cleaning the excavation to the bottom of the footing, usually with a shovel; a half-buried footing causes poor drainage. Next, I unroll 6-ft.-wide filter fabric along the footing, spreading excess on the ground away from the foundation and up the side- walls of the excavation . I then dump 3 in. of 1/4-in. stone on top of the fabric, level it off by hand, then set the PVC pipe so that at worst, it’s level around the entire foundation. Because the footings are mostly level, I’m happy if I can gain a few inches of pitch to the outlet.
During this stage of the project, it’s convenient to tie the drains below each window well to the footing drains. Vertical risers made of solid 4-in.-dia. pipe run up from the footing drains under the window wells and terminate with a grate about 4 in. below the windowsill. The well can be filled later with stone so that leaves won’t clog the grate.
We backfill over the footing pipe with more ¾ in. stone to an elevation of 8 in. above the top of the footing. As a rule of thumb, 1 yd. of aggregate will cover 12 lin. ft. of exterior footing drain; therefore, a house with 150 ft. of foundation will require a little more than 12½ yd. of aggregate. I pull the filter fabric up over the top of the stone and against the wall, using shovelfuls of sand or stones to hold it in place. If the fabric is not long enough to reach the wall, I add another course, overlapping by at least 12 in. Now the burrito is nearly complete.
Because the filter fabric will eventually clog, I put about 6 in. of coarse sand on top of the filter fabric. This progression of materials will keep the drain clear longer than any other practical way I know. The fabric protects the stone, the sand protects the fabric, and the soil won’t wash into the sand.
As long as the lot’s grade allows it, the exterior footing drains should always be run to daylight, pitched at ¼ in. per ft. or more, if possible. If the drains are servicing more than 200 lin. ft. of foundation, you might want to consider added measures. For example, you could put two outlets to daylight or increase the diameter of the outlet pipe from 4 in. to 6 in.

Clogged footing drains can’t do the job. Water draining
into the pipe carries silt that eventually fills the pipe. To avoid replacing
a clogged footing drain, the author surrounds the pipe with a layered filter
that stops sediment.
TIP: The black coiled, slotted pipe often used as a foundation’s drainage system can be difficult to keep straight. Any dips in the pipe cause poor flow and clogs Try.4 in dia. rigid pipe instead.
As long as the lot’s grade allows it, the exterior footing drains should always be run to daylight, pitched at ¼ in. per ft. or more, possible.
If there isn’t considerable pitch on the lot or if a storm sewer isn’t handy, the footing drains must run inside to a sump pump. A single 6-in, pipe that connects the exterior drain to the pump should be cast through the footing at the sump location and gives the drain as short a run as possible.
It’s worth mentioning that it’s never a good idea to connect an interior footing drain with a crossover pipe m the footing to an exterior footing drain that drains outside the house. The probability of failure on an exterior component of the system is high, while the probability of a failure to the interior system is low. If and when the exterior footing drain fails, the water will back up into the interior footing drain and flood the basement.
Making the Foundation’s Exterior Impervious to Water: DRAINING DOWNSPOUTS AND WINDOW WELLS:
If left unattended, rainwater that drains off the roof will end up in the basement. Gutter downspouts can be connected to 4-in, drain lines that run to daylight, away from the house. To keep window wells from leaking into the basement, a 4-in, vertical pipe run from a T in the footing drain can divert any water that collects there.
Because most water problems come from saturated backfill, it’s important to seal foundation walls. An elastic rubber membrane sprayed onto the concrete seals small cracks, holes, and other imperfections. A PVC drain laid along the footing carries excess water away from the house. A multistage filter of stone, filter fabric, and coarse sand keeps the drain from clogging with silt.
Gutter downspout. 4-in. PVC pipe buried approximately 2 ft. below grade. Window well. 6 inches of coarse sand helps keep the fabric clear. Outlet drain. A 4-in. rigid-PVC footing drain collects and diverts water to an outlet drain. Filter fabric surrounds the stone and drain. 3/4-in.stone. Footing. A 3/4-in.-thick rigid-foam board protects the membrane and creates a thermal break. Foundation wall. Waterproof rubber membrane. Grate is covered by stone in well to filter debris.
Drain the Gutters Far Away from the House
It may seem obvious, but many houses don’t have adequate drainage for gutters and downspouts. Rather than carry water away with splash blocks, it’s more efficient to connect the downspouts to a 4-in.-dia. PVC pipe. Starting at about a 2-ft. depth at the house, the pipe should be pitched toward daylight as steeply as possible so that it can flush out the dead leaves and sticks that always accumulate.
Because gutters collect debris, it’s a good idea to enlarge the downspouts to 3 in. by 4 in. instead of the usual 2 in. by 3 in.; this will also drain the gutter twice as fast in a heavy rain. The underground drain itself can be enlarged to a 6-in. dia. if necessary. In the drain, it’s best to avoid 90 bends, which trap leaves and gunk, and use 45 bends instead. If there’s a long run of gutter, give it two outlets. Finally, never connect the gutter drains to the footing drains, no matter how far downstream. Gutter drains are always voted “most likely to clog” and will back up the footing drains, too.
Never connect the gutter drains to the footing drains, no matter how fir downstream. Gutter drains are always voted “most likely to clog” and will back up the footing drains, too.

Tough vapor barrier keeps basement slab dry. Made
of 2-ply high-density polyethylene, the vapor barrier can be installed under
or over the gravel base and keeps moisture from wicking up through the slab.
Getting Rid of Water in Basements
Although installing interior basement drains in new construction is a good idea, they’re usually installed to fix problems in existing construction. Typical strategies include the use of interior perimeter drains that collect water from foundation walls, a vapor barrier below the slab that prevents water and vapor from wicking up through the concrete, and a good sump pump that will eject any water that collects in the drains and under the slab. In new construction, these methods all start with a new basement floor.
Under the slab, I like to lay 8 in. to 10 in. of clean ½ -in. to ¼ -in. stone. This stone allows the entire sub-slab area to drain and makes a good base for the slab. Once the gravel is laid, I always like to install a puncture-resistant vapor barrier (photo above). The strongest material is a 4-mill cross-laminated high-density polyethylene such as Tu-Tuff from Sto-Cote. It comes in 20-ft. by 100-ft. rolls that cost about 4 cents per sq. ft. I overlap adjoining pieces at least 18 in. and seal the lap with housewrap tape.
The concrete guys aren’t crazy about the barrier because it doesn’t allow the water in the mix to settle out, making the finishing process longer, but a 3-in, bed of sand laid over the barrier will alleviate the problem. (You can also lay down the barrier before the gravel is brought in.) Either way, the long-term benefits of an unbroken barrier under the floor are well worth the temporary inconvenience of installation.
Because water usually comes into the basement through the walls and the footing/wall joint, the best place to capture and channel the water is at the junction of the floor and wall. The most efficient method is to install a plastic perimeter drain that sits on top of the footing and below the slab; this perimeter drain collects any water that seeps in through the walls. In retrofit jobs, the first 6 in. of slab perimeter is cut away to expose the footing; once the drain is installed, the slab is patched. There are many manufacturers’ variations on this theme; I use a drain that I designed and now manufacture. Rectangular in cross section, it has a slotted opening facing the wall that channels water down and out toward the pump. The interior footing drain costs about $30 to $40 per ft. in a retrofit.
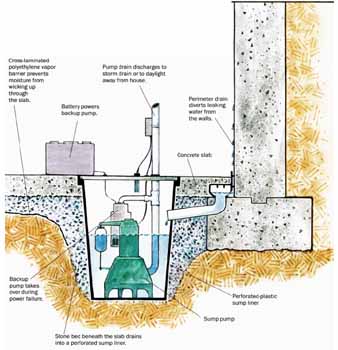
Keeping the Interior Dry with a System of Drains and Pumps:
To handle any leakage through foundation walls and to ensure a dry floor,
an interior perimeter drain collects water from the walls and channels it
to the sump pump. On sites where exterior drainage is poor, the pump can
also be connected to the exterior footing drains. Cross-laminated polyethylene
vapor barrier prevents moisture from wicking up through the slab. Pump drain
discharges to storm drain or to daylight away from house. Perimeter drain
diverts leaking water from the walls. Battery powers backup pump. Backup
pump takes over during power failure. Stone bed beneath the slab drains into
a perforated sump liner. Perforated-plastic sump liner.

Interior perimeter drains are good insurance in new construction
or retrofits. Plastic drains on top of the footing collect water that leaks
in through the walls and channel it to the sump pump. The en tire drain
is to be covered with concrete, except the opening facing the wall.
A less expensive version of this system for new construction is known generically as a draining floor edging. It’s a 6-in, by 4-in. L-shaped plastic flashing with a dimpled design. The dimples are laid against the wall and footing side and allow water to pass into the gravel below the slab, where it can be pumped out. The flashing material costs about $1.50 per ft. You can find versions of these products through your local waterproofing contractor, or you can contact my company, Basement Systems.
Sump Pumps for Interior Drainage
Any drainage technique I’ve mentioned is dependent on one thing: a good sump pump. After installing more than 10,000 pumps myself, I have some criteria for choosing a pump. First, it should have a cast-iron body; second, it should be able to pump ½ -in.-dia. solids; and third, it should have a mechanical float switch (a float riding up and down on a rod not a pressure switch or a “on a wire” design that often hangs up. A Zoeller M-53 fits the bill perfectly, costs about $150 and pumps 2,600 gal. per hr.
The pump sits inside a plastic bucket called a liner that collects water and separates it from the surrounding dirt so that the pump can push it out. The liner should be perforated and set in a bed of aggregate. Any drainage system that feeds water to the sump should have a pipe cut through the sidewall of the liner. The liner should have an airtight lid that will keep moisture from evaporating into the basement; it also keeps objects from falling into the sump hole that could interfere with the switch operation.
Relying on a lone sump pump to keep the basement dry is risky. It’s all too common for a storm to knock out the power and flood the basement all in one night. A battery- operated backup pump provides insurance and often is equipped with an alarm that announces a pump failure. The backup can usually be installed in the same sump hole as the primary pump and use the same discharge line. The best backup systems use pumps that sit up off the sump floor, have float switches, and use matched chargers and batteries made specifically for long-term standby use. This last item is critical. Many backup units don’t provide a battery; if the battery and charger aren’t matched, the system won’t charge properly. Backup-system equipment can cost from $300 to $1,000.
Discharge from the sump pump should be piped to a storm drain if one is available or to the exterior, where it will flow away. The discharge line should be installed so that it doesn’t freeze during the winter.

Drainage flashing is a simpler, less expensive interior
drain. Installed at the junction of wall and footing, this flashing
has a dimpled profile that allows any water from the walls to flow beneath
the slab and into the sump pump. Obviously, it’s important to keep the
top of the flashing clear when pouring the slab.
Prev: Details for
a Dry Foundation
Next:
Related: Foundations and Concrete Structures