The critical defenses in preventing a wet basement are installing a proper gutter system as discussed in Section 1, Wet Basements, and providing a proper grade on the lawn as discussed in Section 2, Correcting the Grade, thus preventing water from reaching the basement. Because water entry is pervasive, it's very difficult to effectively seal a basement against water entry if any substantial amount of water is allowed to reach the basement wall; water will penetrate the tiniest crack in the basement. Any concrete wall, whether poured concrete or block construction, will have some expansion cracks along its length, and will have a shrinkage crack where the basement wall meets the concrete slab floor. In addition to the cracks, concrete blocks are porous, and water will readily soak through the blocks under hydrostatic pressure. It is important to take every step possible to seal the basement against water entry, but remember that the basement wall itself is the last line of defense.
To prevent the potential damage of having water in the basement, take every step possible to block water entry (see sections 1 and 2). The first is to try to stop the water entry, working from the exterior side of the basement.

Parging: A worker applies 50/50 sand and cement coat to seal and waterproof wall.
SEALING THE BASEMENT EXTERIOR
In sections 1 and 2 we discussed the value of both gutters and a proper grade or slope to the lawn. In this section I’ll discuss several other exterior projects to block water entry from the exterior of the basement.
First, check if window wells show any evidence of water entry. To provide good drainage and to help absorb any water that enters the window well, there should be a base layer of 2 to 4 inches (5 to 10 centimeters) of clean gravel at the bottom of the well. Reset and seal the window wells. Use concrete wall anchors to attach the plastic or metal window well securely against the concrete basement wall, so water can't enter through any cracks between the window well and the wall. Use an acrylic latex exterior caulk to caulk these cracks.
Finally, to ensure against water entry from falling rain or snow, buy and install plastic covers over all window wells. These clear plastic covers permit sunlight to enter the basement windows, but provide a barrier to entry of rain, snow, insects, animals, or dirt. With the help of the plastic well covers, basement window wells will stay clean and dry.
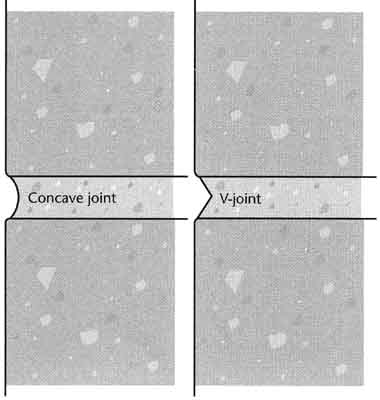
Mortar Joints: Use a joint-striking tool to compact mortar and provide watertight joints.
CAULKING

Caulking Cracks: Caulk all cracks in concrete, such as
where steps meet the foundation wall.
Another point of potential water entry is any crack where an exterior concrete slab, such as a walk, drive, or patio, is immediately adjacent to the basement wall. Remember that caulks usually are used to join two materials that have different expansion ratios and are subject to extreme ranges of temperature, so caulks often crack and must be resealed. In the past, when petroleum-based caulks were the only choice available, re-caulking exterior cracks was an almost endless job because the petroleum caulks become brittle and crack with age. Modern caulks such as acrylic latex and silicone products remain elastic after curing, and will flex slightly as the caulked materials move or expand. Special caulks for patching both concrete and asphalt are available in caulking tubes. Ask your dealer to help you select the best caulk for your project.
Caulk any cracks between asphalt or concrete slabs and the basement wall. To prevent possible water entry, be sure the cracks are completely sealed. For filling large cracks, first pour clean sand or stuff fiberglass insulation into the crack to partially fill it, then seal with a caulk. After the crack is sealed, inspect the caulk seasonally to be sure there are no open cracks. In cold climates it's important to reseal any caulk before freezing temperatures and snow arrive in the fall, and before spring rains begin.
If the exterior of the concrete basement walls is unfinished, use a wire brush to clean away any buildup of dirt or efflorescence (see below), then use a product such as muriatic acid or UGL’s DRYLOK Etch to thoroughly clean the concrete. Then apply two coats of waterproofing paints to the exposed concrete. Choose a paint that's formulated for use on masonry or concrete.

Exterior Sealer: A worker uses a roller or stiff broom
to apply concrete mix to the foundation wall.
WATERPROOFING THE INTERIOR OF CONCRETE WALLS
After sealing the exterior side of basement walls against water entry, move next to the interior. The first step is to clean the concrete walls so the patchers and sealer will adhere properly. Always wear a dust mask when working on concrete.

Interior/Exterior Sealer
Efflorescence is a white-to-gray powder that forms on a concrete surface when moisture activates salts within the concrete. The salts are found in the materials used to make the concrete, and may be sulfates of sodium, potassium, calcium, etc. In order for efflorescence to appear on the surface of the concrete, there first must be salts present in the concrete, and there must be moisture to carry the salts to the surface through evaporation or hydrostatic pressure. To eliminate the surface buildup of efflorescence, take steps to prevent water from reaching the concrete wall, so there will be no moisture to cause leaching or move the efflorescence. Before applying a sealer to the walls, use a wire brush or grinding wheel to remove any heavy buildup of efflorescence. Clean the entire wall with a 5 percent solution of muriatic acid, or with a commercial concrete cleaner such as UGL’s DRYLOK Etch. Wear rubber gloves and eye goggles when using acid or commercial cleaners.
Before starting to patch the basement walls, try to determine if the cracks are merely small expansion cracks, which are common because concrete expands and contracts with changes in the temperature, or are structural cracks that may indicate a serious problem with the structural integrity of the wall. If a crack runs from floor to ceiling, is more than ¼ inch (0.6 centimeter) wide, or if the edges of the crack have become mis aligned, there may be a structural problem with the wall or its footings. If any such crack is present, have a masonry contractor inspect and appraise the condition of the wall before proceeding with waterproofing.
Next, clean any loose concrete or mortar from wall cracks. The major crack will usually occur between the concrete wall and the slab floor because the poured concrete slab contains a large volume of water, and the floor slab will shrink as the concrete cures and moisture leaves the slab.
A wide variety of concrete patch products is available at home centers. The patch product you select should be a hydraulic cement product such as DRYLOK Fast Plug. Hydraulic cement expands as it sets and can be applied even to cracks that are damp, or where water seepage is present in the crack.
Concrete patch products are available in a dry powder form, and are mixed either with plain water or with a catalyst liquid that's included with the box of patcher. Mix the crack patcher and apply it according to the manufacturer’s instructions. Concrete patching products usually are quick-setting, but let the patched areas set for 24 hours before applying a concrete sealer to the walls.
To seal the concrete walls against water entry, choose one of the many available concrete sealers. One premium wall sealer is DRYLOK Waterproofer, containing Portland cement and synthetic rubber. These products come ready-mixed in 1-gallon (4 liter) pails, look much like white latex paint, and can be applied with brush, roller, or sprayer. To be sure the tiny holes in the concrete block are completely sealed, double-roll—i.e., roll the sealer in both directions—or scrub the sealer on with a fiber concrete brush. If you use spray equipment to apply the sealer, be sure to back-brush the sprayed sealer (i.e., brush the sealer out after applying it with the spray equipment). Back- brushing will ensure that tiny pores in the concrete are filled and sealed.
Concrete blocks have hollow cores, and any water that penetrates the blocks may accumulate in these cores. Because water that reaches the basement wall will flow down to the concrete footing level, then rise in the wall, the lower 2 to 3 feet (0.6 to 1 meter) of the wall is most prone to water entry. Because the water penetration usually is in the lower third of the wall, it's best to apply two coats of sealer to this area, with a single coat on the upper two-thirds of the wall.
To begin the sealer application, apply the sealer to the lower one-third of the wall, or whatever portion of the wall becomes visibly wet. Apply a generous coating of the material and work it well into the mortar joints, the corners, and the pores of the concrete. Allow this lower coat to dry as per the manufacturer’s directions, usually for 24 hours, before applying a second coat of sealer.
Starting at the top of the wall, apply a second coat of sealer to the full wall, reap plying over the first coat on the lower portion. Again, to ensure a complete seal, it's important to work the sealer into any joints or pores in the concrete. Allow the sealer to dry. If the wall still has some water seepage, apply a third coat of sealer. When the wall shows no further seepage, follow with a coat of concrete finish paint if desired.

Water Control – Interior: Interior waterproofing includes
baseboard drain tubes, block sealer, drain tubes into bottom row of foundation
blocks, drain pipe, and a vapor retarder under the concrete floor slab.
BASEMENT WATER-CONTROL PRODUCTS
The steps recommended to this point—gutters, proper grade or slope to the lawn, and a coat of waterproofing sealer—will eliminate the majority of wet basement problems. In rare instances, however, it may be impossible to eliminate water entry into the basement. For instance, if a patio or drive slab adjoins the basement wall and slopes toward the basement, the only remedy to keep water out is to remove and repave the concrete slab. If you want a less expensive solution, use a basement water control product, such as the Beaver Basement Water Control system. Keep in mind that the water entry may be through only one wall of the basement, so it's not necessary to install the system along all four basement walls. The wet wall alone will require application of the Beaver system.
The Beaver Basement Water Control system consists of a series of tubular plastic channels that are glued to the basement floor/wall juncture, much like baseboard trim. These must be glued to bare concrete blocks. The water flows into the channels via holes bored in each concrete block core in the bottom row of blocks. From the point of entry, the water flows through the channels to a floor drain or sump pump, which may pump the water through a disposal pipe to a remote spot on the lawn.
To install the Beaver system, drill holes from the basement interior into the hollow core of each individual bottom concrete block. Then insert plastic tubing into each hole. Next, using an adhesive supplied with the system, glue the tubular channels to the concrete floor. The plastic water tubes from the block cores are inserted into the back side of the plastic tubular channels. The tubular channels are adhesively attached to one another, and 90-degree corner connectors permit you to turn the channels around corners if necessary. The tubular channels terminate at the floor drain or sump pump.
Other types of water control products are also available. Many of these plastic drain channels require that you break out a trench in the perimeter of the concrete floor, install plastic tubing to connect the hollow block cores to the channels, then install a sump pump to remove any entry water. Because it's installed against the wall, and you avoid the work and expense of breaking up the concrete floor and then patching the slab, the Beaver system mentioned above is a much cleaner and cheaper installation than those that require breakup of concrete.
WATERPROOFING A NEW BASEMENT
When having a new house or a room addition built, be sure the masonry contractor follows the necessary procedures for ensuring a dry basement. These steps depend upon your region and soil type, which can vary widely over a distance of only a mile or less (¾ kilometer). If you check the soil that has been removed during basement excavations at nearby building sites, you may find that at one site the soil is very sandy, while a short distance away the excavated soil will be heavy black or clay soil. The pre cautions needed to ensure a dry basement may be expensive, but it's best to err on the side of caution to ensure a trouble-free basement.
To ensure that your new basement will be dry, check the building code for the requirements in your area, and check personally as the work progresses to be sure the builder has met those code requirements. Insist on inspecting the open excavation before it's backfilled with dirt, while you can see any drain pipes or water proof coatings. One idea is to photograph the pipes before they are covered, in case of future problems.
WATERPROOFING CONCRETE WALLS
The first barrier to water entry through a concrete wall is the type of concrete block and mortar used, and the way the wall is constructed. The poured concrete or concrete blocks must be made with a high cement content, properly graded aggregates, and a low water/cement ratio.
Air-entrained concrete is concrete that's mixed with additives that improve resistance to freezing and is more watertight because it's more dense than concrete that's not entrained. If you are building a new basement, ask the contractor to use the best quality concrete blocks or mix.
To resist water entry, the mortar joints between the blocks should be no more than ¾ inch (.7 centimeter) wide. Some masons strike or rake the joints, a process that refers to the use of a sharp tool to simply scrape the excess mortar out of the joint. This leaves a mortar joint that may have voids or burrs that can hold water. The best technique is to use a concave or V-shaped tool to smooth or tool the joints so the mortar is tightly com pressed and smoothed on the mortar surface. This approach will help ensure watertight mortar joints between the blocks. (See “Mortar Joints” illustration.)
After the block walls are laid up, the exterior sides of the walls should be plastered with two ¼-inch (0.5-centimeter) thick coats of mortar. This process is called “parging” the walls. The plaster used should be a 1:1 mortar mix, or one part of Portland cement mixed with one part of fine sand. To ensure good bonding between the plaster or parge coat and the block wall, the concrete wall should be slightly dampened before the first coat of plaster is applied. The coating is troweled to form a cove at the footing level to shed water at the joint between the footing and the block wall. The first plaster coat should extend from the footing level up to a point 6 inches (15 centimeters) above the finished grade. To ensure adhesion of the second coat, the surface of the first plaster coat is roughened or scarified while still wet. After the first coat has cured, it's wetted so the second plaster coat will adhere to it.
If the basement is being built in heavy black or clay soils, as extra insurance against water entry, two coats of a bituminous waterproof coating should be brushed on after the exteriors of the walls are plastered with the mortar mix.
In very severe cases an alternative approach is to apply a waterproof membrane over the bituminous coating. The membrane is used to cover the exterior of the wall, from the bottom of the concrete footings to the finished grade. (See “Exterior Sealer” illustration above.)
WATERPROOFING THE BASEMENT FLOOR
Because of capillary action, water from the soil can wick up and penetrate the basement floor slab. In addition to having the contractor waterproof the basement walls, insist on having a vapor barrier laid on the earth or fill before the basement floor is poured. The vapor barrier may be 6-mil polyethylene plastic sheeting, two-ply hot- mopped felts, or 55-pound (25-kilogram) rolled roofing. (Sand is spread over the vapor barrier so it will not be punctured during concrete placement.) Whichever material is selected, the material should be carefully installed, overlapped at least 6 inches (15 centimeters), and sealed at all seams.
PERIMETER DRAIN TILES
As a final barrier to basement water entry, install drain pipes around the exterior perimeter of the concrete footings. These drain pipes are usually plastic and are perforated by small holes on the top. The perforations permit any water that reaches the footings to flow into the drain pipes, which are installed at a slight slope so collected water can flow by gravity to a sump area or to a storm sewer drain.
To install the drain pipes, workers will first place 2 to 4 inches (5 to 10 centimeters) of gravel in the trench as a bed for the pipes to rest upon. Then they install the drain pipes so the bottom of the pipes are level with the bottom of the concrete footings. To prevent soil or silt from seeping into the pipes and clogging them, tar paper is placed over the joints where pipe ends meet. Next, a 12-inch (30-centimeter) layer of washed gravel is placed over the drain pipes. When the gravel is in place, the contractor will use a tractor to backfill the excavation, or to push the soil in place against the basement wall.
In severe cases where there is a high water table, drain pipes are installed on both the outside and inside perimeters of the basement. To avoid an endless battle with water problems, a better choice might be to build a half-basement that extends only 4 feet (1.25 meters) into the ground, such as those seen in a split-level house, or build over a crawl space or a slab on grade.