Stone foundations are not much used these days, but when they are, it’s often under a log house. The two seem to go together. In the right circumstances stone works very nicely, especially for a crawl-space foundation, and is probably the most compatible and attractive foundation a log house could have. And if you have a substantial supply of good stone on hand, more time available than cash, and don’t mind a little hard work, the economics of building a stone foundation are mighty persuasive.
Stone walls laid up dry are more durable than those put together with mortar. They are best used in a crawl-space arrangement where the total height of the wall is about 4 feet or less. This makes a shallow crawl space, with the wall about a foot above finish grade level on the outside, 2½ to 3 feet above grade on the inside, and approximately 1 to ½ feet completely buried in the ground. The thickness of the wall should be about 2 feet at the bottom and a minimum of 16 to 18 inches at the top, with the outside face vertical (approximately plumb), and the inside face either vertical or slanted back slightly.
Full-height foundation walls can also be made from stone, but this is a big job that has to be done exactly right in order to avoid difficulty. And, of course, moisture incursion is un avoidable in such a dry-laid wall, and nearly as problematical in a mortared one. All things considered, other methods are easier and do a better job.
Even a low foundation wall must be correctly and sturdily built if it's to stand up to the weight of the house and the forces of time and the elements. But it certainly can be done. Disbelievers in this system have only to look at the 200-year-old houses—many of them quite large—still standing today foursquare and strong on dry-laid stone foundations. Proper stone wall building is as much of an art as it's a craft, and there are a great many details involved in the process, too many to delve into here. The do-it-yourselfer who wants to build a stone foundation is advised to do some re search to see how the job is done, and then practice by building a small, freestanding stone garden wall or something similar before starting in on a foundation.
The basic procedure is to first lay out the foundation in the usual manner (which will be explained at the end of this section). Then make the required excavation or trench cuts, calculating the depth so that the bottom of the stone wall will lie about a foot or a little more below the bottom of the crawl-space floor. Bed the first course of stone (usually consisting of two parallel and partly interlocking rows, but sometimes three and occasionally only one) solidly into the subsoil at the trench bottom. Subsequent courses are laid up by carefully fit ting and locking the stones together, with a little trimming or shaping if necessary, and setting tie-stones crosswise in each course about every 3 or 4 feet to help lock the rows together. The best stones should be saved for the top course, which must be laid flat and level, and should preferably be large enough to cover the full thickness of the wall. Anchor bolts are not used in a dry-laid stone foundation (which might be against code in many places), and the heavy sill logs or beams just lie on top of the foundation, held in place by the rigidity of the framing and the weight of the structure. Ventilation ports are not needed for the crawl space either, because there is ample air movement through the cracks in the stonework. Figure 4-21 shows a typical rubble- stone or fieldstone crawl-space foundation wall.
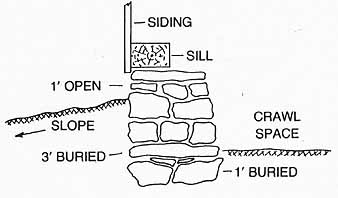
Fig. 4-21. Cross-section of a typical crawl-space foundation wall
made of field stone.
In areas where such a foundation is not permissible because of a lack of sill anchoring, there is another way to achieve the same effect. Set the house on a pier foundation, correctly engineered for the structure. Then, instead of using a conventional skirting material, fill in the spaces between the piers with short stone wall sections. With a little ingenuity, you can arrange a slight setback for the piers, so that you can face them with thin stone slabs and give the appearance of a solid stone foundation.
It should be noted that either of these stone foundation systems can be laid up with mortar, rather than dry. In some regards, this makes the job of laying a bit easier, and the result is certainly attractive enough if the mortar joints are nicely tooled and the stonework cleaned of residue afterward. There is one point to keep in mind: Don’t use gobs of mortar slap-dash and make the mistake of relying upon the mortar joints to make up for the lack of strength and stability of poorly fitted stones. Fit the stones first, as you would with a dry-laid wall, for the best positioning and interlocking you can. Then make sure each stone is clean—no dirt and grit—and lay the mortar bed in relatively thin joints. Also, be sure to make provisions for ventilation ports when building mortared stone foundation walls (not necessary with most dry-laid walls).
There is another way to create the appearance of a full stone foundation wall, which can be used with either crawl-space or full- basement foundations. This method employs poured concrete foundation walls built up in the usual way. Mark a line on the forms to indicate a point slightly below the planned finish grade level. The concrete being poured into the forms should be as stiff as is practicable, and when the grade level line is reached, stop pouring. Then place preselected stones of any face size, but only about 4-inch thickness, on the fresh concrete with their faces tight against the outside form wall. As they are placed, slowly pour additional concrete so it settles around them. As the first row of stones is set the second is begun, and so on until the top of the form is reached.
This is a fairly slow process which should be done in sections, so the concrete does not start to cure before all the stones are properly embedded. Each section should be preplanned, with the stones laid out on the ground in the desired pattern and then transferred to the wall. Two or three people working in coordinated fashion to set the stones and keep the fresh concrete coming behind them helps to speed the job along.
When the forms are later stripped away, the upper portion of the concrete walls will present a rock facing (Fig. 4-22). The joints between the stones probably won’t have much concrete in them, and the appearance will be rough and ragged. This is easily taken care of by filling the joints with mortar applied with a small pointing trowel. Tool the joints smooth and dense as the mortar sets up, and then clean them of residue later on.

Fig. 4-22. Stone can be bedded into the exterior visible portion of
a poured concrete foundation wall to simulate a stone foundation.
There is a variation on this theme that some masons prefer, and which might be easier in some circumstances. It also has the ad vantage of being usable with concrete block as well as poured concrete walls. The foundation is poured or laid up in the usual fashion up to a point just below the planned finish grade level. At this level, the outside face of the wall is stepped back 4 to 6 inches, and continued to the top at a reduced thickness; the lower section of the wall may be made thicker than usual in compensation. After the concrete or mortar joints have cured, a veneer of flat stones is mortared into place in the setback area, filling the wall out and giving the appearance of a solid mortared stone wall. Often ties or tie-wires are partly embedded in the concrete or block wall as it's built, then the free ends are bedded into the stonework mortar to help secure the veneer in place.