Though not quite as strong and perhaps not quite as satisfactory from a few other stand points, the concrete block foundation is easily as popular as poured concrete. There are some advantages to this type of construction: Ready-mix concrete is not really essential, the individual blocks are relatively easy to handle, and the blocks are easily laid (especially some of the new types of system blocks). The job can be done by one person alone and in piecemeal fashion as time and energy dictate. Also, the cost is likely to be less than for a poured foundation.
There are two kinds of blocks in general use: concrete, which are made with stone as the aggregate, and cinder, which contain cinders instead of stone. The concrete variety is stronger and heavier, and preferable. The standard 8- x -8- x -16-inch block is satisfactory for most jobs, but large, heavy houses might re quire the 12- x -12- x -16-inch size. Though there are many different shapes of block avail able, foundations usually require only four or five configurations at most.
The bulk of the walls consists of standard stretcher blocks, which are flanged at each end. Building up corners requires corner blocks, which are flat on one end and flanged on the other. In the standard half-overlay or running bond construction, half-blocks are needed to fill out the courses. Some masons use 4-inch- thick solid blocks as a cap or final course on the walls, and they can also be used where a half-height course is needed. Door and window openings might require the installation of beam or lintel blocks above the openings, and specially molded jamb blocks are sometimes used on the sides of these openings. Special sizes or shapes can be cut on the job with a power masonry saw, or by careful chipping with a mason’s hammer or block chisel.
When figuring out the details of a concrete block foundation, you can save some labor by calculating the overall dimensions to agree with the modular sizes of the blocks. Stay with multiples of 4 or 8 inches for height and 8 or 16 inches for length wherever you can, so as to reduce or eliminate the need ‘for cutting blocks to odd dimensions.
As with the poured concrete, a block foundation wall requires a substantial footing. This footing is designed and built in exactly the same way as a poured foundation wall, but without the keyway on the footing top. After the footing has cured sufficiently (3 days mini mum), the block laying can begin. Start by spotting the first corner, and snap a chalk line all the way around the footing to denote the exact position of the blocks. The blocks should be centered on the footing; find the centerline, then measure outward (or inward) half the width of the block and snap the guideline. Check these lines for accuracy, and make sure that the overall dimensions match those of the floor frame of the building and are properly squared. If the footings turn out to have been poured a little cockeyed, you will have to ad just the block guidelines. And if the block wall tops don't come out just right, you will have problems constructing the floor frame to the correct dimensions.
The next step is to lay out a full course of block dry (use no mortar) on the footing top, spaced ¾ inch apart to simulate mortar joints, all around the footing to make sure that the blocks will line up properly.
Now mix up a batch of mortar. You can do this by combining bulk ingredients from scratch, using a ratio of 1 part masonry cement to 2¼ to 3 parts damp loose sand, with just enough water to make a plastic, workable mix. This is the best way to go if you will be laying a lot of block. Or, you can opt for a pre-pack aged mortar mix to which only water need be added; this costs more but is also more convenient if only small quantities of mortar are needed. You can mix the mortar in a wheel bar row or mortar tub by hand, or use a small power mixer. The latter provides a more uniform and workable mix, faster and with less effort. Combine and stir up the dry ingredients first, then add the water. Mix for 5 minutes at least by hand, and about 3 minutes by machine.

Fig. 4-9. Laying a full mortar bed on the footing top.
Start at one corner and lay a full bed of mortar along the footing top to an extent that will handle four or five blocks. Furrow the mortar out along the centerline with the trowel tip so that the bed is at least as wide as the blocks (Fig. 4-9). Set the corner block down into the mortar, held flat, accurately positioned and aligned, and push it down until there is a inch mortar joint between it and the footing. Stand the next three or four stretcher blocks up on end and butter the flanges with mortar (Fig. 4-10). Set these blocks successively by lowering them in a combined down and forward motion to form both the bed joint and the head joint between the flanges (Fig. 4-11). This head or vertical joint should also be ¾ inch.

Fig. 4-10. Buttering the block flanges prior to laying.

Fig. 4-11. Setting the blocks into place in the first course.
Check to make sure that all the blocks are aligned with one another by running a straight edge along their sides. Check that they are level by laying a long spirit level across the tops. Then ascertain that each block is plumb, or straight up and down. Make any necessary adjustments by gently tapping the blocks with your trowel handle (Fig. 4-12), but don’t move them so much that the mortar joint breaks. If this happens, remove the block and begin again; a broken joint can't usually be reset by wiggling or pressing on the block. When the blocks are in final position, scrape away the excess mortar that has curled out of the joints and flip it back onto the pile for reuse.
When this set of blocks is squared away, perform the same operation starting at the same corner but in the opposite direction. Then start right in again on the second course, again be ginning at the corner. Lay a face shell bed of mortar atop the first-course blocks by buttering just the outside edges and not the crosswebs. Lay the second course of blocks in place in a half-overlap pattern in the same fashion as you laid the first course, leveling, plumbing, and aligning as you go, making 3 joints. The second course will be a half block short of the end of the first course. Continue building the corner in this fashion until you have a corner pyramid with only one block on the top (Fig. 4-13). Five or six courses in height is about right. Then move on to the next corner and do the same thing all over again.
At this point you can either go back and fill in between the two corners you have just completed, or you can go ahead and build up all of the remaining corners. Filling in between corners is merely a matter of laying successive stretcher blocks (Fig. 4-14) until the gap is closed. Use a full mortar bed under the first course, and a face shell bed on succeeding courses.
At some point in each course you will come to a place where one block or half block will complete the course. This block is called a closer, and is handled a little differently than the others. Butter the face shells of the lower- course blocks upon which the closer block will rest, and the end flanges of the two blocks that form the opening to be closed. Then butter the flanges or edges (a half-block might have one or two smooth ends) of the closer block ends. Hold the closer block directly over the opening and slide it slowly and carefully straight down into place without dislodging the mortar (Fig. 4-15).

Fig. 4-12. Tapping the first set of blocks level.
If your wall is only a few courses high, that’s all there is to it. If you are building full-height foundation walls, go back to the corners and build them up into pyramids once more, to the required height. Fill out the courses to complete the wall.

Fig. 4-13. Laying up a corner pyramid of block.
Whether the wall is low or high, the final course requires some additional treatment. The last course should be sealed off so no moisture or wildlife can get down into the hollow cores of the blocks. One way to accomplish this is to make the last course of solid blocks, which are available in several modular thicknesses. These blocks are laid just the same as the others. Another method, which allows easy installation of anchor bolts to secure the sill, is to complete the wall up to the next-to-last course. Then lay a strip of screening or hard ware cloth on top of the course just wide enough to cover the core openings. Lay the top course of standard block in the usual manner, sandwiching the screening into the mortar joint (Fig. 4-16). Then fill all the core spaces in the top course with mortar (Fig. 4-17). At the same time bed the anchor bolts into the mortar, about a foot from each corner and 4 feet in between.
Window and door openings are built in as the block-laying goes along. The opening sizes are calculated to match the block dimension modules wherever possible, to save cutting. Sturdy and well-braced wood frames, or ready- made door bucks, or sometimes steel frames, are set in place at the proper course level and the block laid up around them. Special-purpose blocks are sometimes used here. Lintel blocks are laid over the openings and then filled with mortar or concrete along with a few lengths of reinforcing rod. Placing window openings so their tops are even with the wall eliminates the need for lintels, and the sill or sill plate acts as a header over the opening.
There are two kinds of block systems, relatively new to the market, that are ideal for do- it-yourself block foundation building. Both are code-approved and available in most places. These are the stack-block or interlocking block system, and the surface-bonded masonry system.
Working with stack-blocks (Fig. 4-18) is simplicity itself. The first course is laid in the usual manner in a mortar bed on a footing, but without any mortar between the end joints. The blocks are made with interlocking tongues and grooves, and are just slid together until they mate. From there to the top of the wall, no more mortar is used. Simply stack the blocks in the half-overlay pattern, dry, with the tongues and grooves mated. Leveling and plumbing and adjusting each block is not necessary, though the walls should be checked for plumb after stacking.
Special sash blocks are used to box out door and window openings, with bond beam blocks set over the tops of the openings. The top course of the wall must also be made up of bond beam blocks, all the way around. The top corner blocks are fitted with both vertical and horizontal lengths of reinforcing rod, and then the corner cores and the bond beam blocks are filled with grout, a slurry of cement and sand. In some cases, especially very high walls, extra vertical reinforcing rods are inserted and grouted into place for extra strength. All of the details, which vary a little depending upon the manufacturer, can be obtained from the supplier.

Fig. 4-14. Laying
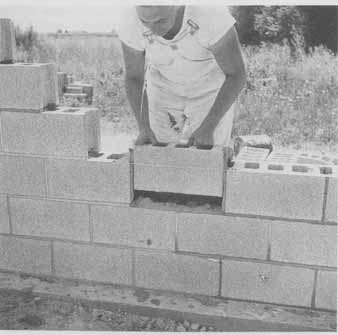
Fig. 4-15. Setting a closer block to complete a course.

Fig. 4-16. Laying the top course of block over wire lath sandwiched
into the mortar joint.

Fig. 4-17. Filling the top-course cores with mortar, which bonds to
the block and to the wire mesh sandwiched in the joint below.

Fig. 4-18. A typical stack-block configuration; no mortar joints are
used.

Fig. 4-19. Surface-bonded blocks are held together with a thick coating
of special bonding material troweled onto both the inside and outside
faces.
The surface-bonded masonry system (Fig. 4-19) uses conventional concrete blocks, avail able anywhere. Like stack blocks, the first course is laid in a bed of mortar atop a suitable footing, with the ends butted up against one another without any mortar joint. In this case, allowances must be made for the lack of mortar joints in a block wall that's supposed to have 3 joints vertically and horizontally; each block will leave you ¾ inch short of the standard module. As with a standard block wall, great care must be taken to keep the blocks properly aligned and perfectly plumb.
Once the first course is laid, the blocks are just stacked up dry in whatever configuration is required. Then both surfaces of the walls, in side and out, must be plastered over with a special coating, which is laid on ½ inch thick with a trowel. This coating, made up of cement, additives, and glass fibers, bonds the blocks together and seals them against dampness and the weather. As with the other systems, the top courses should be filled with mortar or grout and anchor bolts placed as necessary. The end result is a clean, smooth, virtually weatherproof, sturdy foundation that's easy to lay up.