How to Repair a Joist
Odds are that the joists in an old home have suffered considerable damage over the years. Perhaps a small crack formed into a bigger one, or maybe someone cut into a joist for reasons that seemed reasonable at the time. Damaged joists, regardless of the cause, must be repaired before a new ceiling is installed. Not all cracks compromise the strength of the joist; however, if the joist is sagging or if the crack runs clear to the bottom edge of the joist, it must be repaired. Only in rare cases is it best to remove a joist, even if it’s seriously damaged. Keep in mind that the floor sheathing is nailed into the floor joists, so pulling a joist risks damaging the finished floor above.
An existing joist may be reinforced and repaired by attaching a same-sized joist alongside it; this is called “sistering.” The new lumber must be as long as the existing joist and of the same depth, and it’s supported in the same locations. Maneuver the new joist into position (cutting off one corner of the joist may help), push the old joist back where it belongs, and then use 16d nails to nail the two together.
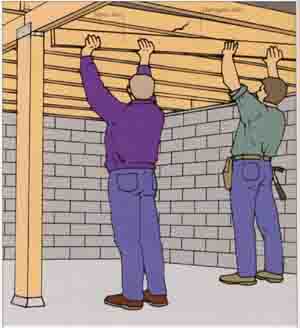
Figure 20: A piece of lumber that’s attached to the side of a joist
to strengthen it’s called a “sister.” It should be almost the same length and exactly the same depth as the joist it supports. Cutting off the
corner of opposite edges of the joist can help put it into position.
Reducing Moisture
A basement can’t be turned into a livable space unless it’s guaranteed to stay dry. Water problems range in seriousness from mild condensation and seepage to periodic flooding. Given enough time and money, all water problems can be solved, but that doesn’t mean the effort is justified.
How to Determine the Source of Water or Moisture
Assuming that the plumbing doesn’t leak, basement moisture comes either from seepage (water from out side the house leaking through walls or floor) or from condensation (the result of warm, moist air hitting a cold masonry wall or cold water pipes). The source of the water may be identified by conducting a simple test. If condensation is the problem, get rid of it by either installing a dehumidifier in the basement or insulating the walls and water pipes.
Seeping water is harder to get rid of because it might be coming from any or all of these sources:
Gutters: Those that don’t direct water away from the foundation are a problem. Clogged gutters let water spill over and run down the siding toward the foundation wall. Leaders that dump water near the foundation encourage water to soak in at exactly the wrong places. Use splash blocks or leader extensions to direct water away from the house.
Poor Grading: If the grading slopes toward the house or allows water to pool near the foundation, it’s a problem. To conduct water away from the foundation, the grade must drop at least 6 inches in 10 feet all around the house. Fill in pockets that encourage water to pool.
No Footing Drains: Some water inevitably reaches the bottom of the foundation but it won’t be a problem if perforated pipes, known as “footing drains”, lead it away. Most newer homes have footing drains but older houses might not. Drains can be added to older houses, though not without quite a bit of effort. A contractor is need here. It requires the use of heavy equipment to excavate the entire perimeter of the foundation. It also involves placing gravel sub-drains; installing perforated piping for the main drains, and lastly, backfilling and re-grading.
Cracked Foundation Walls: Water will ultimately get through even the smallest cracks -- use hydraulic cement to patch all cracks.
Pipes / Electrical Lines: The problem isn’t the pipe or the line; it’s the gap (channel) around the pipe and the line that leads water into the basement. Seal gaps with hydraulic cement or silicone sealant (a high-performance product similar to silicone caulk).
Badly-Waterproofed Foundation: A foundation such as this allows moisture to migrate directly through the masonry. Concrete and concrete block are not waterproof. The outside of every foundation wall is supposed to be waterproofed before backfilling. If the foundation wasn’t waterproofed or if the waterproofing failed, the solution isn’t something for the beginner. Similar to installing new footing drains, extensive excavation is usually required.
Proximity Vegetation: Plants retain moisture in the soil, and their shade reduces the evaporation of ground moisture. Both factors add to water problems. Also: plants that require a lot of deep watering add moisture to the soil that could seep in.
High Water Table: The water table varies in depth from area to area and even from season to season. Not much can be done about the level, but foundation drains and sump pumps can help conduct water away before it becomes a problem.
Sealing a Masonry Wall
Even if the basement isn’t to the types of water issues that present themselves as active drips, moisture might still be seeping through the masonry itself. This kind of moisture movement can be halted by sealing the walls from inside the basement. Even if the walls appear “dry,” sealing them is a wise precaution. After all, it does not take much moisture to warp wood paneling or to encourage a musty smell. To seal the walls, brush them with a product that contains portland cement and synthetic rubber. This product goes by many names: cement paint, waterproofing paint, basement paint, or basement waterproofer. Though some brands claim to keep out water that's under a modest amount of pressure, nothing applied to the inside of the walls can solve serious water problems. After applying a waterproofing paint, paint over it with a quality latex paint.
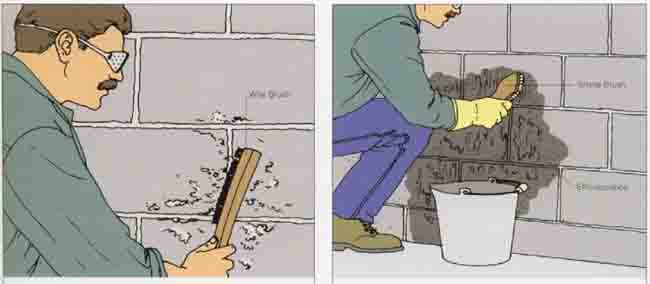
1. Use a scraper and a wire brush to remove loose mortar and dirt, and then vacuum the wall to remove the remaining dust and debris. 2. Use a bristle brush and a mixture of etching compound and water to remove efflorescence on the surface of the masonry. Wear rubber gloves and eye protection.
1. Cleaning the Surfaces. Use a wire brush to remove loose mortar and dirt from the walls. Sealing is most effective on a wall that has never been painted, but if all of the old paint is removed, the sealant still has a chance to do its job.
2. Removing Efflorescence. A harmless, white, crystalline deposit called efflorescence some times forms on concrete or concrete- block walls. It’s caused by water- soluble salts within the masonry that migrate to the wall’s surface and interferes with the bond between the and then use a trowel to force the cement mixture into cracks and holes. Use the trowel to smooth out patched areas immediately.
5. Plugging Other Water Problems. Water seepage may also be a problem at the juncture of floor slab and walls. Use a liberal amount of hydraulic cement to seal the area, and then smooth it with the trowel.
6. Applying Waterproofing Paint. Once the hydraulic cement has cured and the wall is dry, use waterproofing paint to seal the walls. Make sure the work area is well ventilated. For best results use a wide nylon bristle brush to dab the mater al into the pores of the masonry. Allow the first coat to dry overnight, and then apply a second coat.
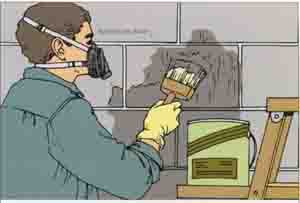
6. Use a wide nylon paintbrush to apply masonry waterproofer to the walls. Work it into the rough surface of concrete block.
Correcting Severe Water Problems
If water continues to enter the basement despite efforts to seal the walls from the inside, the problem must be tackled from the outside. If an excessive amount of water builds up in the soil just outside the foundation, it will be forced (by hydrostatic pressure) through the masonry. Water that's under a modest amount of pressure can be sealed out with waterproofing paint; however, large amounts of pressure can defeat any product that's applied to the inside of the wall. A waterproofing layer that's applied to the outside of the foundation is far more effective. This is because the more pressure is applied to it, the tighter the waterproofing adheres to the wall. However, it’s not easy to waterproof the outside of the foundation, and it’s expensive. Because all possible strategies involve a good bit of excavation, this work is best left to a contractor. The work typically involves digging down to the footing, installing a system of drainpipes to redirect water around the house, and applying a protective waterproofing membrane to the outside of foundation walls. Compare several estimates before signing a contract.
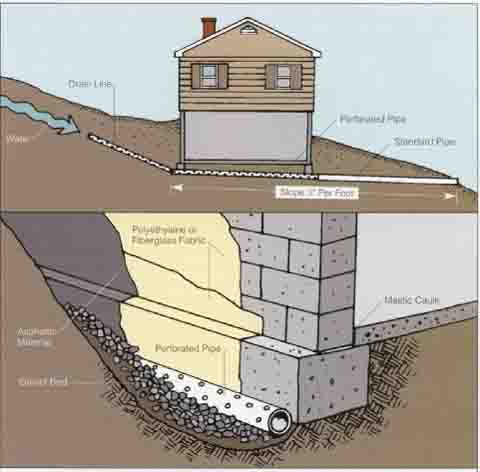
Correcting Severe Water Problems . Severe water problems can be corrected by intercepting water before it reaches the foundation (top) or by waterproofing the foundation itself (bottom), or both.
Sump Pumps
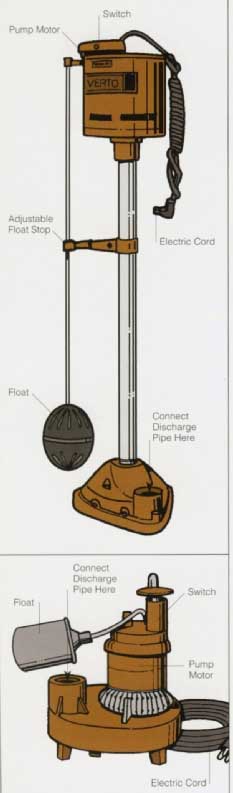
Types of Sump Pumps. The pump motor on a pedestal pump (top) stays clear of the water. The pump motor on a submersible pump (bottom) is immersed in the water.
One way to keep the basement dry is to install an electric sump pump. This device draws water from beneath the slab and pumps it away from the house. The pump sits in a hole, or sump, that extends below the slab. When water collects in the sump, the pump turns on automatically and removes the water through a plastic discharge pipe that exits the basement above grade.
The installation of a sump pump calls for wiring, plumbing, and concrete- demolition skills. A pump must not be the only thing standing between you and a flooded basement, however. After all, pumps do fail. A sump pump may be part of a strategy to keep water out, but if water problems are severe, footing drains may have to be installed as well.
Types of Sump Pumps. There are two basic types of sump pumps. A pedestal-type pump features a raised motor that does not come in contact with water. Instead, it sits on top of a plastic pipe that extends into the sump. Water rising in the sump causes the float to rise and turn on the pump. When the water level drops so does the float, turning off the pump. With a submersible pump, the entire pump sits at the bottom of the sump pit and is submerged every time the sump fills up with water. A float on the pump triggers the on-off switch. Either type of sump pump removes water effectively. Consult a plumber or a pump supplier to determine the best one for your particular situation.
Installing a Sump Pump
In addition to plumbing codes, the pump installation must conform to electrical codes, which in general terms means that the pump must be supplied by a dedicated 15-amp circuit. The following step-by-step project is a guide to how the work usually is done, but be sure to check local codes and the manufacturer’s instructions that came with the pump. The exact dimensions of the sump pit, For example, depend on the size of the liner (sometimes called a basin). Purchase the pump and the liner before starting work.
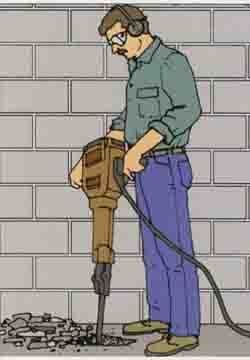
(24-1.jpg) 1. To reduce the amount of work involved in digging a sump,
rent a jackhammer, as shown, or a rotary hammer. Be sure to wear safety
glasses and hearing protection when using either tool.
1. Digging the Sump. The sump pump is located in the lowest part of the basement so that water naturally drains to it. The whole point of installing the device is to keep water out of the basement to begin with, of course, but it’s still prudent to locate the pump this way. Turn the basin upside down, and use it as a template to scribe a circle on the floor; the circle’s centerpoint must be about 16 inches away from both walls. Creating a hole in a 4-inch-thick slab is not easy work, so rent an electric jackhammer or a heavy-duty rotary hammer for the job. Wear safety glasses, and remove concrete up to the layout line. Then dig out the soil and gravel beneath the slab—the depth depends on the size of the liner (usually about 24 inches). Periodically slip the liner into place to see if it fits.
2. Installing the Liner. The liner is a plastic tub with holes in the sides that allow ground water to seep into it. Some liners have a lip at the top that covers the edges of the concrete. Once the hole is deep enough, slip the liner into place, fill in around it as needed with gravel, and (if necessary) use hydraulic cement to seal the edges of the hole.
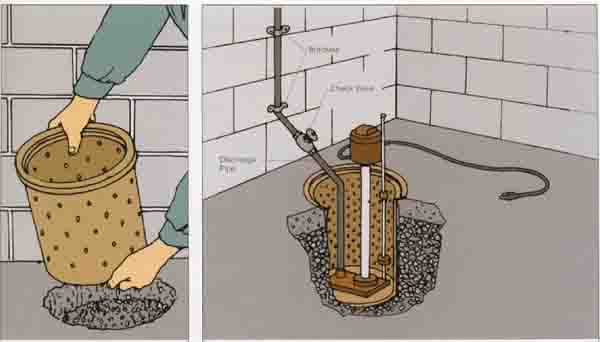
(25-0.jpg) 2. Slip the liner into place, and fill in with gravel
as needed; 3. The discharge pipe is usually PVC and must be secured
to the foundation walls with support clamps.
3. Connecting the Discharge Pipe. Check the manufacturer’s instructions that came with the pump to determine the type of discharge pipe needed and the necessary diameter (usually 1 7-inch PVC pipe). Attach a piece of pipe that's long enough to reach the pump itself (submersible type) or the intake housing (pedestal type). Then lower the pump into the sump and connect additional discharge pipe as needed. Support clamps must secure the pipe to the foundation walls, and a check valve must be used somewhere in the discharge piping to keep water from draining back into the sump. If the pump has to be removed for servicing, disconnect the discharge pipe at the check valve. It usually has a threaded fitting.
4. Cutting the Rim Joist. It’s usually easiest to route the discharge piping out through the rim joist. Afterwards, use caulk to seal the hole. Be sure that the end of the discharge pipe does not dump the water against the outside of the foundation walls. A splash block can be used to direct water.
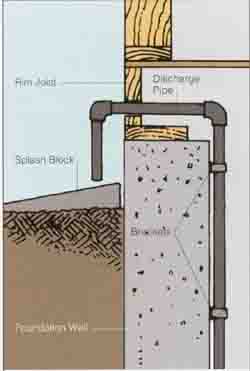
(25-1.jpg) 4. Cut a hole in the rim joist, and route the discharge
pipe through it. Direct water away from the foundation wall.
5. Wiring and Testing the Pump. Check local electrical codes to see whether a ground-fault circuit interrupter (GFCI) is required for a sump pump; then run wiring from the service panel to the general location of the new pump. The pump itself has a long electrical cord and three-prong plug, so you must install a grounded receptacle for it. This arrangement makes it easy to disconnect the pump should it ever need servicing. The box is typically located high on a wall to avoid splashes caused by the pump itself. (Check local codes for spe cifics.) Use masonry anchors to secure a 2x4 to the foundation wall. (See page 36.) This provides a secure base for installing the electrical box. After installing the discharge pipe, plug in the pump and pour water into the sump. The pump begins to work when the sump is about half full. As water flows through the discharge pipe, check all connections for leaks.
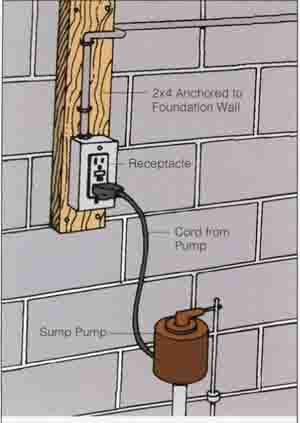
(26-0.jpg) 5. Use a 2x4, attached the foundation walls with masonry
anchors to create a base for installing the electrical box.
Basic Stair Dimensions
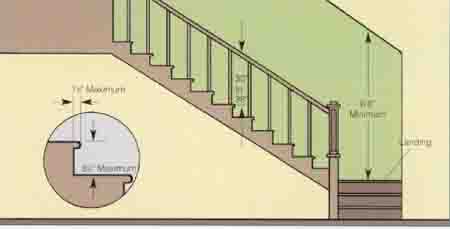
Your local building codes are the last word on stair dimensions but the following can be a guide.
• The width of the stair must be at least 36 inches. Measure between finished walls.
• Nosings (if used) must not project more than 1 1/2 inches.
• Headroom must measure at least 6 feet 8 inches from the tip of the nosing to the nearest obstruction at all points on the stair.
• The ratio of riser height to tread depth should total 18 inches. The ideal riser height, For example, is 7 inches and the ideal tread depth is 11 inches (7 + 11 = 18). Risers must be no more than 8 1/4 inches high; treads must be at least 9 inches deep.
• All stairs made up of three or more risers must have a 30- to 38-inch handrail on at least one side. Handrails are measured vertically from the tip of the tread nosing. The end of the handrail must return to the wall or terminate hi a newel post.
• Landings must be the same width as the stair and at least as long as they are wide.
Stairs
One advantage to adding new living space in the basement rather than the attic is that a stairway already is in place. It may be suitable just the way it's , but in some cases it must be rebuilt. Building codes are strict when it comes to stair construction, in part because small variations in details such as step height make a big difference in the safety of the stairs. For a basement conversion, you may decide to insulate the concrete floor with a system of wood sleepers and rigid insulation capped with plywood and carpeting. The thickness of this assembly changes the height of the last step on the stairs; it becomes shorter than all the others by the thickness of the new floor system. Unless this problem is corrected, the stairs won’t be safe, and the project won’t pass code inspection. Unfortunately, in this situation the stair carriage can't simply be raised—the stairs have to be rebuilt. There are other reasons to rebuild a stairway, too. Though basement stairs in all newer houses have to adhere to the same codes as those anywhere else in the house, this was not always the case. If your house is an old one and the basement stairs are uncomfortably steep or poorly constructed, they must be rebuilt. This can usually be done without enlarging the stairwell itself. If it’s necessary to build stairs, consult a reputable guide on stair building.
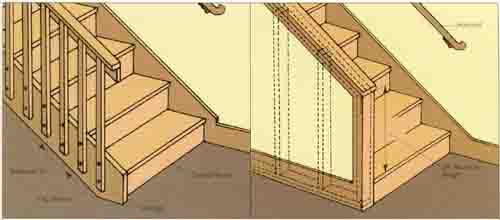
(27-0.jpg) Adding a Balustrade
Many existing basement stairs may not be up to code. In particular, handrails and railings often are mis sing or inadequate. If the stairs are usable otherwise, however, handrails can easily be added to an existing stairway. Balusters are bolted directly to a stringer; bolts or screws can be countersunk and concealed with wood plugs. Space the balusters so that the opening between them is no more than 6 inches measured horizontally. The top of the handrail must be easy to grasp.
Another option is to partly enclose the stairs on one side with a wall that follows the stairway pitch. A handrail can be placed either on the partial wall, on the full wall, or on both. The partial wall can be built just as if it were a partition wall with a slanted top plate. The stringer is securely fastened to the studs of the partition wall. Cover both sides of the new wall with drywall or paneling.
Concealing Mechanical Equipment
A basement is packed with remodeling obstacles, including sump pumps, water pumps, water heaters, pipes, ducts, drains, and furnaces, among other things. It’s easiest to avoid these items from the start, so try to work the design around them. If they can't be avoided, however, often they can be concealed.
If the furnace shares space with basement living areas, safety is the most important issue to consider. The furnace is best located in a separate room, though it can share the space with other mechanical equipment such as the water softener and water heater. Local building codes may regulate the size and details of the room; check them for specifics. Generally, however, a furnace room must have a door that's big enough to remove the largest piece of equipment, though in no case can the door be less than 20 inches wide. The room must contain an unobstructed working space on the control side of the furnace that's at least 30 inches wide and 30 inches high. It’s also a good idea to provide a light that's controlled by a switch near the door.
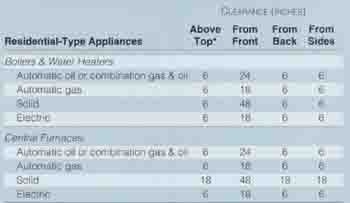
(27-1.jpg) Clearances For Heating Appliances
Be sure to vent the room so that there is enough incoming air for a combustion-type furnace. The amount of air required depends on the type and capacity of the furnace; check with a local heating contractor.
As a safety precaution (particularly if someone is to sleep in the basement even occasionally), install a carbon monoxide detector. Carbon monoxide is a colorless, odorless, and potentially lethal gas that's a by-product of combustion. Under normal circum stances carbon monoxide is vented out of the house, but a faulty furnace or gas water heater may cause it to leak into the basement. A detector sounds an alarm when it senses car bon monoxide.
Building codes regulate the distance between heating appliances and combustible walls, so check local codes before building a room for the furnaces and other appliances. In the meantime, however, the table “Clearances For Heating Appliances” provides an idea of what is required.
Service Corridors. Combustion furnaces are supplied with fuel via fuel lines. These fuel lines have a fuel filter that must be accessible for periodic maintenance. Fuel lines must never run beneath flooring but can be hidden behind a partition wall. By leaving about 24 inches between the partition wall and the foundation, a service corridor is created and can be used for ready access to the line. A service corridor also can be used to maintain access to other devices, such as a sump pump or a water pump.
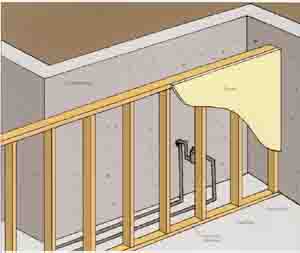
(28.jpg) Service Corridors. By leaving about 2 ft. of space between
a foundation wall and a partition, a service corridor is created and allows for easy access to various devices.