A continuous wall of concrete block resting on a footing of poured concrete is the most expensive foundation for a vacation home and the hardest to build—but it's the strongest, the most permanent and the most weather-tight. It may be required by a local building code; in any case it's generally necessary for heavy buildings like log cabins, for maximum protection in earthquake or hurricane country, and for unstable soil that can't support the pin-point load of piers or poles. In other situations, the advantages outweigh the cost. In very cold country, for example, concrete block is often preferred to elevated foundations because it's easier to insulate and because a water heater and plumbing pipes can be housed in a weather-tight crawl space.
The length of each wall in a block foundation must be a multiple of 8”—half the length of a standard masonry block—or the walls will not fit together properly. The footings must ex tend at least 18” below ground— more where the frost line is deeper—and the walls must rise 24” above grade level, to protect the wooden floor and walls from moisture and termites.
To determine the number of blocks you need for the foundation walls, multiply their total length in’ by the number of courses, then by .75. The mortar can be made either from 1 part (by volume) portland cement, 1 part hydrated lime, 6 parts damp sand, and water; or by combining 1 part premixed masonry cement, 3 parts sand, and water.
If you need deep trenches for the footings, you probably will want to get a backhoe operator to dig them for you; in any case, don't try to dig deeper than 4’ unless you have had extensive experience that will enable you to prevent dangerous cave-ins. Have dirt dumped just outside the trenches, in low mounds that will not block the chute of a concrete truck; then, after the floor joists are installed, you can backfill around the foundation wall with the same dirt.
For a project of this size, it's usually easier to have the concrete delivered in a transit-mix truck than to mix it yourself. Order one cubic yard of concrete for every 22 linear ft. of footing. If possible, clear the site so the truck can back up to each side of the building and pour the concrete directly into the footings. Otherwise, assemble a group of helpers with wheelbarrows and plywood chutes.
Planning and Pouring the Footing
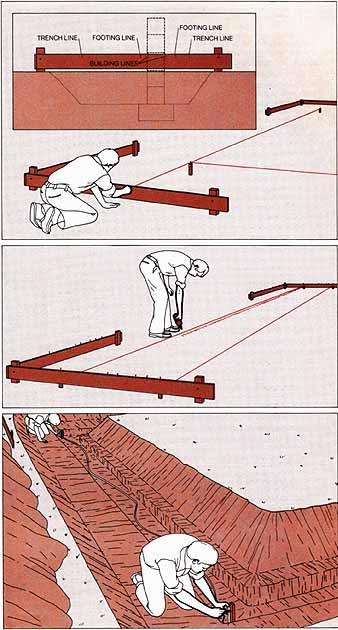
1 Laying out the building lines. With stakes and two steel tape measures lay out the outside of the foundation walls, using the 3-4-5 triangle method to get right angles at the corners. Drive stakes at two adjacent corners of the planned buildings, drive nails into the tops of the stakes and stretch a string taut between the nails to indicate one side of the building. Exactly 3’ along the string from one corner stake, drive a measuring stake and nail. Have one helper hook a tape over that stake, and a second helper hook a tape over the corner stake; swing the tapes across each other. Where the 4-foot mark on the corner-stake tape and the 5-foot mark on the measuring-stake tape cross, drive another measuring stake. Use this stake and the corner stake to establish the second side of the building, measuring the length of the wall along a line running through the two stakes and driving the third corner stake and its nail at that point. Locate the fourth corner in the same way (inset), using the previously established corner stakes and additional measuring stakes to create a 3-4-5 right triangle (dashed lines).

For greater accuracy, you may prefer to use triangles based on multiples of 3, 4 and 5’ — 9-12-15, for example. And to check your layout, compare the diagonal measurements between corners, which should be identical.
2 Making and marking batter boards. Transfer the building lines to structures called batter boards, which serve as reference points. Drive three 2-by-4 batter-board stakes about 5’ out s de each corner stake to form a right angle: matches the corner, then nail 1-by-6s 8 ft. long to the three batter-board stakes. Stretch a string from a corner stake to the batter boards at an adjacent corner and move the taut string until it brushes the nail on top of the second corner stake, then mark the string’s location on the top of the batter board. Repeat the procedure for the building lines at each corner.
Mark each batter board, making the first mark 7 5/8” inside the building line for the inside of the foundation wall; mark the board 4” outside the building line and 12” inside for the footing. Mark an additional 24” outside the outer footing mark and 6” inside the inner footing mark for the edges of the trench (inset). Drive nails into the batter board at each mark and remove the corner stakes.
3 Digging the trench. Stretch strings between low stakes driven at the trench-line marks and trace the strings along the ground with a squeeze bottle of powdered chalk. Dig the trench to a depth 8” less than the footing depth required by code. Caution: trenches deeper than 4’ present a cave-in hazard and are best left to professionals.
Stretch strings between footing marks on the batter boards, drop plumb lines from the strings to the bottom of the trench and mark lines for the footing trench as you did for the original excavation. Dig the trenches 8” deep.
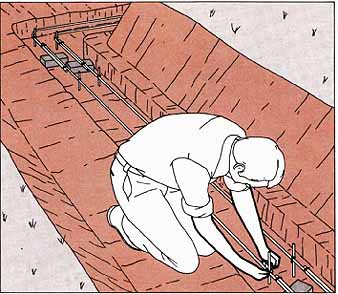
4 Leveling the footing trench. Drive 1-by-2 stakes at each corner of the footing trench, mark one stake 8” from the bottom of the trench and transfer the 8” mark to the other stakes with a water level. For additional reference points, drive stakes 3” from the sides of the trench every 3’, alternating from one side to the other, and transfer the marks to them. Measure down from the mark on each stake to the bottom of the trench and deepen it wherever necessary to at least 8”; the concrete will fill any deeper sections.
Drive 16” lengths of ½” reinforcing bar— called grade pegs—into the footing trench next to each stake until the top of each bar is level with the mark. Remove the wooden stakes and tamp the dirt around the grade pegs.
5 Pouring a reinforced footing. Support long pieces of No. 4 reinforcing bar about 3” above the bottom of the trench with bricks or stones, then lash the bars to the grade pegs with wire. Where two pieces of bar meet, overlap them about 16” and lash them together. To make bends in the reinforcing bar for the corners, slip a piece of iron pipe over the end of the bar, lay the bar on the ground, step on it and pull the pipe up gradually.
Pour the concrete to just above the tops of the grade pegs and work it around the reinforcing bars with a shovel, then level and smooth the concrete with a wooden float until the tops of the grade pegs barely show. Cover the footings with polyethylene sheeting and let them cure for at least 24 hours.
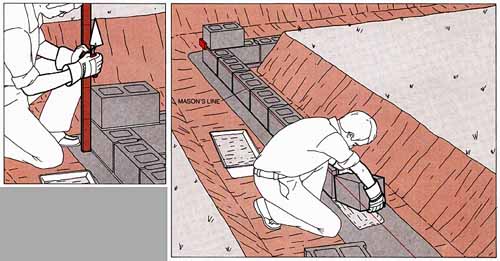
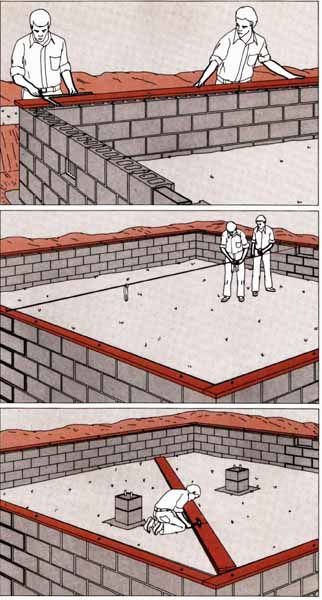
Stretch strings between the building-line marks on the batter boards, drop a plumb bob from each string and snap matching chalk lines on the footings. Remove the strings.
Lay four blocks on each side of the corner, checking them with the level as you work; then spread a 1” bed of mortar on this course, set a corner block on top of the first one and perpendicular to it, and tap the corner block down. Check the height of the corner blocks with a story pole—a 1-by-2 marked every 8” to indicate the level of each course—building up or reducing the thickness of the mortar joints as necessary.
Building the Foundation Wall
1 Building the leads. At each corner of the trench, lay a stepped set of blocks called a lead. To start this part of the job, spread a mortar bed 10” wide and 1½” thick from the corner, set a corner block between the chalk lines and tap the block down with a trowel until the mortar joint is 3/8” thick. Check the position of the block with a mason’s level.
2 Leveling the wall. Hook a mason’s line between two adjacent corners, using corner gripping mason’s blocks, and align the line precisely with the top of the first course of blocks; then spread a 1½” mortar bed on the footing and complete the first course of blocks. Keep the face of each block 1/16” from the ma son’s line and the top level with the line. When you reach the centers of the two opposite walls that will support the girder—generally the shorter walls in a rectangular building—substitute a solid block for the normal hollow-cored one. Move the mason’s line up to lay the second and third courses, always using solid blocks where the ends of the girder will rest. (In these pictures, solid blocks are indicated by heavy outlines.)
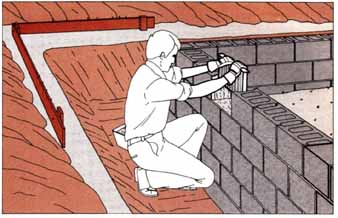
Lay a mortar bed at each corner for the leads of the next three courses and press masonry-type wire-mesh reinforcement into the mortar, then lay the next three courses. Add a layer of mesh reinforcement over every third course.
3 Venting the crawl space. On opposite sides of the building, about 4’ from the corners and 8” above ground, omit a block to leave a space for a vent—one for every 300 square ft. of floor space. Fill around the opening with mortar, set the vent 4” inside the wall, with its tabs atop the blocks on either side, and pack mortar around the vent edges, slanting mortar at the bottom outward to shed rain. In the next course, use solid blocks over the vent.
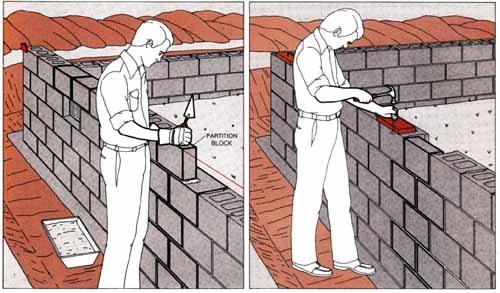
4 Making girder pockets. In the final course, insert a partition block—a solid block 4 by 8 by 16”—at the center of each of the girder walls. Set the block flush with the outside, leaving a 4”-deep shelf inside for a pocket in which the girder will rest. Fill the cores of all exposed blocks with mortar, troweling flush with the tops. Build up the long walls, then proceed immediately to set anchor bolts (Step 5).
5 Setting anchor bolts. L-shaped anchor bolts, ½” thick and 8” long, are set into the mortar-filled cores a foot from each corner and every 4’ in between. To set each bolt, place it in a jig—a 1-foot 2-by-6 with a 3/8” hole through the center—attach its washer and nut, and place the 2-by-6 flush with the out side of the block. Tap the anchor bolt into the wet mortar until the washer lies flat against the 2- by-6. After 24 hours, remove the nuts and washers and slide the 2-by-6s off the anchor bolts.
Supports for the Joists: Sills, Piers and Girder
1 Fastening the sill plate. Have a helper hold a section of sill plate—a perfectly straight 2-by-6 pressure-treated with preservative—on top of the final course of blocks with one end flush with the corner of the wall and with one side touching the anchor bolts. With a framing square, draw a line across the 2-by-6 at the center of each bolt; mark on each line the distance from the wall edge to the bolt center and drill a ¾” hole for each bolt. Fasten the sill plate over the bolts with their nuts and washers. Attach the remaining sections of sill plate and nail the ends together. Cut 5¾-by-4” notches in the girder- wall plates over each pocket.
2 Laying out the piers. Drive nails partway into the sill plates over the centers of the girder pockets and stretch a string between the nails. Have a helper measure off one third and two thirds of the distance between the outside edges of the foundation walls and mark the string with cloth strips at these points.
Using a plumb line, locate and dig holes for pier footings below the strips, excavating to the depth required by the local building code. Pour concrete footings and set precast concrete piers or build masonry-block piers level with the bottoms of the girder pockets.
3 Making and setting the girder. Cut three 2-by-8s 1” shorter than the span between the backs of the girder pockets and fasten them together with staggered 16-penny nails every 10”. With one helper for every 5’ of girder length, set this girder in the girder pockets, leaving ½” of air space between the ends of the girder and the backs of the pockets. Use steel plates or slate shims under the girder at the pockets and the piers to bring the top of the girder flush with the top of the sill plate. Cut several bricks in half and brick in the sides of the girder pocket, using ¾” mortar joints between bricks and leaving ½” of air space on each side of the girder.
If the span of the girder is longer than 16’, splice separate lengths of 2-by-8. Stagger the splices and locate them directly above piers.
Constructing the Floor
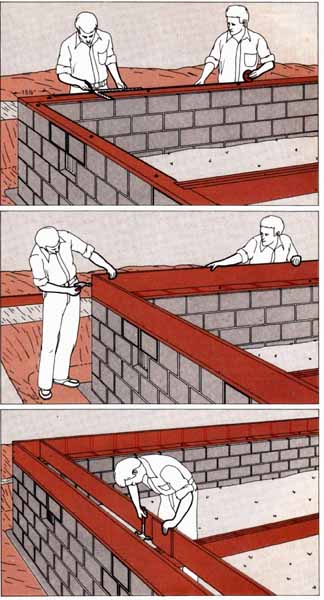
1 Marking the sill plates for joists. Hook a tape measure—one long enough to stretch the length of the wall—to a nail driven 15½” from the end of a long wall and have a helper pull the tape taut. Set the tongue of a framing square (the leg that's 1½” wide) across the plate at 16” intervals, and draw lines on each side of the tongue. Mark the opposite plate in the same way, starting at the same end of the building. To mark the joist locations on the girder, stretch a chalk line between pairs of marks on the two walls and snap the line over the girder.
2 Nailing header and stringer joists. Set a long, straight 2-by-10 on edge as a header joist—placing it flush with the outside of the wall and parallel to the girder, and toenail it to the plate. Have a helper butt another 2-by-10 (a stringer joist) against the first at the corner, and nail the two boards together. Nail header and stringer joists for the other two sides of the foundation wall in the same way, toenailing them to the sill plate and to each other and butt-nailing them together at the corners.
With a framing square, extend the lines that you marked for floor joists in Step 1 onto the inside faces of the header joists.
3 Nailing the regular joists. Cut regular joists to fit between the header joists and the center of the girder. Set two regular joists in place between the header joists, lining them up with the marks on the insides of the headers; drive three 16-penny nails through the headers into the regular joists. Where the two regular joists meet, over the girder, toenail them to the girder, then sandwich them between two 9¼” squares of 3/8” plywood, nailed onto each side. Add a second pair of regular joists in the same way.
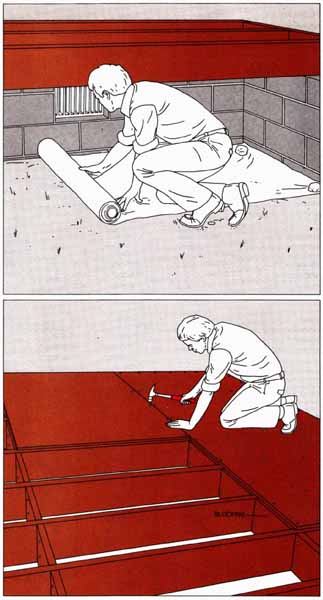
4 Laying a vapor barrier. Unroll a length of 3-foot-wide polyethylene sheeting over the crawl- space floor, beneath the two pairs of joists; cut off the sheeting, and weight the corners with rocks. Then nail in two more regular joists and unroll another length of sheeting, overlapping the first by 6”; again weight it with stones. Continue nailing joists, two at a time, and spreading polyethylene sheeting until you reach the far end of the foundation.
5 Laying the subfloor. Add blocking between joists at 4-foot intervals to stabilize the joists and provide nailing surfaces for plywood panels; toenail and face nail the blocking to the joists. Then lay 3 exterior-grade plywood across the joists, and nail it down with eightpenny nails; space the nails 6” apart across the ends of the panels and 10” apart between ends. Stagger the end joints of the plywood panels, and leave gaps between the panels, 1/8” at the ends and 1/16” along the sides.
- - - -
Where to Find Land
When America’s pioneers picked a spot for a cabin, they simply staked out a land claim in the wilderness, sharpened their axes and went to work. Putting up a cabin or cottage is more complex these days—and so is the job of locating a suitable building site. But finding land is still a necessary first step for a would-be cabin dweller: to move a project from the dream stage to the drawing board, you must have your site picked out or purchased.
Obviously, land is generally cheaper and more readily available in regions far from major metropolitan centers. But even in isolated areas, land prices are rising along with demand. Americans are competing for rural property—particularly for land near national or state parks, forests and recreation areas—and landowners and real estate agents are well aware that this is so. Yet potential land-buyer need not resign himself to paying an outrageous price for property. There are still ways to find reasonably priced building sites, often without giving up easy access to recreational areas.
One prime source of vacation land in the United States is a group of some 200 government projects west of the Mississippi. Initiated by the U.S. Bureau of Reclamation, these projects generally begin with the damming of a river, creating reservoirs with thousands of miles of new shoreline. Most of these areas are supervised by the state agencies that cooperated in their original planning and construction.
At some of these projects cabin- builders can lease small lots—the typical size is a quarter acre. Leasing conditions and restrictions vary widely from project to project and are subject to change, but when lots are available they can be had for astonishingly low prices; in one recent year, for example, lots were available at the Cedar Bluff and Lovewell Reservoirs in Kansas at annual rents of less than $90 for a 25-year term. For the latest information on the availability of such sites, apply to the appropriate state park or recreation department, or to the administrator of a specific project.
Canadians can lease or buy recreational building lots on publicly owned Crown lands. In recent years, for example, Ontario has made annual offerings, in approved subdivisions, of hundreds of lots ranging from three quarters to one acre. These properties are always advertised in the press, and are later parceled out to potential buyers or renters in a public drawing.
If you can't lease or buy government land in the region you have picked for your retreat, you must turn to the private market. For the quickest in formation on where land is available— and at what price—start with the most obvious sources: classified advertising listings in a metropolitan newspaper in your chosen area, and the national or regional real estate companies that publish periodic catalogues of country properties. But remember that sellers of the remote parcels you are looking for don't advertise widely. In general, only properties near recreational areas or major highways turn up in the classified pages of major newspapers or the catalogues of agents—and such land is nearly always the most expensive.
Once you have settled on a specific area, look for local sources of information about land for sale. Subscribe to a leading small-town newspaper in the locale you have chosen. These papers frequently carry land-for-sale advertisements that don't appear in big-city newspapers or comprehensive catalogues. They are also good sources of local political and economic news that might affect land prices or influence your decision to buy. Plans for a major new recreational area, for example, would increase the cost of property.
Another place to learn of land that may be up for sale is the tax assessor’s office in the county you are considering. Tax records are open to the public, and if you can locate a parcel with a heavy bill for back taxes, you might find that the owner would be willing to sell at a reasonable figure.
No matter where you decide to buy your land, there is no substitute for firsthand inspection, and regular visits, to the area you have chosen can often turn up a desirable building site. When ever you are in the area, talk to country storekeepers and service-station operators—they often can tell you of nearby landowners who might have property on the market.
You may, of course, decide that you want to build your cabin on private land near a national or state park or recreation area, even though land costs are likely to be higher than they would be for more remote sites. If so, building sites can frequently be found either within or adjacent to such lands, and you may be able to take advantage of a situation in which private land is partly administered or protected by the government. In New York State, for example, two huge preserves supervised by the state have been set aside in the Adirondack and Catskill Mountains, and there is a good deal of privately owned land available within these areas.
- - - -