|
Noise pollution comes in two forms—airborne and impact—and soundproofing products are often classified by the type of noise they affect. Airborne sound can be created by televisions, stereos, or speech. Impact noise travels as vibrations through solid materials, and includes footsteps or furniture being moved. Soundproofing a floor is easier than soundproofing a ceiling, but if you live in an apartment you may not have a choice. Most soundproofing efforts are done to block-out sound, whereas in many renovations and newer houses, great effort is taken to soundproof theatre rooms to create an enhanced “theatre-like” experience. Soundproofing a FloorCombining acoustic underlayment with acoustic mats beneath a floor
reduces the effects of both airborne and impact noise. If the problem
is solely impact noise, underlayment alone may suffice. Remove
the coverings to reveal the floor (see Flooring).
If the floor is to be carpeted, leave the baseboard in place and
proceed as shown below. For other floorings (see image), remove
the baseboard molding and lay out the acoustic underlayment, butting
the lengths up against one another and allowing them to lap a short
distance up the wall. Tape all joints, and then lay acoustic mat,
ensuring that any seams do not coincide with the joins of the underlayment.
Lay a floating tongue-and-groove chipboard floor over the top,
and trim the edges of the underlayment. You may then install further
floor coverings, such as laminated
flooring. |
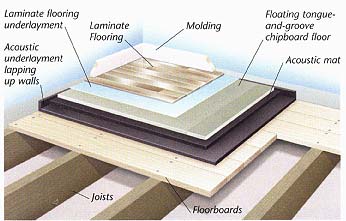 Soundproofing hard floors: A combination of acoustic underlayment with acoustic mats and chipboard sheets is a very straightforward option for effective soundproofing. Here it is installed below a floating chipboard floor, over which underlayment and laminate flooring are laid. |
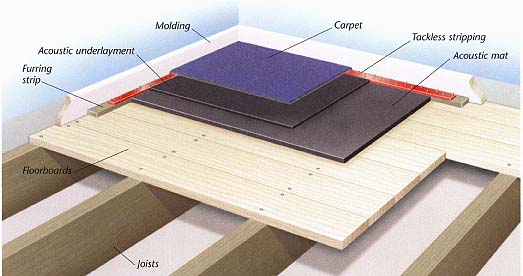 Soundproofing carpeted floors: When soundproofing floors that are to be carpeted, first install furring strips around the room’s perimeter, then lay acoustic mats and underlayment between, and butting up against, the furring strips. Attach tackless stripping to the furring strips and lay the carpet. |
Flooring materials and soundproofing
As soundproofing involves the building up of materials, thick floor coverings are more soundproof. For example, cushioned vinyl is more effective than regular vinyl. You can lay sheet vinyl over a soundproofed chipboard floor and attach it with double-sided adhesive tape. Similarly, high-quality burlap-backed carpets will prevent sound travel better than cheaper foam-backed carpets.
Do not add flanking strips to a carpeted floor. The fact that the carpet stretches across the tackless stripping and makes contact with the baseboard should provide protection enough against flanking noise.
Doors and Windows
- Double glazing windows or glass doors improves sound insulation, as well as thermal insulation.
- If noise from outside is a major problem, consider triple glazing.
- Weatherstripping added around doors and windows will insulate them against sound as well as heat loss.
Reducing Sound Travel
- Sound is created by vibrating material. Making a room stiff and thick reduces the amount of sound that can escape.
- Using acoustically efficient materials to add mass to a structure increases its ability to absorb sound.
- Structural elements carry sound, so creating a barrier between them prevents sounds from traveling across a room.
- Use acoustic sealant, flanking tape, or flanking strips to isolate a structural element.
- Seal the edges of walls and floors to prevent sound from traveling to the next room.
Soundproofing a CeilingThere are two main methods of soundproofing a ceiling. One is to use hat channels. These are lightweight metal channels that separate wall and ceiling surfaces, preventing airborne and impact noise from traveling through them. They provide a frame to which drywall can be attached. The other method is to lower the ceiling by building a false ceiling beneath the existing one. In both examples shown below, the drywall of the existing ceiling has been stripped away first. An alternative to these is to fit hat channels directly onto the ceiling, in a similar way to that shown for walls (bottom, left). Where the existing ceiling is high enough to permit it, the second technique may be used, but without removing the drywall on the existing ceiling. |
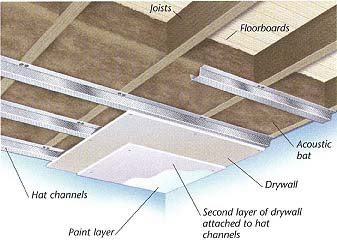 Using hat channels: Remove the drywall from the existing ceiling and attach hat channels across the joists at intervals of 16 in (400 mm). Fit acoustic bats 4 in (100 mm) deep above these bars, between the joists. Attach two layers of drywall, one 1/2 in (12 mm) thick, then one 3 in (9 mm) thick, staggering the seams. Twin-layered board is available, and is a quicker option, but ultimately would be more costly. 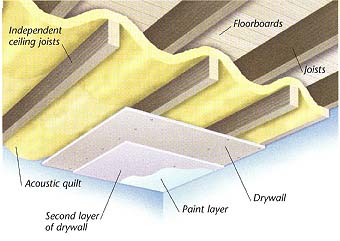 Using independent ceiling joists: Expose the existing joists and insert new ones between them. (Search the web for “technique for installing new joists”.) The lower faces of the new joists should be at least 2 in (55 mm) below the faces of the existing joists. You should then weave a layer of acoustic quilt between the two joist levels, as shown, before attaching two layers of drywall to the lower joists in the usual way. |
Soundproofing a WallThe principles for soundproofing ceilings and floors from below can also be applied to walls. For example, you can fit hat channels directly to the surface of an existing wall, as shown below left. If losing a little space in the room is not a problem, build a completely new, independent wall in front of the existing structure. This is most easily done with a metal stud wall as it is quick and creates little mess. Build it 1 inch (25 mm) away from the original wall. You can then insert acoustic bat between the stud uprights to create a soundproof layer. |

Using hat channels: Make sure that the open side
of the ground- level channel is facing upward. In the others it
should face downward. 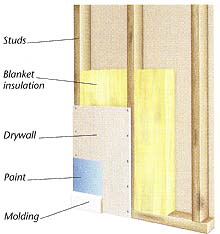
Increasing mass: Adding to the mass of a stud wall
will help it to absorb sound. Adding blanket insulation will also
improve its thermal insulation. 
Adding an independent wall: When creating a metal stud wall, make sure that the acoustic bat is rigid enough to remain vertical between the metal studs. |
Next: Ventilating a Home
![]()