|
Efficient ventilation removes odors, pollutants, and vapor-laden air trapped inside a home before they can cause any damage, harm to you or your house, or discomfort. Condensation occurs as moist, warm air comes in contact with cold surfaces. It is easily visible on glass, walls, or ceilings, but it can also form on carpets and curtains. Damp surfaces may decay over time, and the resulting mold and mildew can cause an unhealthy living environment. Insulation, double-glazing, and heating can all lessen condensation, but good channels for ventilation and the free flow of air are required. Static VentilationA simple hole, usually at the top or base of a wall, with grilles to let air in or out, provides static ventilation. Some interior grilles can be closed, but others are fixed open for constant airflow. Static ventilation is mandatory in rooms with a fuel-burning appliance, and is often used for venting clothes dryers. Unused chimneys also need static ventilation to circulate fresh air and prevent discoloring damp patches from appearing on the chimney breast. “Trickle vents” in window frames provide ventilation even when the windows are closed. Exhaust FansYou can ventilate most kitchens and bathrooms with a fan carrying
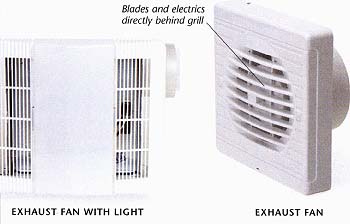
air a short distance through a wall (an axial fan). Wall- or ceiling-mounted
fans (below left) have their electric components directly behind
a grille, and must not be used within reach of water. To ventilate
a shower cubicle, use an in-line fan (below right), which is installed
with a length of ducting between the grill and the electric parts.
Some kitchen fans are built into a cabinet or hood. When choosing
a fan, consider the sound it makes (you may want a “low noise”
fan for an attached bath), its power, and the manufacturer’s advice
for a specific fan’s use. Most can be wired into the lighting circuit
to run when a light is on (usually with a timer so that it continues
for a while after the light is switched off), or operated separately
with a pull-cord. |
 right: Bathroom
exhaust: Position the fan on the ceiling.
lf you have a shower stall, install the fan near the shower. Ensure
that you have the correct power supply, and follow the wiring and
safety instructions closely. right: Bathroom
exhaust: Position the fan on the ceiling.
lf you have a shower stall, install the fan near the shower. Ensure
that you have the correct power supply, and follow the wiring and
safety instructions closely.Installing a fan The most common position for a fan is in the bathroom, kitchen, or attic. They are connected by ducting, which takes the air from the fan through a wall, roof, or soffit to an exit vent. In a hot climate, you may want to consider a whole-house fan. If the hole must be through masonry, you will need to rent a core drill bit. Make sure you have the correct power supply in place, and closely follow the wiring instructions (see our section on working with electricity). |
 right: Kitchen hood: Kitchen hoods remove odor, heat, and smoke from the house. Installed above a stove or range, the hood can be a focal design point. |

Dehumidifiers
Removing moisture from the air reduces humidity and condensation, and therefore helps to deal with their associated problems. An excellent way of doing this is to use a small, portable dehumidifier. You can move these around the home easily and place them in any room or space that has a condensation problem. The dehumidifier collects water in a tank that is then emptied.
Health and SafetyWhen installing a fan, make sure that the extracted air is replaced
by fresh air—especially in a room containing a fuel-burning appliance.
Failure to provide fresh air can cause a fatal buildup of carbon
monoxide in a room. Fuel-burning appliances should be regularly
checked and serviced. If you have any doubts about how to ventilate
an appliance, get professional advice before proceeding and install
carbon monoxide detectors. |
Installing a Bathroom Fan |
Articles about Dust Control, Air Purifiers, Cleaners and Filters |


Next:
