Metal stud walls are a good interior wall option. They aren't susceptible to rotting and warping or termite damage. Studs are typically pre-drilled to accommodate plumbing and electric. It is important to order the correct amount of material. Wall track is available in 10-ft (3-m) lengths. Measure the length of the wall in feet, multiply this number by two and divide by 10 for the number of lengths you’ll need for the top and bottom tracks. To determine the number of studs necessary, divide the wall’s length by the length of the stud intervals, then add one extra.
1. LAYING OUT

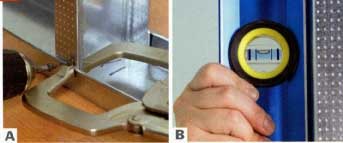
A. The first step to building a stud wall is layout. Lay out the location
of wall on the floor using a measuring tape and pencil. B. Use a plumb
bob to mark three corresponding ceiling locations for the metal track.

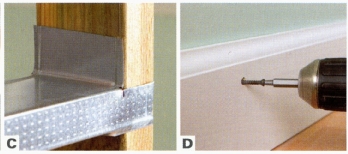
C. Lay out the top track of the metal wall using a
chalk line. Pull the string line across the marks made in step B. D.
Measure, mark, and cut the top and bottom tracks. Cut out any sections
from the bottom track for door openings.
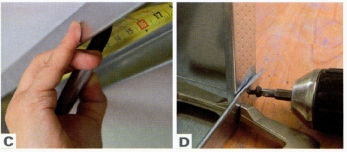
2. INSTALLING THE OUTER FRAME

A. Attach the bottom track to the floor. Mark the
stud locations at 16-inch (400-mm) intervals on center on both the
bottom and top track. B. To help increase accuracy, place the bottom and top track parallel with each other while marking the stud locations
with a felt marker.

C. Align the top track with the chalk lines made on the ceiling. Attach
the top track to the ceiling using fasteners. Use a plumb bob to mark
the top track for the metal stud positions. D. Insert the studs into
the metal tracks. It is easier to insert them perpendicular to their
final position. E. Using a twisting motion, move the metal studs
in to position. Make sure all of the flanges are facing the same
direction.
3. INSTALLING THE STUDS
A. Clamp the metal studs to the tracks, making sure the stud is plumb,
then using screws, attach each stud to the top and bottom tracks. B.
After the screw is in place, use a level to check for plumb before
installing the next stud.
C. Use a tape measure to check measurements for the
metal studs along the top and bottom track, making sure they are 16
inches (400 mm) apart on center. D. Hold the last
stud in place with a clamp, aligning the stud with the end of the bottom and top tracks, and secure in place.
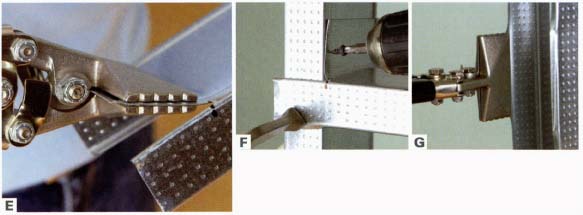
E. For doorways and windows, you will need to bridge the header. To
make the piece fit with the studs, cut along the creases of the material and bend it back. F. Install the header piece with the flat side on
top. The piece will be secured using metal screws. G. The end of
the flange has a slight lip. You will need to flatten the ends of
the horizontal pieces to make a secure connection.
4. INSTALLING METAL STUDS TO A WOOD FRAME
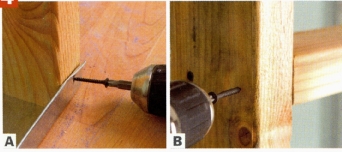
A. If you have a wood-framed house, you can still use metal studs
to construct new walls in your house. B. Metal stud to wood frame connections,
can be made with drywall screws, as with wood-to- wood connections.
C. When connecting metal framing members to wood,
use the same techniques as above to wrap the end of the horizontal
metal member around the stud. D. After you have covered
the metal frame with drywall and finished it in paper or paint, use
screws to attach any trim. Nails will not make a connection into metal
framing.
Overview


Click each image groups above for full size.