Sometimes an exterior wall's structure provides the decorative finish, but most require extra material for decorative or weatherproofing purposes. For example, a brick or stone wall provides structure and finish, but a wood frame or block wall needs to be stuccoed or covered in siding. For most homeowners, the systems and techniques for these coverings become relevant only when they are faced with repairs. You will need to understand how these coverings are created if you want to match them on an extension, or if you wish to refurbish an entire section of wall.
REGULATIONS AND PERMISSIONS
The rules covering exterior alterations vary from area to area, and according to whether the building is historic or in a historic district. Before your plans advance too far, check with your local authorities and home owner’s association as to whether you need permission. It may also be necessary to get permission to use certain paint colors. In all cases, a quick phone call can normally confirm any local guidelines or requirements.
STUCCO
This can be applied directly to blocks or bricks, or onto metal laths (sheets of wire mesh that help adhesion) to provide a decorative, weatherproofing coat that protects a wall’s structure. There are several finishing options, the most common of which are shown to the right. Some topcoats have extra features, such as enhanced water-proofing properties, or suitability for finishing with outside- quality paint. Investigate your options with your builder or supplier, who will also be able to advise you on the quantities needed, and any waterproofing measures that may be necessary.
Planning to stucco:
Stuccoing large walls isn't a job for an amateur -- advanced plastering skills are required, as is experience in achieving the chosen finish. Unless you are very experienced, hire somebody to do the work for you. It may need several coats -- usually an initial scratch coat followed by one or more further layers of stucco. Avoid application at times of extreme weather conditions, which can seriously affect the way stucco adheres, and may therefore reduce its life span. For those less experienced at DIY or the novice who wants the look of stucco, EIFS is an option. Made in panels, EIFS is similar to finished stucco and easier to install but requires careful flashing, so you will need professional help even for this option.
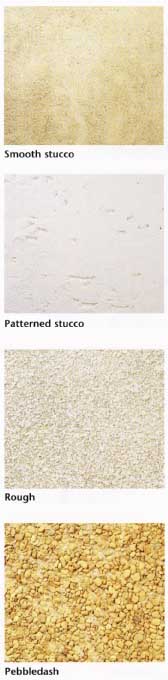
Above: (top to bottom): Smooth stucco: The smoothest of
stucco finishes will still have some slight texture; Patterned
stucco: Smooth stucco can be tooled to produce various patterns
if needed. Rough: A uniform rough finish that's applied over
smooth stucco. Pebbledash: Achieved by throwing pebbles onto
damp stucco.
SIDING
Siding is often found on most newer houses, forming the outer layer of a wood cavity wall. Some homes are partially covered in siding for decorative effect--boards can be placed horizontally or vertically--but siding also performs a vital weatherproofing function. Boards may be wooden, but synthetic options such as fiber cement board, viny], and aluminum are also available. These need less maintenance than wood, and some can be painted. Metal-based boards are usually attached to the house with special clips and channels, bought with the boards.
Siding should be applied on top of either building paper (a moisture barrier) or a breather membrane (which stops water from entering a wall, but allows vapor within the wall to escape). If you have a block house you may need a series of furring strips over the paper or membrane, to provide anchor points for the nails or screws to attach the siding.
Using Furring Strips
Horizontal siding goes onto vertical furring strips (see fig below), which provide a cavity for drainage channels between boards and wall. To maintain channels behind vertical siding, which attaches to horizontal furring strips, fit vertical furring strips first.
Chamfering the top edges of the horizontal furring strips directs water away from the wall. If untreated, furring strips must end 6 in. (150 mm) above the ground, so that siding does not touch damp soil. Use treated softwood measuring 1 x 2 in. (25 x 50 mm). Some manufacturers will produce siding systems that incorporate an insulation layer between siding and the wall. Ask for professional advice, because it's important to use the correct insulation and vapor barrier to avoid problems with condensation.
FURTHER INFORMATION
Choosing the right exterior cladding material depends on your climate, personal preference, and budget. Follow all manufacturer’s guidelines and local codes to ensure the material you choose performs well over time. One part of this is choosing the correct fasteners for the material and your weather conditions. Most often, you will need to use rust-resistant nails for exterior work.

Above: FEATHER-EDGE BOARDS; TONGUE-AND-GROOVE BOARDS

Above: SHIPLAP BOARDS; FIBER-CEMENT SIDING (Vertical furring
strips; Plyboard sheathing behind breather paper)
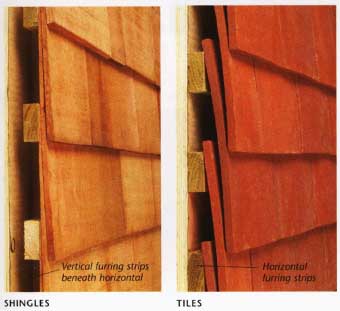
Above: SHINGLES; TILES

Above: VINYL SIDING; BRICK
Siding products:
Most types of exterior cladding materials are illustrated here. Typically siding is installed from bottom to top, nailed to plywood sheathing through a building paper. Each product has its benefits and special installation instructions. These can include tools and techniques for making installation easier, and some require air spaces or nailing strips. (More on Siding)
APPLYING FIBER-CEMENT SIDING
Having attached building paper and furring strips at 16-in (400-mm) intervals, you can start building up rows of siding. You will need the following: nail gun and nails, corner strips, boards, kicker strip, sealant, and dispenser.

A. Apply corner strips with a nail gun, taking care to use the tool
safely. B. Attach a kicker strip to the bases of the furring strips
to push out the boards at a slight angle, helping with positioning and water runoff.

C. Apply boards, nailing into every furring strip. Build up rows,
overlapping the previous layer each time by at least 1 in (25 mm).
D. Use sealant at corners and where boards meet another surface.
A common option for a corner is to use a corner trim piece.