Floorboards can form an attractive finished floor but, unless the boards are very new, they will need sanding to remove old coatings and rough areas. Machine sanders are the ideal tools to carry out this work, but the job is still arduous and very messy. Sanders are also expensive, so rent them rather than buying (see below). Once sanded, the floor needs a decorative protection such as wax or varnish. Floor paint is an option, but a floor does not need to be sanded to such a high quality if you plan to paint.
Tools, Materials and Supplies: Basic Tool Kit, and see this page.
PREPARATION
Order of work
The direction of sanding will depend on the floor’s condition. If it's fairly flat, it may be possible simply to use the sander up and down the boards’ grain. If the floor is uneven, or has a very thick coating of paint or varnish, start across the grain. Sanding at a right angle to boards may damage them, so sand at 45 degrees. Cross the room in one direction, then the other (see overview), before finishing along the grain. Reduce the coarseness of the sandpaper as you progress, finishing with the finest grade.
Protecting yourself and your home
Sanding is a very dusty, noisy, and messy job. Wear protective clothing, including ear protectors and a respiratory mask. Cover and mask around doors to prevent dust from spreading throughout the house. Open all windows, so that you work in a well-ventilated room.

Image: SEALING A DOORWAY
Sanders
You need three sanders: a heavy-duty drum sander (a drum wrapped in sandpaper that rotates at high speed); a heavy-duty edging sander; and a corner sander. Each requires sandpaper in a particular shape, which is available from the rental store. The paper is expensive, and will tear if it isn't correctly fitted. Make sure nails do not protrude from the floor (see image). Unplug the sander before changing paper, and allow it to cool if any parts have heated up while in use.
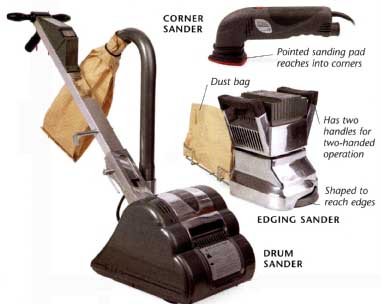
CORNER SANDER: Pointed sanding pad reaches into corners
EDGING SANDER: Has two handles for two-handed operation; Shaped to reach edges; has Dust bag
DRUM SANDER: Powered with Dust bag
1. PREPARING THE FLOOR
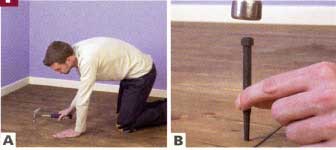
A. Nail down any loose floorboards. Set the nail heads beneath the surface.
B. Check the floor for protruding nail or screw heads. If any are sticking out, drive them below the surface.
2. PREPARING THE DRUM SANDER
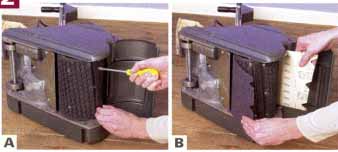
A. With the sander unplugged, unscrew the retaining strip on the drum sander and feed a sheet of sandpaper underneath it.
B. Feed the sandpaper around the drum and secure the end under the retaining strip, aligning the cut sections with the retaining screws.
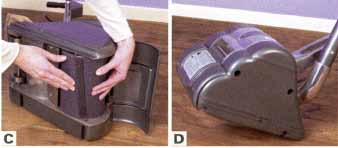
C. Check that the paper is taut and correctly positioned before you tighten the retaining screws.
D. Plug in the sander, tilt it backward so that the drum is raised off the floor, and start the machine.
3. USING THE DRUM SANDER

A. Lower the drum onto the floor and make the first diagonal run across the floor.
B. Sand the whole floor in one direction. Then change direction and make the other set of diagonal runs across the floor, at a right angle to the first runs.
C. Then change direction again, and run the drum sander across the floor following the direction of the grain.
4. USING THE EDGING SANDER

A. Ensure that the sander is unplugged, then use the bolt key supplied with the edging sander to undo the retaining bolt, and remove the old disc of sandpaper. The key is often stored on a retaining clip on the underside of the sander.
B. Position a new disc of sandpaper and retighten the retaining bolt to hold the disc securely in position. Ensure the retaining bolt head is well below the sandpaper surface level.
C. Take a firm hold on the sander before starting it, and work around the edges of the room.
5. USING A CORNER SANDER

A. To change the sandpaper on a corner sander, simply take hold of the old paper and tear it off. Align a new sheet of paper with the pad’s face and press it into position.
B. Use the corner sander to deal with the room’s corners, and to sand any awkward, otherwise inaccessible areas such as beneath a radiator.
6. FINISHING THE FLOOR

A. Sweep and then vacuum the floor to remove any debris not held by the sanders’ dust bags, and wipe with a damp sponge. If you find any rough areas, sand them by hand.
B. Apply your chosen finish. Two coats of water-based varnish can be applied in a day (it dries quickly), but some light hand-sanding is needed between coats.