Although laminate wood flooring is becoming popular, you may prefer real wood, shown here. Boards can be laid as a floating floor, nailed down, or installed with adhesive. On a wood floor, you can remove old boards and install new ones, but not if a partition crosses the old boards. Check whether doors need to be trimmed. Remember that a vapor barrier is important, especially on concrete. You may sand a wood floor after installing it.
Tools, Materials and Supplies: Basic Tool Kit, and see this page.
Floating Tongue-and-Groove on Wood
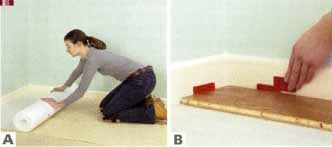
A. Wooden floors are usually laid floating, allowing for expansion and contraction. Lay a vapor barrier if necessary, then roll out underlayment.
B. Position the first board, with its tongue facing into the room. Use wedges to maintain an expansion gap against the wall.
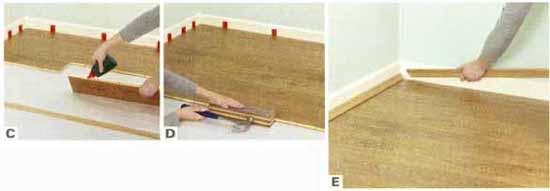
C. Apply glue to the board’s grooved edge (avoid going deep into the recess, as less contact is made here with the tongue of the next board).
D. Tighten the joints as you proceed, by hitting a knocking block against the boards. Or you may prefer to use a ratchet floor clamp (see below).
E. Wipe away any excess glue that seeps out between joints after the boards are tightened. Continue adding rows, and stagger the boards in the normal way. Once adhesive has dried, add shoe molding to cover the expansion gap, or replace the baseboard if you removed it before laying the floor.
Using a Ratchet Floor Clamp

A. This is an alternative to step D above. Lip the clamp over the end board. Unroll the strap to beyond the nearest board.
B. Position the ratchet section over the edge of the board closest to you. For a large floor area, you may need to position several ratchet clamps.
C. Thread the extended strap through the ratchet section, and clamp it down. You may wish to set up two across a section of flooring.
D. Move the ratchet backward and forward until the strap is taut and tightens the tongue-and-groove boards. Repeat every few rows.
Gluing Tongue-and-Groove Boards on Concrete
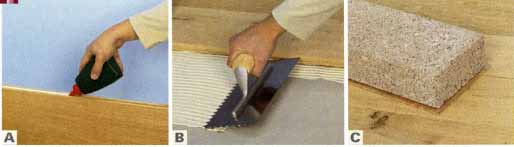
A. Glue joints between boards, using wood adhesive in the grooved edges. Avoid going too deep into the recess (see step C at top).
B. Spread a commercial adhesive on the floor, using a notched trowel to groove it for better adhesion. Press the boards firmly in place.
C. Continue gluing the boards and pressing them into the adhesive. The weight of concrete blocks will help to push down the boards as they dry.
Powering Up
If you plan to cover a large floor area with strip flooring, the job will be much faster, and easier on the knees and hands, if you use a pneumatic flooring nailer, which is available for rent at most home improvement stores. When selecting a floor nailer, review the safety features.
Laying Nailed Tongue-And-Groove Flooring On Concrete

A. Remove baseboard, loosening it with a pry bar before pulling it from the wall. Sweep away debris. Apply self-leveling compound if required.
B. Lay vapor barrier, with an overlap of 6 inches (150 mm) up the wall. Fold it in the corners to allow it to sit flush on the floor.
C. Attach furring strips around the room with 4-in (100-mm) concrete screws. Fix furring strips every 16 inches (400 mm) at a right angle to the new boards.
D. If furring strips do not lie level, use shims or offcuts to pack out any indents and level the furring strips. If insulation is required.
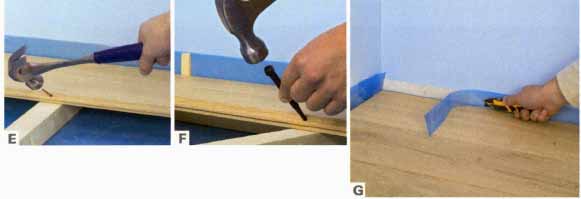
E. Start laying boards, and attach with toe nailing into the furring strips. This is done by securing a nail at a 45-degree angle into the tongue.
F. Drive the nail through the board and into the furring strip, so the head is just beneath the board’s surface. Or use a floor nailer.
G. Continue laying boards (as described earlier, where tongue-and-groove is being attached to joists). Once the floor is complete, apply any finish (e.g., wax or varnish) that may be required. Trim off the membrane overlap with a utility knife. Replace the baseboard to cover the expansion gap.
Laying Parquet Tile Flooring

A. Attach two temporary furring strips to the floor to mark a starting point (as you would for laying hard floor tiles -- see this page, and this page).
B. Spread enough adhesive inside the angle of the furring strips for the first two or three tiles. Use a notched trowel, or the tool supplied.
C. Press the first tile into position, bedding it into the adhesive. (Some manufacturers specify that the adhesive should be allowed to become tacky before you position tiles.) Check that the edges of all tiles are precisely aligned as you work across the floor. As with other tiling jobs, lay all the full tiles first.

D. Remove the furring strips with a claw hammer to prepare the edges of the room. Then fill the gap with cut tiles.
E. Measure for cuts as for other tiles. Wooden tiles are easy to cut with a fine-toothed saw. For curved cuts, use a jigsaw.
F. Apply adhesive and place the cut tiles in the gaps to complete the floor and press them into position.
G. Finish off by filling the expansion gaps with cork strips. Replace baseboard or apply edging. Seal the tiles if required.