Removing Grime from Masonry
| Home | Wiring | Plumbing | Kitchen/Bath |
|
To clean masonry—whatever the surface—start with elbow grease rather than strong chemicals. Use them as a last resort, particularly on decorative masonry like marble and slate. Cleaning these surfaces calls for patience, especially in the final stages, when some effort is needed to erase any lingering shadow of a spot or stain. Routine Cleaning: The power of a scrub brush and an all-purpose detergent should not be overlooked. Many spots and stains will yield to such treatment. If not, try a heavy-duty degreaser or scouring powder. Be warned, however, that stronger cleaners may dull the polished surface of stone, which will later have to be restored. Getting Tough on Grime: Some stains and blemishes require more abrasion than a scrub brush can sup ply, such as brick speckled with paint or discolored by ivy. Efflorescence—a white powdery deposit on brick—and oil and grease spills or hardened lumps of plastic-base products on concrete need special treatment. For large outdoor masonry surfaces, such as the brick wall of a house or a concrete driveway, you can rent a pressure washer. This device delivers a stream of water at pressures sufficient to blast out all but the most deeply in grained dirt. For embedded stains that have worked into the pores of masonry surfaces, draw them out with a poultice. Restoring the Appearance: Once the dirt or stain has been removed, you may have to take measures to erase the effects of your cleaning. Concrete and brick surfaces generally require nothing more than a thorough rinsing; marble and slate, on the other hand, may need buffing. Protecting the Surface: Although sealing brick is not recommended, you can protect clean concrete or stone against soil by applying a commercial concrete sealer, which is available at paint and hardware stores; however, this product will impart a slightly unnatural gloss to the surface. Sealing asphalt fills hairline cracks and restores the surface color. TOOLS:
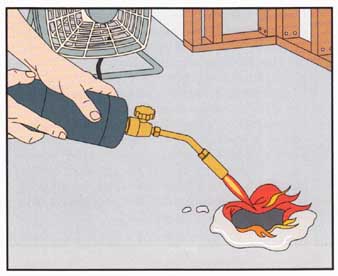
SAFETY TIPS: Put on goggles when sanding or using a propane torch. DISLODGING SURFACE DEPOSITS: Sanding stains off brick. • Break a matching brick into fragments and choose a piece that will comfort ably fit your hand. • Working slowly and pressing lightly, rub the broken surface of the fragment over the deposits with a back-and- forth motion (r). Use only the bro ken surface of the brick—the smooth faces could scratch the brickwork. /20 Dissolving efflorescence. • Working on one small section at a time, scrub the wall with a dry scrub brush (l ). • If brushing doesn’t work, buy an acid- base cleaning product designed for brick. Protect the ground under the wall and nearby plants with plastic sheeting. Wearing rubber rain gear, nitrile gloves, rubber boots, goggles, and a face shield, add 1 part of the cleaner to 10 parts water in a plastic pail. Test it on an inconspicuous area. • Soak the masonry with plain water. • Using a natural-bristle scrub brush, scrub the wall with the mixture. • Let the product sit for 10 minutes, then rinse it off with a garden hose. !! CAUTION !! Always pour an acid-base product into water—never add water to an acid. When working indoors, open all windows and keep the air moving with fans. If your nose or eyes begin to sting, leave the room immediately and splash your face with cold water. Don’t continue using the cleaner until the stinging subsides. Soaking up grease and oil. • Flood the surface with mineral spirits to dissolve heavy deposits. • Cover the stain with clay-base cat litter or fuller’s earth and let it stand for several hours until it has soaked up the grease or oil; then sweep it up. • Wearing rubber gloves, scrub away any residual stain with a heavy-duty degreaser. • If oil or grease has soaked below the surface, apply a poultice. Burning plastic off concrete. • Holding a propane torch about 6 inches above the surface, play the flame slowly back and forth on the hardened plastic; it will begin to give off an acrid black smoke. Avoid keeping the flame on one spot too long—it can damage the concrete. • When the plastic is reduced to ashes, turn off the torch and sweep up the ashes. !! CAUTION !! Remove all flammable objects from the area and keep a fire extinguisher handy. If you are working indoors, open at least two windows for cross ventilation and set a fan in one of the windows to speed the airflow. ///21 Drawing Out Embedded Stains: When substances penetrate deep into masonry, they may leave persistent stains that require the special treatment of a poultice. For the types of stains listed here, make poultices by mixing just enough of the recommended liquid cleaning agent with talc, whiting, or lime to make a thick paste. Spread a 1/4-inch layer over the stain and cover it with plastic, sealing the edges with masking tape (b). Leave the poultice in place until it dries, then scrape it off with a putty knife. Rinse the area well as recommended. Several treatments may be necessary before the stain is completely gone. When preparing or applying poultices, wear goggles, a dust mask, and long sleeves as well as the type of gloves recommended for the agent, and keep the work area well ventilated. Asphalt or Tar: Scrape off excess material with a putty knife, then scrub the spot with scouring powder and hot water. If the stain lingers, put on a pair of polyvinyl alcohol (PVA) gloves, and apply a poultice prepared with tri-chloro-ethylene obtained from a paint store. After removing the poultice, scrub the area again. Blood: Wet the stain with water. Wearing nitrile gloves, cover the stain with a thin layer of sodium peroxide powder. Dampen the powder with a little water and let it stand for a few minutes. Add more water and scrub the area with a stiff-bristle brush. Pour vinegar on the spot to neutralize any alkaline residue, then rinse it with water. Caulk or Chewing Gum: Scrape off as much of the material as possible. Wearing rubber gloves, apply a poultice prepared with isopropyl alcohol. After the poultice is dry, brush it away and wash the surface with a heavy-duty degreaser. Coffee or Tea: Put on rubber gloves to make a poultice of 1 part glycerin, 2 parts isopropyl alcohol, and 4 parts water. Apply it to the stain. Repeat the application up to three times if necessary. If the blemish is still visible after the third treatment, switch to a poultice prepared with chlorine bleach diluted to one- quarter strength. Grease: Wearing rubber gloves, scrub the spot with a heavy-duty degreaser, then apply a poultice made with an oil-dissolving solvent, available at an auto- supply store. Or, wearing PVA gloves, treat the area with trichioroethylene. Ink: Some inks can be removed from masonry by scrubbing with scouring powder; but the ink from a felt-tipped pen responds only to types of bleach. You may need to experiment to determine which compound works best. Wearing rubber gloves, try a poultice made with diluted chlorine bleach or bleaching powder. Put on nitrile gloves to apply calcium hypochlorite, available at swimming-pool-supply stores; a mildew remover; or a poultice made with household ammonia. Nonferrous Metals: To remove the blue or green stains left by copper, brass, or bronze, put on nitrile gloves and make a poultice with sal ammoniac and household ammonia. For the white powdery stains left by corroding aluminum, use the same treatment as for efflorescence (- 21). Paint: Blot fresh paint spills with rags or paper towels; work gently without wiping, which could spread the paint and embed it in the surface. After the excess paint has been blotted up, scrub out the remainder: For latex-base paint, use scouring powder and water; for oil-base paints, wear nitrile gloves and apply mineral spirits. To remove dried paint, start with a poultice prepared with commercial paint remover. Put on nitrile gloves and scrub the remaining stain with steel wool or a scouring powder. Tobacco: Apply a poultice of scouring powder and hot water; when the mixture dries, scrape it off and rinse the area with hot water. /22 RESTORING THE GLOW OF DRESSED STONE Polishing with jeweler’s rouge. • Install a cloth-covered buffing attachment on an electric drill. • Press a bar of jeweler’s rouge or stone-polishing compound against the edge of the revolving wheel hard enough to charge the wheel liberally with polish (above, left), but not so hard as to mat the fibers. • Touch the buffing wheel lightly against the stone and work it slowly back and forth until the surface is smooth (above, right). • Wash the polished surface with hot, soapy water to remove any residual compound. Sanding out scratches. • Wrap a sanding block with ultrafine (600-grit) wet-or-dry sandpaper, moistened with water. • Pressing the sanding block against the scratched area, rub hard in circular strokes until the surface is smooth. • Restore the gloss by sprinkling powdered tin oxide—available from lapidary supply stores—onto the surface. Add just enough water to make a thick paste. Flip the sandpaper smooth side out and wrap it over the sanding block; resume rubbing until the stone is glossy. • Wash the surface with warm, soapy water, then rinse it clean. • Polish the stone with jeweler’s rouge. //23 APPLYING A PROTECTIVE SEALER Sealing stone. • Using a paint roller with a short nap—a 1/4-inch nap works best—apply a thin film of silicone sealer to the surface. Along the edges, use a cloth pad saturated with sealer. • Allow the stone to dry for 45 to 60 minutes, then apply a second coat. Protecting concrete. • For outdoor jobs, fill a pressurized garden sprayer with a concrete sealer and work the pump up and down several times to pressurize the tank. • Wearing goggles, lightly fog the entire surface, holding the sprayer nozzle 12 to 18 inches away. • Go over the area again, working the sprayer back and forth until the concrete is flooded with as much sealer as it can absorb. On indoor surfaces, spread the sealer with a sponge applicator.
COATING AN ASPHALT DRIVEWAY 1. Applying the emulsion. • Clean the surface with a hose; wearing rubber gloves, remove any oil or grease with a heavy-duty degreaser. • Fill any holes and cracks wider than - inch with asphalt-patching corn pound. • If the surface has dried, dampen it lightly. • Beginning along one edge of the driveway, pour a thick ribbon of coal- tar pitch emulsion 3 feet long onto the surface—one 5-gallon pail of emulsion will coat about 400 square feet. For a nonslip surface, buy a product containing sand. 2. Spreading the sealer. • With the squeegee side of a combination brush-and-squeegee tool (photograph), spread the emulsion all the way across the surface in a 3-foot-wide swath. • Turn the tool to the brush side and smooth out the coating with the bristles. • Apply and spread more emulsion, coating the surface in 3-foot sections, until the entire driveway is covered. • Keep traffic off the drive for 24 hours.
|


| HOME | Prev: Tending to Wickerwork | Next: | Article Index |