| PREV: Preparing the Fabric | Next: Understanding Ease |
Are you looking for sewing or crafts-related items such as sewing machines, sergers, yarn, and knitting supplies? Try our online catalog pages here. Or see what products on our site the popular search engines have chosen to list...
Recommended ReadingRecommended Products5 Drawer Foldaway Desk: Perfect for your sewing machine or serger! Constructed from durable melamine laminated particle board the Mobile Desks will offer a life time of reliable service. If you need specific sewing supplies, browse through the products on pages like these:
Take Complete MeasurementsSelect the same undergarments you normally wear, a leotard or a full slip, pan hose and comfortable shoes with the heel height you usually wear. Tie a narrow piece of elastic snugly around your waist. Move and bend until the elastic fits on your natural waistline.
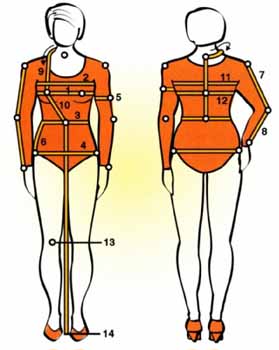
Bust: Measure around the fullest part of the bust with the tape straight across the back (1). Chest: Measure around the body above the fullest part of the bust (2). Waist: Measure around body over the elastic (3). Hip: Measure around the fullest part of the hip approximately 7”-9” (18 cm-23 cm) below the waist (4). If the circumference of your thighs is larger than the circumference of your hips, record the thigh measurement for the hip measurement. Bicep: Measure around the upper arm approximately 1" (2.5 cm) below your armpit (5). Hip Length: Measure the distance from the waist to the full hip at side (6). Arm Length: With the arm slightly bent, measure from the shoulder to the elbow (7) and from the elbow to the wrist bone (8). Front Length: On the front, measure from the base of the neck, around the neck to the bust point (9) and from the bust point to the center front waistline (10). Back Length: Measure from the back of the neck to back bustline (11) and from the bustline to the waist (12). Skirt Length: Measure from the center front waistline to desired point on your leg for the length to the knee (13) or to the floor (14). Refer to the back of the pattern envelope for a descript of the length. You will need these additional measurements for pants. 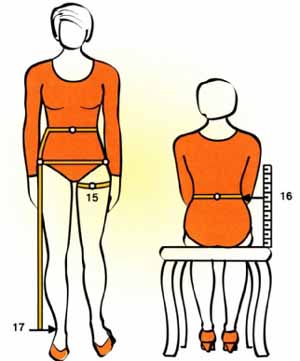
Thigh: Measure around the fullest part of the upper leg, approximately 1” (25mm) below the crotch (15). Crotch Depth: Sit straight on a hard, flat chair. With a straight ruler, measure from chair to waist at side seam (16). Pants Length: Measure from the waist at side seam to middle of ankle bone (17). 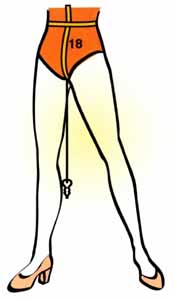
Crotch Length: The crotch length is measured from the waistline to the center back waistline between your legs. (18) Using a string and a narrow length of ribbon, tie a key or pencil to one end of the string. Tie the other end of the string around the ribbon so it can slide. With a friend’s help, place the ribbon under the elastic in the center front, through your legs, and under the elastic in center back. Adjust the plumb bob (key or pencil) so it hangs freely at the bottom of your torso. Mark the ribbon where it meets the string and the waistline elastic front and back. Remove the ribbon/plumb line. To establish the correct inseam position, mark 3/4” (20 mm) from the center toward the front. Set aside for use in evaluating the crotch length. Compare MeasurementsAfter you have taken your personal measurements, compare them to the chart below. This will give you an idea of the pants size to start your pattern adjustments with. 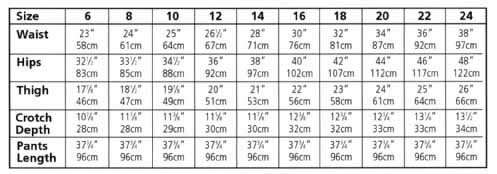
|
| PREV: Preparing the Fabric | Next: Understanding Ease | HOME |
Thursday, 2016-10-13 12:35 PST