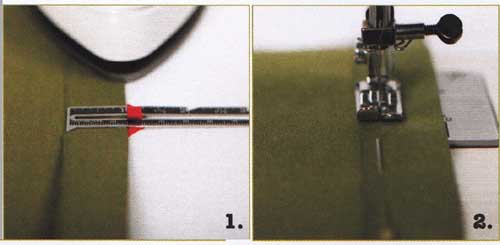
Many of your sewing projects need a hem somewhere, whether it’s the lower edge of a skirt, the top edge of a bag, or the opening of a pillowcase A smooth, beautifully stitched hem of the right type for the project will help give your work that finish that carries it over the line from homemade into handmade. Hem allowance The amount of fabric folded over to make the hem is called the hem allowance. On lightweight fabrics this is usually 1(2.5cm) for a single hem and for a double hem—the most commonly used type—it will usually be 1 3/8” (3.5cm). Always check a pattern to see what it specifies. Hem allowances on heavier fabrics can be up to 3” (8cm), as narrow hems on thick fabrics become stiff and bulky. Curtains will routinely have a hem allowance of up to 8” (20cm). You can add extra to the hem allowance on children’s garments to allow for letting the hem down as they grow, but bear in mind that too deep a hem will hang oddly. When the hem is let down there may be a permanent mark on the fabric along the original fold line. This mark can be disguised by sewing ribbon or braid over it, but a fashion-conscious child may not be thrilled by this idea. Single hem
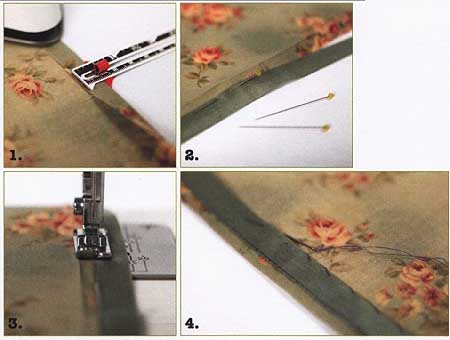
2. Pin the selvage edge in place. Set the sewing machine to a medium straight stitch. Put the fabric under the presser foot of the machine with the edge of the foot against the selvage edge. Machine-sew the hem, removing pins as you get to them and reversing at each end to secure the stitching. Selvages: The selvage is the edge along the length of the fabric: it's created during production of the fabric and won’t fray. Woven fabrics, such as the one used here, usually have a selvage that's the same colour as the main part of the fabric, but it can have a slightly different, tighter weave. This can shrink during washing, which would make a selvage-edge hem pucker unattractively and permanently. Printed fabrics usually have a white selvage—often with the manufacturer’s name printed on it—and that, too, can be of different weave. If you want to use a selvage, wash a bit of the fabric first to see what happens. Also see our discussions on...
Best used for...
Double hem
The most commonly used type of hem, this gives a neat finish by enclosing the raw edge. If the fabric frays readily, then either trim the raw edge with pinking shears or zigzag it before making the first fold.
2. Fold the fabric over by a further 1” (2.5cm) and press this second fold. Pin the folded edge in place and machine-sew the hem as for a Single Hem, positioning the edge of the foot against the first pressed fold. Best used for...
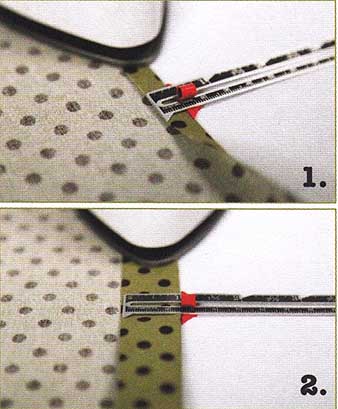
Narrow hem It can be difficult to make a very narrow double hem, especially on sheer fabrics. This method is quick, easy, and successful. You need a hem allowance the desired width of the double hem, plus 5/8” (1.5cm).
2. Trim the seam allowance close to the line of stitching. The distance between the folded edge and the trimmed edge establishes the depth of the hem. 3. Fold the hem over to enclose the raw edge and machine sew again, sewing over the first line of stitching to complete the hem.
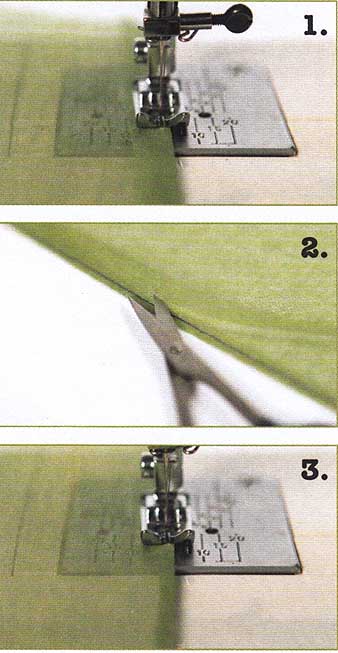
Blind-stitch hem Above: a blind-stitch hem on the right side of the project (left) and on the wrong side (right). This is a hem that relies on your sewing machine having a blind stitch setting, but it's a fairly basic function and most modern machines will have it. It can require a bit of fiddling about to get a perfect result, so check the instruction manual for your sewing machine for any specific information and practice on a spare piece of the fabric first before hemming a project. Best used for...
1. Follow Steps 1 - 2 of Double Hem. 2. Fold the pressed hem to the right side of the main fabric so that just a small amount of the 3/8” (1cm) hem is visible, as shown. The precise amount that needs to be visible will depend on the settings your sewing machine uses, so this is where the manual and practice come in.
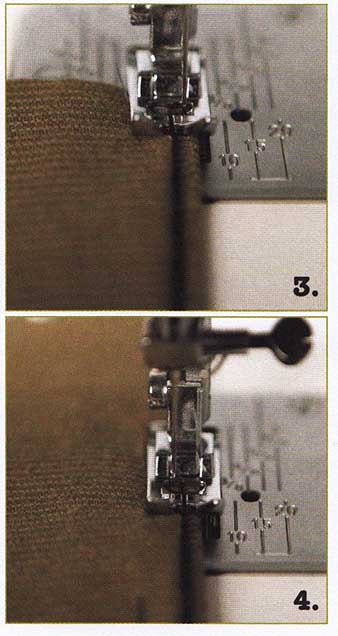
4. As you sew the hem, the needle will move across to the left and at its furthest left position it should be going down into the fabric just over the folded-back edge. The needle should not be right on the fold or the stitch will not catch enough of the fabric to make the hem secure. It also should not be too far over the fold or the stitch will be very visible on the right side. Experiment on your spare piece of fabric until you’ve got the position of the fabric under the needle exactly right, then, if necessary, mark the position of the right-hand edge of the fabric on the throat plate with a piece of masking tape. Curved Hem
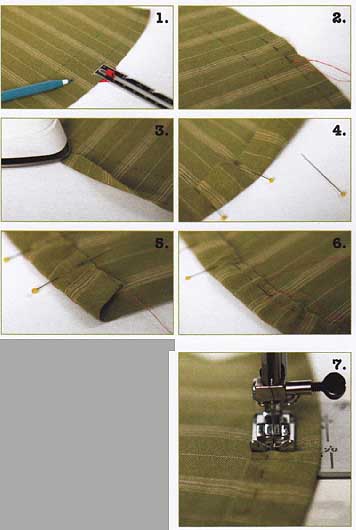
Projects with curved edges—such as a circular skirt or a round tablecloth—will need this hemming technique. The basting might seem a little time-consuming, but it's worth doing for a perfect finish. Remember to test the fabric marker on a scrap of the fabric to make sure the mark will disappear.
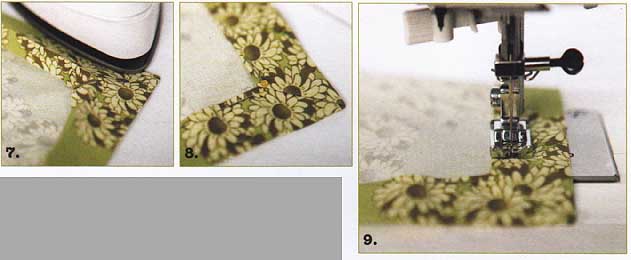
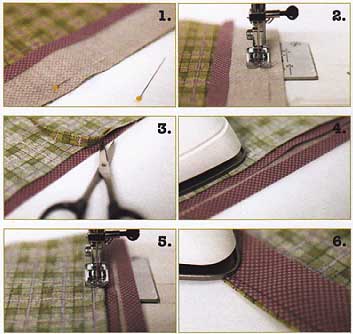
2. Using a contrast-colored thread, baste along both marked lines. You can use quite long basting stitches, but try to make them fairly even in length. Leave long tails of thread at each end of the basted line nearest the raw edge. 3. Fold the fabric over along this lower basted line and press the fold. Don’t worry about pressing any puckers or gathers in the folded-over fabric, just concentrate on getting a smooth hem line. 4. Fold the fabric over along the upper basted line, but don't press the fold at this stage. Put in lots of vertical pins—heads facing out—to hold the hem in position. Again, don’t worry about puckers in the fabric, concentrate on making the hem line a smooth curve. 5. Gently pull on the long tails of thread left at each end of the lower basted line. Working methodically along the hem, pull up and adjust the gathers evenly until the inner edge lies as flat as possible. 6. Baste along the inner edge of the hem, using small stitches to baste the gathers in place. Press the hem, pressing the gathers flat. 7. Set the sewing machine to a medium straight stitch. Put the fabric under the machine with the edge of the foot against the inner hem line. Machine-sew the hem, sewing carefully over the gathers to prevent them pushing up into lumpy groups. Remove the basting stitches and press the finished hem thoroughly. Corner hem The idea of having to produce a square, flat, mitered corner is one that sends many novice sewers pale, but it isn’t a difficult technique to get right, you just need to be able to measure and press accurately As usual, the raw edges can be overcast or zigzagged if you are worried about the fabric fraying.
2. Open the pressed hems out flat and lay the fabric right side down. At the corner fold over a triangle of fabric: the point where the second pressed lines cross should be in the middle of the folded-over edge. Press the corner fold flat. 3. Open the corner out then, right sides together fold the corner in half, matching the raw edges and the ends of the pressed corner fold. Pin the layers together along the pressed corner fold, with the head of the pin facing toward the raw edges of the fabric.
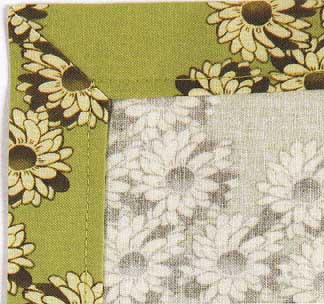
5. Trim off the corner of fabric 1/4” (5mm) above the line of stitching. At the folded edge, clip off a little more fabric at an angle, as shown. 6. Open the corner out square along the second pressed hem lines. Press the edge trimmed in Step 5 to one side. The clipped angle—which is now at the point—should sit neatly inside the square corner.
8. Turn under the first pressed hem lines and pin them in place. 9. Put the fabric under the machine with the edge of the foot against the first hem line. Machine-sew the hem, pivoting the fabric around the needle at the square corner Press the hemmed edges and corner thoroughly.
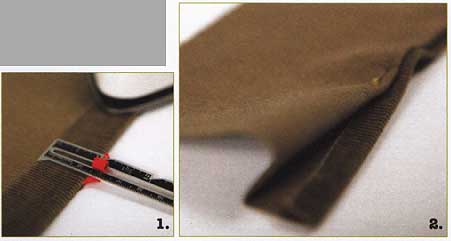
Taped hem
2. Lay the fabric flat and pin the ribbon to the right side, ¼” (5mm) below the fold. 3. Set the sewing machine to a medium straight stitch. Put the fabric under the presser foot of the machine with the edge of the foot against the pressed fold: when you start sewing the line of stitching should be on the ribbon, very close to the upper edge. Machine-sew the ribbon to the fabric. 4. Re-fold the fabric along the line pressed in Step 1 ,then you have a choice of finishing technique. You can machine-sew along the other edge of the ribbon or you can slipstitch it by hand, as shown. Slip stitching is almost invisible on the right side, but if you machine-sew the edge then the line of stitching will be visible (see Step 6, Faced Hem,). Choosing ribbon or tape: The ribbon or tape must be a similar weight to the fabric, so don’t use lightweight ribbon on thick woolen fabric. Also, you must take laundering into account: the ribbon and the fabric must be wash compatible. Once you’ve resolved these practical issues, consider the look of the thing. A pretty, patterned tape will be seen by almost no-one except you, but you’ll know it’s there. It adds a fabulous finishing touch, and those who do catch a glimpse will be impressed. Faced hem This style of hem is similar to the Taped Hem and is great if you are short of your main fabric, but as you are joining two fabrics close to the hem line it’s not good for heavyweight fabrics because the seam will create bulk. Again, it’s a perfect opportunity to add a designerly touch to a project by facing the hem in a fabric that complements—or contrasts with—the main fabric. The facing should be between 2¾” (7cm) and 1 1/2” (4cm) deep and should be of a fabric that's a similar weight and fiber content as the main fabric. The technique is shown here on a straight hem, but you can also use it on curved hems, just cut the facing to match the curve of the main fabric. Best used for...
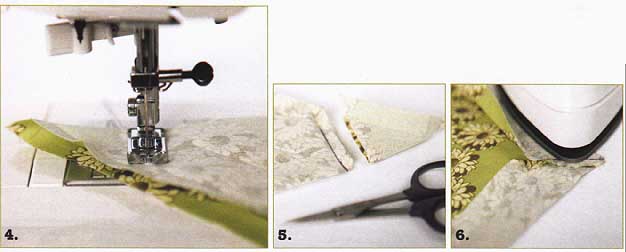
2. Set the sewing machine to a medium straight stitch. Using thread to match the facing and taking a ¼” ( seam allowance, machine-sew the facing to the hem. 3. Trim the seam allowance of the main fabric to about half its depth. This edge can be cut with pinking shears if the fabric has a tendency to fray 4 Press the seam flat then press the facing flat, pressing both seam allowances toward the facing. 5. Understitch the facing by sewing a line of machine stitching 1/8”” (3mm) from the seamline, sewing through both seam allowances and the facing. 6. Fold the facing to the wrong side of the main fabric, folding over just a tiny amount of the main fabric at the same time to ensure that none of the facing shows on the right side. Press the fold. You can finish the top edge as for a Taped Hem by either slipstitching or machine-sewing it. If you slip-stitch then choose a thread color to match the main fabric. If you machine sew, then sew with the facing uppermost and match the spool thread to the facing and the bobbin thread to the main fabric for best results. |
| PREV: All about seams | NEXT: Fastening and Fasteners: Zippers, Buttonholes, Ties, and Loops | Home |
Monday, 2011-08-22 15:14