Sewing straight lines The first and simplest sewing technique to learn is the seam. Once you can sew two pieces of fabric together, you can make something. There are different styles of seam and various ways of finishing the seam allowances, depending on what you are making and the fabric you use. Most often the seam you require will be straight, and it’s important that you sew it straight. A wobbly seam will look terrible and can affect the fit of a garment. Many beginners struggle to sew in a straight line, but there are tips and tricks for mastering this, and of course I am going to share them with you. The amount of fabric between the raw, cut edge and the line of stitching that makes the seam is called the seam allowance. In dressmaking the standard seam allowance is 5/8” (1.5cm), though you should always check a sewing pattern to see what it requires.
Before you start sewing fabric, get some sheets of ruled paper (pages from an ordinary notebook are perfect) and practice sewing along the lines. Set the sewing machine to a medium straight stitch, take it slowly, pressing the foot pedal gently, and get used to guiding the paper with your hands to keep the line of sewing running along a line on the paper Before you start sewing fabric you MUST change the needle in the sewing machine because sewing the paper will have made it blunt.
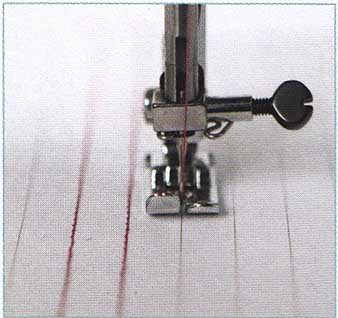
Magnetic guide: To make this easier still, you can buy a magnetic seam guide. This is a handy little gadget that you put on the throat plate along the appropriate marked line. It gives you a raised, easy-to-see guide to keep the edge of the fabric running against while you sew the seam. Masking tap If you have to sew with a seam allowance that's wider than any of the marks on the throat plate, then stick a piece of masking tape on the bed of the machine to act as a guide. Measure out the required extra distance from the last marked line on the throat plate then stick on the tape, being careful to keep it parallel to the marked line.
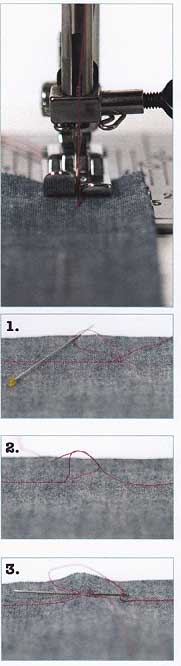
A completely different way of keeping to a seam line is to mark it on the fabric. Always use a proper fabric marker and test it on a scrap of the fabric first to make sure that you can remove the mark. This method can be useful when sewing a shaped seam, as you can concentrate on the stitching and not worry about where the edge of the fabric is. Starting and finishing sewing You need to secure the ends of all lines of stitching or they will work loose and your seams will split. There are two simple ways of doing this. Reverse stitching Most modern sewing machines have a reverse stitch function. This is usually a little lever that you hold down, or a button you push, to make the machine sew backward -- and a few backward stitches are a great way to secure the ends of most seams. Knotting ends If the line of stitching is visible (for example, top stitching), a reversed end can look untidy. The best solution here is to tie the threads in a firm knot on the wrong side of the fabric. 1. Before starting to sew, pull the top and bobbin threads through the machine until they are about 4” (10cm) long. Then sew the seam. At the other end, cut the threads 4” (10cm) from the fabric. Pull gently on the bobbin thread to pull a 1 of the top thread down through the fabric. Slip a pin into this loop and pull the top thread right through, so that both ends of thread are on the wrong side of the fabric. Position the fabric in the machine with the raw edges against the appropriate seam allowance mark and so that the needle will start sewing about 3 from the start of the seam. You can check that the fabric is positioned correctly by turning the handwheel to lower the needle until it just touches the fabric. Hold down the reverse lever and slowly sew a few stitches backward. Try not to sew over the edge of the fabric as it may pucker. Release the reverse lever and machine-sew forward to sew the seam. When you reach the other end of the seam, just before you get to the edge of the fabric, hold down the lever again and sew backward for 3/8” (1cm). 2. Tie a single knot, but take one end of the thread twice through the loop formed by the other end before tightening the knot. Tie a second knot in the usual way. This is called a surgeon’s knot and the double twist at the start prevents the first knot slipping loose while you tie the second one. Trim the ends of the thread about 3/8” (1cm) from the knot. 3. If the knot is going to come under strain, sew in the ends of the threads. Thread the ends into a hand-sewing needle and either weave the needle in and out of a few stitches, or make tiny backstitches in the seam allowance, as shown. When weaving in and out of stitches, be careful to take the needle under them and not split the stitches with the tip of the needle.
Finishing edges Most fabrics will fray to some degree, so the raw, cut edges of an open seam allowance need to be neatened—or finished as it’s also called—to prevent them eventually fraying so far that the seam splits. The method of finishing you choose will depend on how much your fabric frays, how special the project is, whether the seam allowances are visible, and whether they will be subject to wear and tear. Check out ... Stitches; How to run a sewing machine; Pressing; Sewing straight lines; Open seam; Zigzag bias binding. Best used for ... Open seams; All fabrics that fray 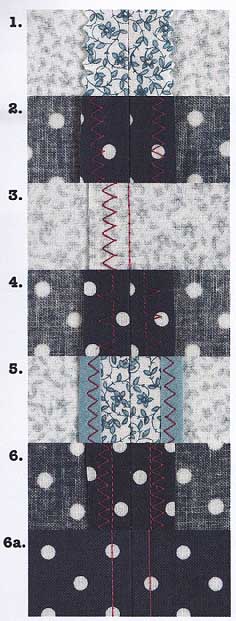
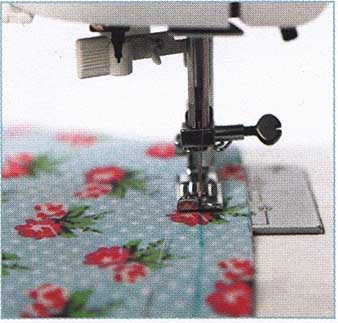
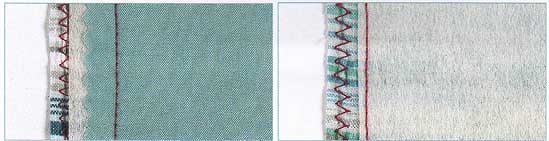
1. Items such as fancy-dress costumes or pillows made from fabric that doesn’t fray much, can just have their seam allowances trimmed with pinking shears. This is perfectly adequate for projects that don’t need to last or won’t get much wear but not for anything else. 2. The most commonly used method of finishing seam allowances is zigzagging them. All but the most ancient of sewing machines will have a zigzag function. Test the width and tightness of the zigzag on a scrap of the project fabric and adjust it until it fits within the seam allowance and doesn’t pucker the fabric, Press the seam open then zigzag stitch along each allowance in turn. Trim them afterward if necessary. 3. If you are in a hurry and the project isn’t special, then you can zigzag the allowances together Press the seam open, then press it flat again. Set up the zigzag stitch as before, then zigzag stitch along both allowances together. Trim them if necessary, then press them to one side. 4. If your machine has an overcasting function, then you can use that to finish the allowances in a similar way to zigzagging. 5. For seams that will be visible, zigzag binding is practical and good-looking, though it's time consuming. If you can cut fabric and sew seams very accurately, then consider binding all the edges of the project pieces before sewing them together; it’s easier but hard to change if you get anything wrong. Otherwise, bind the seam allowances after sewing the seam. Turn to Zigzag Bias Binding for instructions. 6. Pinked, open zigzagged, overcast, and bound seams can be topstitched for added security, and the lines of stitching are a great finishing detail on the right side (see 6a). This is practical for thick fabrics, or fabrics that are difficult to press so the seam allowances don’t lie very flat. Finish the seam allowances using the desired method. Right side up, place the fabric under the machine with the edge of the presser foot against the seam. Keeping the edge of the foot against the seam so the stitching is beautifully straight, topstitch the length of the seam, sewing through the main fabric and seam allowance. Repeat on the other side of the seam, starting from the same end as before. Working in the same direction on each side of the seam prevents the fabric distorting. You can topstitch seam allowances that have been zigzagged together with a single line of top stitching on one side of the seam. However this can make for a bulky seam, so experiment on a scrap of the fabric first. Trimming and layering seams If a seam is joining more than two layers of fabric, or if a fabric is very thick, the seam can become bulky. This can make it lie badly or show on the right side of the fabric when the seam is pressed. Trimming the seam allowances can cure these problems. Check out... Pressing; Sewing straight lines; Finishing edges; Open seam. Best used for... Open seams; All fabrics, especially heavyweight ones.
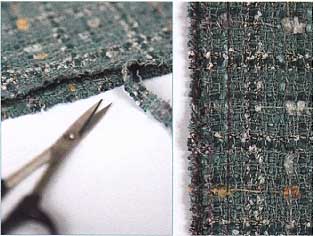
Trimming When two layers of thick fabric are seamed, carefully trim off up to two- thirds of one or both seam allowances using small scissors. Trimming one seam allowance only will mean that the two no longer align and so will produce less of a bump if they are pressed to the same side. Trimming both seam allowances makes the seam less bulky if it's being pressed open. If you are concerned about the fabric fraying, either trim with pinking shears or finish the edge after trimming it. Layering
If the fabric is interfaced with sew-in interfacing, as above, then that can be trimmed very close to the line of stitching as it won’t fray. If you are using iron-on interfacing, then trim it before ironing it onto the fabric and sewing the seam. = = Shaped seams These also need to be trimmed, but in slightly different ways depending on whether they are corners, curves, or points. See Around the Corner to find out how to deal with the seam allowances on these shapes. = = Open seam This is the most basic seam and the one that you will use most often. Although it’s easy to do, it’s worth learning to sew it smoothly and well, as all of your projects will look better when the seams are perfect. Check out...Stitches, How to run a sewing machine, Pinning, Basting, Pressing, Sewing straight lines, Starting and finishing sewing, Finishing edges. Best used for... Straight seams, Gently curved seams, All fabrics, especially heavyweight ones 1. Right sides together pin the two pieces to be seamed and , if necessary, baste them 3/8” (1cm) from the raw edges. 2. Set the sewing machine to a medium straight stitch. Position the fabric in the sewing machine to take a 5/8” (1.5cm) seam allowance. If the ends of the seam are going to be reversed to secure the stitching, position the fabric so that the needle will start sewing about 3/8” (1cm) from the start of the seam. 3. Sew in reverse for 3/8” (1cm), then machine-sew forward to sew the seam. When you reach the other end, sew in reverse for 3/8” (1 cm). 4. Remove the basting stitches. Press the seamed area flat, then press the seam allowances open. Finish the edges of the seam allowances as desired. 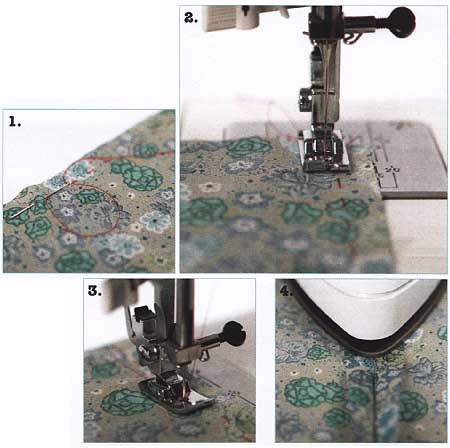
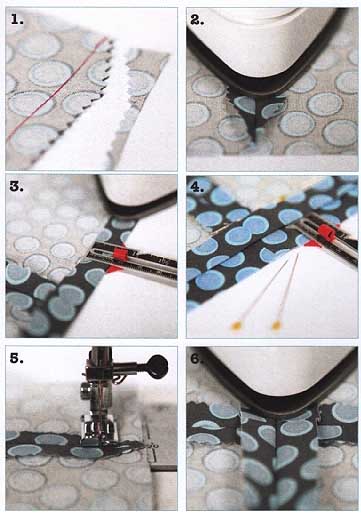
French seam This is a classic seam that encloses the raw edges of the fabric to create a neat finish on both sides of the work. It’s particularly good for sheer fabrics, such as the cotton organdie that's being used here, but not for fabrics that fray very easily. You need to be careful and accurate when trimming the allowances in Step 2 so that no stray threads poke out through the final line of stitching. Check out... Stitches, How to run a sewing machine, Pinning, Basting, Pressing, Sewing straight lines, Starting and finishing sewing, Open seem. Best used for... Straight seams, Sheer, lightweight, and medium-weight fabrics, Seams where the reverse is visible, Seams where the reverse will be subject to wear arid tear. 1. Pin the pieces of fabric together with the WRONG SIDES facing each other Sew the pieces together following Steps —3 of Open Seam, but taking a 3/8” (1cm) seam allowance. Press the seamed area flat but don't press the seam allowances open. 2. Trim both of the seam allowances to approximately 1/8” (3mm). 3. Along the seam, fold the fabric so that the RIGHT SIDES are facing each other and the trimmed seam is hidden in the fold. Pin the layers together 4. Put the fabric under the foot of the machine with the folded edge ¼” (5mm) from the needle. Many machines don't have a ¼” (5mm) mark on the throat plate, so either measure out from the needle and mark the distance with masking tape, or use a ¼” (5mm) presser foot, as here. Sew the seam, reversing at each end to secure the stitching. 5. Press the seamed area, then open the fabric out flat and press the enclosed seam allowance to one side. 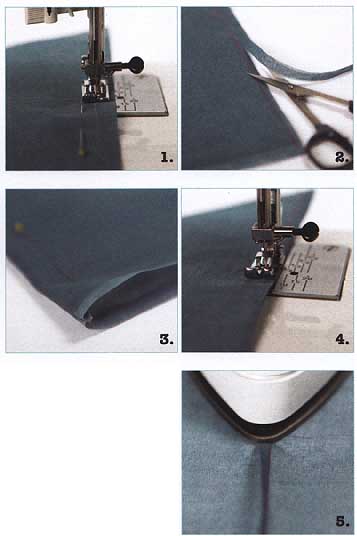
Self-bound seam Of all the seams with enclosed edges this is the best one for fabrics that fray easily, such as the dupioni silk used here, but don’t use it for heavyweight fabrics. The reverse isn't quite as attractive as that of the Mock French Seam and French Seam (opposite), but it will be durable. Check out... Stitches; How to run a sewing machine; Pinning; Basting; Pressing; Sewing straight lines; Starting and finishing sewing; Open seam. Best used for... Straight seams; Lightweight end medium-weight fabrics; Fabrics that fray easily; Seams where the reverse will be subject to wear and tear. 1. Sew the pieces together following Steps 1 - 4 of Open Seam, but don't finish the seam allowances. Trim one of the seam allowances to 1/4” (5mm). 2. Press the trimmed allowance over so that it lies flat on top of the untrimmed allowance. 3. Fold over the edge of the untrimmed allowance until it almost, but not quite, touches the trimmed edge. Press the fold. 4. Fold the pressed edge over the trimmed edge so that the pressed fold lies along the line of stitching of the original seam. The fold shouldn’t overlap the stitching or the seam can look lumpy on the right side. 5. Fold the fabric right sides together along the original seam and press the folded seam allowances. Position the fabric in the sewing machine so that the needle will start sewing very close to the folded edge: you can check this by turning the handwheel to lower the needle until it just touches the fabric. Machine-sew the seam. Press the seamed area, then open the fabric out flat and press the enclosed seam allowance to one side so that the folded-over edge is uppermost. 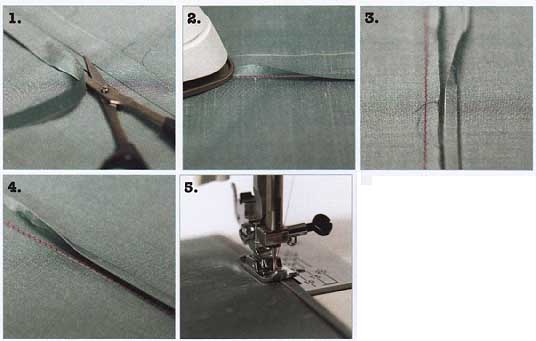
Flat fell seam Probably best known as the type of seam that runs down the outside leg of a pair of jeans, the flat fell seam is robust, suitable for heavyweight fabrics and , unlike all the other enclosed seams, it's flat on the reverse and so very comfortable to wear It does require a beautifully straight line of stitching to finish it in Step 5. Check out... Stitches, page 23 How to run a sewing machine; Pinning; Basting; Pressing; Sewing straight lines; Starting and finishing sewing; Open seam. Best used for... Straight seams; Medium-weight and heavyweight fabrics Seams where the reverse will be subject to wear and tear. 1. Pin the pieces of fabric together with the WRONG SIDES facing each other Sew the pieces together following Steps —4 of Open Seam, but don't finish the seam allowances. Trim one of the seam allowances to ¼” (5mm). 2. Press the trimmed allowance over so that it lies flat on top of the untrimmed allowance. 3. Fold over the edge of the untrimmed allowance so that it touches the trimmed edge. Press the fold. 4. Press the whole of the untrimmed allowance over so that it covers the trimmed one and all the raw edges are hidden. 5. Position the fabric in the sewing machine so that the needle will start sewing very close to the folded edge. You can check that the fabric is in the right position by turning the handwheel to lower the needle until it just touches the fabric. Machine-sew very close to the folded edge to complete the seam. Press the seam flat. 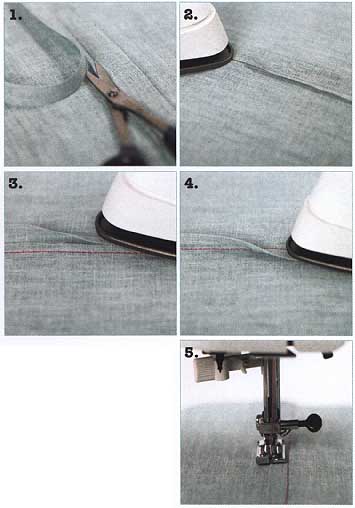
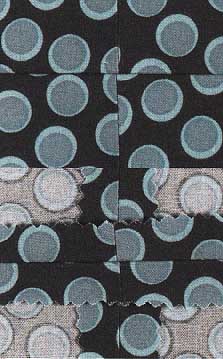
Intersecting seams Seams that cross or meet need to be treated in a particular way to avoid lumps of stacked seam allowances. This sample shows seams crossing one another but the same principles apply if two seams form a T-shape. Check out... Stitches; How to run a sewing machine; Pinning; Basting; Pressing; Sewing straight lines; Starting and finishing sewing; Open seam. Best used for... Lightweight and medium-weight fabrics 1. Sew the first pieces together following Steps 1—3 of Open Seam. Press the seamed area flat, but don't press the seam allowances open. At the end of the seam that will intersect, trim the seam allowances to a point, starting to cut about 3/4” (2cm) from the end of the seam and sloping the cut to end about 1/8” (3mm) from the line of stitching. Trimming the seam allowance with pinking shears will help prevent fraying without adding bulk. 2. Press the seam allowances open. Repeat Steps 1—2 on the other intersecting piece. 3. Measuring accurately, press under the seam allowance (across the trimmed end of the first seam) on one of the pieces to be joined. 4. Lay the pressed piece on the other piece, 5/8” (1.5cm) from the raw edge, and match up the seams perfectly. Pin the pieces together then press the top seam allowance flat again. 5. Taking a Vs” (1.5cm) seam allowance, sew the new seam as for an Open Seam. Stitch carefully over the ends of the first seams, being sure not to ruck up or pucker the seam allowances. Press the new seam flat, then press it open.
|
| PREV: Getting ready to sew | NEXT: Hems | Home |
Thursday, 2011-06-02 16:29