|
When you are learning to sew, it's necessary to learn: 1. The names of the main parts of the machine 2. How to thread the machine properly 3. How to make simple adjustments 4. The causes of common machine troubles and how to correct them 5. How to oil and clean the machine Sewing machine repairmen make many calls for simple adjustments which anyone who uses a sewing machine should be able to make. If you phone or call in at the shop, most companies are pleased to advise you. Unless you know the names of the parts, their purpose and use, they can't be of much assistance and will have to send out a service man. Why pay service charges when you can correct the trouble yourself? Study your sewing machine manual; keep it handy for reference.
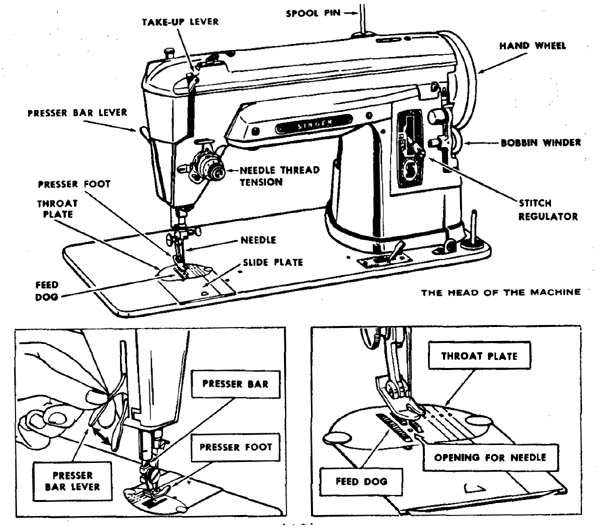
PRINCIPAL SEWING-MACHINE PARTS Presser foot — holds the fabric against the feed dog and is raised or lowered into position by operating the presser bar lever. Presser bar lever — is located at the back of the machine; its purpose is to raise and lower the presser foot or any attachment that's attached to the presser bar. Throat plate — the part directly under the needle through which the needle passes and through which the feed dog operates. Feed dog — the mechanism which moves the fabric. When sewing, the feed clog rises a precise amount above the throat plate, grips the material against the presser foot and moves the fabric after each stitch is formed. Open the left side of the machine head and you can see the entire presser bar. Raise and lower the presser bar lever and observe the operation involved. The amount of pressure is controlled by a dial pressure control or by a thumb screw (a smooth topped screw without a slot for a screw driver, turned by hand hence the name). Check your manual to locate the pressure control. Turn thumb screw or dial back and forth and simultaneously raise and lower the presser bar. You can “feel” the difference in the amount of pressure exerted by the presser foot on the fabric. You will learn how to adjust the pressure for different weights of fabric. Use heavy pressure for heavy fabrics and light pressure for light fabrics. Correct pressure is indicated by smooth, even handling of several thicknesses of fabric. Too light pressure will result in irregular feeding which affects the evenness of the seams and the quality of the stitch. Too heavy pressure affects the quality of the seam and stitch. The pressure of the foot will cause the teeth of the feed dog to scar and sometimes cut smooth-surfaced and pile fabrics. Always sew several test seams, 1. right sides of the fabric together, 2. wrong sides of the fabric together to observe how pressure affects top stitching on the garment. A number of special presser-foot attachments are available; some have a variety of uses. Those not furnished with your machine may be available at your nearest sewing center. Check periodically for new attachments. Many will assist handling and sewing of the fabric, others will aid in finishing seams or applying decorative trims. Be sure they will fit your machine. Ask for a demonstration. Zipper-cording foot — a narrow foot which can be moved to the left or right of the needle; designed to stitch close to a raised edge. Invisible zipper foot — designed for the application of invisible zippers. Button sewing foot — short open foot which accommodates any size sew-through button, holding it securely for stitching. The groove in the foot allows for insertion of a machine needle, over which a thread shank may be formed. Special purpose foot — used for satin stitching in monograms, motifs and applique work. Eyelet on left side of foot accommodates a cord which may be used with the satin stitching for extra decorative effect. Roller presser foot — ideal for sewing knits and stretch fabrics; knurled rollers provide needed grip to feed the top layer of fabric through evenly with the under layer. Also helpful when sewing nylon, dacron, plastic and tricot. Smooth even feed foot — gives smooth seams on knits, stretch fabrics, synthetics, vinyls, bonded, satins, plaids, velvets, fake furs. Over-edge foot — prevents seam edge from curling when finishing edge with zigzag stitch. MACHINE NEEDLES Machine needles range from fine (size 9) to heavy or coarse (size 18). Consider thread and fabric when selecting the size. The eye of the needle must be large enough for thread to pass through it freely. The needle must be fine enough not to mar or damage the fabric with a large puncture, yet heavy enough to pierce the fabric without being bent or deflected. The needle package indicates the size of thread suitable for the size of the needle. Size 14 or 16 is suitable for 50 mercerized thread, 60 to 80 cotton, silk, and can be used for sewing most light weight or medium heavy weight fabrics. Be sure to use like threads for both needle and bobbin. Ball point sewing machine needles should be used for sewing knitted fabrics, stretch fabrics and elastic. The rounded point pushes aside fabric yarns and doesn't pierce and damage yarns or elastic. Leather sewing machine needles have three-cornered points, knife edged for stitching leather. Replace needles frequently — worn, dull needles will not stitch smooth seams and will snag fabric. Bent needles often cause broken threads. To SET the NEEDLE CORRECTLY All sewing machine needles have long- and short-groove sides. Check closely — run your thumbnail along the long groove. All machines are threaded from the long-groove side of the needle. The needle is inserted according to the threading; threading direction varies, depending on age, model, and make of machine, from left to right, right to left or front to back. If in doubt, consult your machine manual. The long groove of the needle must always face the side from which the machine is to be threaded. If the needle isn't placed correctly the machine will not sew. LENGTH of STITCH and ADJUSTMENTS The fabric and the purpose for which the stitching is being done determines the stitch length. The general rule is a short stitch is used on fine fabrics and a longer stitch on heavier fabrics. Consult your machine manual and locate the stitch length control.
TENSION and ADJUSTMENTS Machines for home sewing have two tensions; one Controls the upper thread, the other controls the lower or bobbin thread. The upper tension regulator controls ‘pull’ or tension of the needle thread. A spring and screw on the bobbin case controls pull on the bobbin thread. (Do not adjust this screw unless you are an experienced seamstress.) When tension on both threads is balanced the stitching locks between the two layers of fabric and looks the same on both sides of the seam. To test the tension use two colors of thread, one on top, the other on the bobbin. Stitch three seams, one on the crosswise grainline of the fabric, one on the lengthwise grainline, one on the bias. If tension is balanced, lock of the stitch occurs between the two layers of fabric. If upper tension is too tight, thread from the bobbin is pulled up to the top layer of fabric. If upper tension is too loose, loops of upper thread are seen on the underside of the seam. Adjust upper tension until you obtain a perfect stitch. Never adjust the screw on the bobbin case unless it's absolutely necessary, because adjusting bobbin tension is a very delicate operation. Most bobbin cases are removable — take it down to your sewing center; they will likely have a machine similar and check it for you. Phone and tell them the model of your machine and type of case and ask their advice. Avoid a service charge if possible. Sometimes bits of lint become lodged between the tension discs of the tipper tension control or under the spring on the bobbin case. Re threading the machine and bobbin case will usually remove the lint. Repeat the procedure a number of times if necessary. MINOR MACHINE PROBLEMS If the machine will not move the fabric and stitches on a single point: - Loose threads may be caught on the presser foot or on the bobbin case. - Stitch adjuster is set in neutral position. - Feed dog has dropped down; may have been lowered for darning or embroidery. Thumb screw on feed throwout device may have become loose. Check manual to locate throwout device and follow instructions for raising feed. If the machine isn't feeding properly: - Pressure may be too light for fabric being used. - Teeth of the feed dog are worn smooth. Remember the teeth will wear smooth if the machine is run with pressure foot lowered and no material under it. Always raise presser foot after each stitching. If the machine is working heavily: - Bobbin winder left down, bringing pressure on balance wheel. - Drive belt is too loose or too tight. Check manual for adjusting tension on belt. If tension can't be adjusted a new belt may be required. - Oil in moving parts may have become “gummed” and machine needs cleaning. If the needle breaks: - Needle may be bent or blunt. - Needle may be inserted wrongly. - Needle may not be pushed into needle clamp as far as it will go. - Perhaps you pulled the fabric instead of letting it feed under the presser foot at its own speed. - You have used the wrong size needle for the thread or fabric. - You have stitched across a very thick portion of the garment using too fine a needle. - Presser foot has become loose and the needle struck it. - There is a knot in the thread. If the bobbin thread breaks: - Bobbin is threaded incorrectly. - Bobbin tension is out of balance with upper tension. - There is a knot in the thread. - Bobbin is wound unevenly. If the needle thread breaks: - Needle may be blunt or bent. - Machine is threaded wrongly. - Upper tension is too tight. - There is a knot in the needle thread. - Needle isn't the correct size for thread or fabric. - Needle isn't inserted correctly. - Roughened hole in throat plate. If there is a mass of tangled thread on the underside of the seam: - You did not draw up the bobbin thread and hold both needle and bobbin thread when you lowered the needle into the fabric. - Bobbin not inserted correctly. If machine jams and needle and bobbin become immovable: - Loosen and remove needle and fabric. - Remove bobbin case. - Clean out any thread or fabric, re-insert needle, re-thread machine and bobbin. If machine skips stitches: - Needle in backwards. - Needle not inserted as high as it will go. - Needle point is blunt or broken. - Needle is imperfect — too short or is the wrong type for your machine. - Wrong size of thread for weight of fabric. CARE and MAINTENANCE of the MACHINE (cleaning and oiling) The care of the machine is very simple. Do not neglect it. Keep it clean. A small lint brush is usually provided with the machine. - Dust off lint and fluff around all moving parts of machine head and underneath head. Manual gives guidance on how and where. - Dust machine each time you use it. - Remove lint, dust and threads before oiling. - Oil little and often. - Kerosene will remove “gummed oil” — use a very small paint brush dipped in kerosene; wipe off excess. - Consult manual to find out which parts should be oiled and how often. - Thread machine and stitch on several layers of fabric or paper toweling until all surplus oil has been worked out. - If you have oiled the machine before putting it away, slip a double thickness of paper toweling or absorbent fabric under the presser foot; lower needle into fabric; raise presser foot. Excess oil will be absorbed and will not stain your fabric the next time you use the machine. - Keep machine covered when not in use. BUTTONHOLE ATTACHMENT Some newer machines have a built-in buttonholer; simply turn a dial and sew to any size. Buttonholes can be made with any zigzag or swing needle machine — these have a bar tack at each end. Raised or corded buttonholes can be made by using the “special purpose foot”. Follow your sewing machine manual for directions. For straight stitch machines you can buy buttonhole attachments (also used on zigzag machines). The attachment makes buttonholes with rounded ends and straight or keyhole buttonholes. Many dressmakers prefer using the attachment because the finished buttonhole resembles a handmade buttonhole; if you work over this buttonhole by hand it has a custom-made look. A set of templates is furnished with the buttonholer for a variety of sizes. Additional templates are available, as well as an eyelet template for studs and lacings. - Follow buttonholer instruction booklet for attaching it to the machine and for use. - Always use feed cover plate. - Adjust pressure so it's sufficient to hold cloth firmly. - Slide paper over fabric when inserting it under buttonholer and when removing it to eliminate the danger of teeth on cloth clamp catching fabric threads. - A strip of paper placed under fabric while making buttonhole helps with some problem fabrics. Paper is easily torn away later. Try samples, using different weights of paper and select most suitable. - All garments should have interfacing of a firm fabric to keep buttonholes in shape. Select interfacing to suit fabric; e.g., organdy or fine lawn for light weight fabrics and sheers; firm cotton or taffeta for wool and synthetics. - After completing buttonholes, press and carefully cut through each center with small, very sharp, pointed scissors. Some people like to use a seam ripper, but it needs skillful handling to avoid cutting too far. - Always make a sample buttonhole, using two layers of garment fabric and interfacing; press and cut open; try it over your button. LEARNING to STITCH Before starting to sew, practice machine stitching, stitching curves, turning corners, stitching parallel rows of stitching spaced at various intervals. To stitch straight, watch the point at which the needle enters the paper or fabric. - Use two layers of paper toweling, draw lines. - Leave machine unthreaded and stitch. - Stop at intervals and inspect holes in paper to see if you have followed lines. - Thread machine. Using two layers of fabric, repeat practice-stitching processes. Practice reverse stitching. Remember: Always use two layers of fabric when you check for stitching length and correct tension. Why? You will be using two layers when constructing your garment; if tension is balanced, the lock of the threads will be between the two layers. CLOTH GUIDE OF SEAM GUIDE This guide is standard equipment for most machines; aids in straight stitching. It is fastened to the machine by a thumb screw and can be adjusted to various distances from the needle. It is also useful for edge stitching and tucks. Some machines have scored throat plates to guide edges of seams, hems, and tucks. These markings are at 1/8-inch intervals. On some throat plates there are cross lines on each marking to indicate the point to pivot on the needle when turning square corners. Scored throat plates can be purchased and are more satisfactory than using a cloth or seam guide. A strip of adhesive tape or line scratched on the throat plate at the 5/8-inch seam allowance will act as a guide. If scratching a line, do so carefully and file off any rough edges, so they will not snag delicate fabrics. A magnetic seam guide is also available, which adheres to the machine by a non-slip power grip magnet, can be set for the desired width. STARTING to STITCH 1. With needle up, presser foot up, place the fabric under presser foot so needle, when lowered, will enter fabric exactly where first stitch should be. 2. Lower needle. 3. Lower presser foot. 4. Be sure that both tipper and lower threads are pulled well back under pressure foot; hold them to prevent tangling. 5. Use left hand to guide fabric. 6. Use right hand to turn balance wheel. 7. Start to stitch slowly and increase speed gradually; slow down as you near end of seam, holding balance wheel lightly to stop at the end. (Presser foot will wear teeth of feed dog if there is no fabric under it; also, under side of presser foot becomes worn and roughened.) 8. Let fabric feed through on its own — don't pull it through. When stitching over bulky sections (cross seams, etc.) pull gently or turn balance wheel by hand. 9. To turn a corner or rearrange fabric, be sure needle is down in fabric before raising presser foot. STOPPING STITCHING and FASTENING the THREAD It isn't necessary to fasten ends of threads on every seam. Consider the position of the stitching. If another seam crosses over the first seam, as when applying neck and armhole facings, seam allowances will be trimmed before turning the facing to the inside and your fastened threads will be cut off — so why bother to fasten them. Three ways to fasten the thread at the end of the line of stitching are: 1. Raise presser foot slightly and take two or three stitches in the same place. 2. Reverse stitch for about 1/2 inch — the exception to this is never reverse stitch at the point of a dart. Why? It will stiffen the point and will be almost impossible to press the point and eliminate a “bubbly” look. 3. Remove the fabric from the machine by drawing it to the back, cut the thread leaving ends about three inches long, and tie a dressmaker’s knot. GUIDING the FABRIC Let fabric feed through at its own speed. It is usually sufficient to guide fabric only in front of the presser foot. Use the left hand to guide fabric and keep the right hand near the balance wheel to stop and to stitch slowly near seam ends and dart points. Occasionally, when handling large garment sections or easing in slight fullness, you may require one hand behind the needle and the other in front. GENERAL SUGGESTIONS for BEGINNERS Before starting to sew you should be able to: - thread machine correctly - thread bobbin correctly - insert a new needle correctly — a needle improperly set can cause the thread to break - adjust pressure - adjust stitch length - adjust upper tension — too loose upper tension will cause loops on underside of seam; too tight upper tension can cause thread to break. Hints - If machine skips stitches, needle is too short — point may be blunt or broken off. Are you using the correct needle for your make of machine? - Always test stitch on two layers of fabric. - Make samples of seams on same fabric as garment: 1. on lengthwise grainline, 2. on crosswise grainline, 3. on bias — observe that bias seam doesn't pucker as readily as seam on true grainline. - Make a sample dart — use a generous sized piece of fabric so there will be several inches left below point of dart. - Use samples for test pressing to check correct temperature of iron; to check if seams or dart mark fabric when pressed — if so, use strips of brown paper under seam edges and dart edge. - Puckered seams — on some fabrics puckering will appear to press out then come back. To avoid puckering, use a finer needle, stitch slowly and evenly, and use correct stitch length and tension. If necessary, stitch over strips of paper; try different weights. Use a smooth even feed presser foot. - A narrow zigzag stitch and a ball point needle is most satisfactory for knits and for stretch fabrics because the seams will “give” when the fabric stretches, and the stitching will not break. - A zigzag stitch and a ball point needle is best for stitching elastic to a garment. - Napped or pile fabric should be stitched with the pile, not against it. Use a slightly longer stitch for heavy nap or pile so that pile or nap isn't held clown too tightly. - When joining a plain and a pile fabric, pin entire seam; baste with short stitches; machine stitch with plain fabric on top. Use the smooth even feed presser foot. - When stitching stripes and plaids it's often difficult to match them perfectly. Baste with short stitches — if necessary use two rows of basting, placing one on each side of stitching line. Use the smooth even feed presser foot. - When joining a bias section to a straight section, pin entire seam, baste with short stitches. Machine stitch with bias on top. - On some fabrics bias seams stretch badly while being stitched. Stitch with the grain. Baste a strip of tissue paper between the two edges of fabric. After seam is machine stitched, tear paper away. - To keep shoulder seams and neck edges of loosely woven fabrics from stretching, it's advisable to cut a strip of silk seam binding in half or use narrow cotton tape and baste it to the seamline. Stitch through the tape when stitching the seam. If the seam is curved, pre-shape the tape to fit by steam pressing. Draw the shape of the curve on the ironing board with chalk and use it as a guide when steam pressing. - When joining a curved section of garment to another section which doesn't have any fullness, it's easier to control the fullness if you ease stitch the curved section. Set stitch length at 8 - 10. Place a row of stitching on seamline, in portion of seam to be eased; draw up bobbin thread to make the slight fullness. Adjust carefully between pattern markings so fabric doesn't look puckered when stitched. Press seam over a curved surface. (An example of this procedure is the seam over the bust area in princess line garments.) |
| PREV: Your Sewing Tools | NEXT: About Fabrics | Home |
Wednesday, 2009-04-08 2:30