HOMEBasement Waterproofing solutions: Sump Pump guides: More Waterproofing resources: |
Since their functions are dissimilar, heated basements and heated crawl spaces are not insulated alike. A heated unfinished basement, potentially part of the living area of a house, must be insulated with compact materials in a way that makes finishing the space easy. A heated crawl space in a one-story house can never be lived in, of course, but it can be part of the house heating system. In some houses it serves as a huge duct, called a plenum, through which heat passes on its way to the living area above. Even a well-insulated plenum is relatively inefficient. Before insulating a heated crawl space, consider the advantages of ducts to carry the heat from its source to the living area—the ductwork may save enough fuel to compensate for its cost. If ducts can't be installed, you can greatly reduce heat loss by covering the ground with a polyethylene vapor barrier, and by draping the walls and part of the ground with insulation blankets as shown below.
For insulating the walls of a heated basement, the material commonly used is rigid foamed plastic. It is installed between furring strips, to which gypsum wallboard (not wood paneling) is nailed, covering and protecting the flammable plastic from fire. Be sure to get board with a Class A fire-rating stamp; it has the lowest rate of combustion. The space between the top of the wall and the sub- flooring is filled with flanged blankets.
Heated Basements
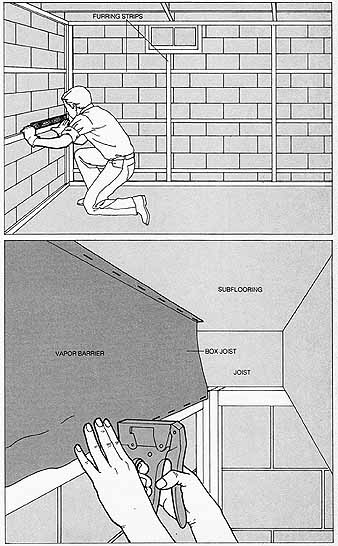
1. Attaching furring strips.
Cut 2-by-¾-inch fur ring strips to frame each window and load a caulking
gun with construction adhesive. Then run a bead of adhesive around the
window and press furring strips into the adhesive. In the same way, apply
furring strips in all corners and at the tops and bottoms of walls. Within
this framing, mount additional furring strips in a grid pattern to fit
the panels of rigid insulation board—usually 2 by 4 feet. If necessary,
use a carpenter’s level and a plumb bob to check the horizontal and vertical
alignment of the strips. 2. Insulating the box joists.
On walls that run in the same direction as the joists, the spaces between
the top of the wall and the subflooring are called box joists. Use one-piece
strips of flanged blanket for insulation. Install the blankets with the
vapor barrier facing you and the insulation tucked into the contours of
the space. At 6-inch intervals, staple one flange to the subflooring, the
other to the top of the furring strip frame.
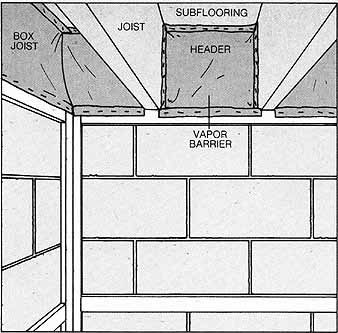
3. Insulating headers. The
spaces enclosed by the ends of joists, the top of the wall and the sub-
flooring, called headers, are insulated with sections of insulation blankets
cut with a 1-inch overlap over the top of the furring-strip frame. Fit
the sections between joists and staple the existing flanges to the joist
sides. At the bottom of each section, push the fluffy insulation back an
inch or so to form a bottom flange and then staple this flange to the furring
frame.
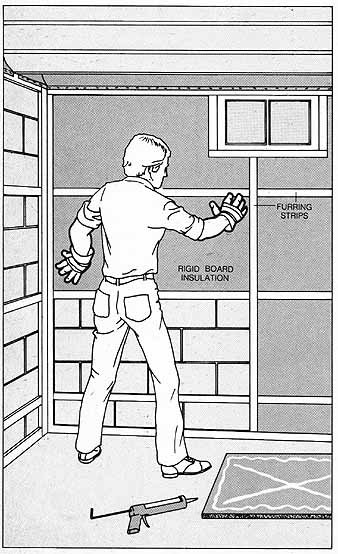
4. Fitting the rigid insulation.
Apply construction adhesive to the backs of the insulation boards in the
amount and pattern specified by the manufacturer—a common pattern is shown
below. Mount the insulation on the wall between the fur ring strips, cutting
the boards to size with a utility knife or a handsaw. The boards must fill
the spaces between strips snugly.
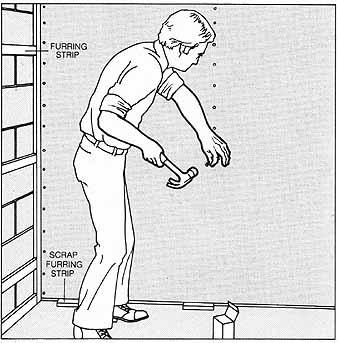
5. Covering the insulation.
For fire protection, nail to the furring strips ½-inch-thick panels of
gyp sum wallboard. The wallboard should be used even if you plan to cover
it with modern paneling. When attaching the wallboard, support the bottom
edges temporarily on scraps of furring strip. When you pull the scraps
from under the panels, the ¾-inch space left will protect the wall from
any moisture that accumulates on the floor.
Heated Crawl Spaces
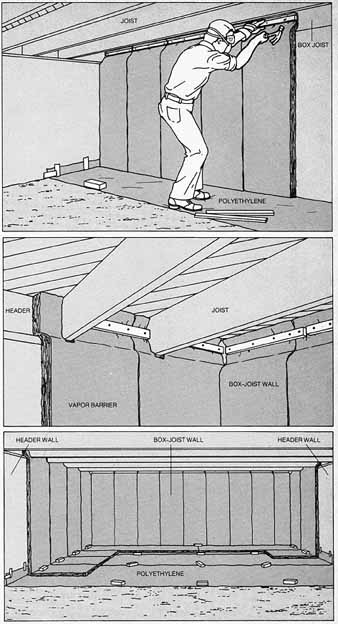
1. Insulating the box-joist walls.
Lay single strips of polyethylene vapor barrier along the ground next to
the box-joist walls—the walls that run parallel to the joists. Then insulate
these walls with sections of insulation blankets cut to the height of the
crawl space from the ground to the subfloor. Fasten the sections to the
walls, with vapor-barrier side facing you, by setting narrow strips of
scrap wood along the top of each section, and nailing through the wood and the insulation to the box joist.
2. Insulating the corners. Starting at the end of the crawl space farthest from the exit, install corner blankets with one side butting against the box- joist insulation and the top flush to the subflooring. Trim the blankets to fit around the joists and fill in the corners with scrap insulation. Run these blankets down the walls and along the plastic strip to meet in the middle of the room. At the meeting point and at the bases of the walls, weight both strips of insulation down with bricks.
3. Completing the header walls. Lay a second strip of polyethylene vapor barrier on the ground and install a second width of insulation blankets to the header walls; in these and succeeding widths, run the insulation only 2 feet onto the floor. Continue laying polyethylene and installing insulation toward the exit until you reach the opposite box-joist wall; there, install two blankets (Step 2) ex tending across the polyethylene to meet midway.