In the last few years, seismic retrofits on the West Coast have boomed as the Big One, long overdue according to most geologists, draws near. (The quake of 1989 was just a preliminary.) Happily, these retrofits—anchor bolts, shear walls, and metal connectors—are relatively easy to install in wood-frame houses, requiring little tear-out and, hopefully, providing the additional strength a house would need during a major earthquake. Retrofits primarily improve the connection of housing materials at various points: holding the sill fast to the foundation so that the structure doesn’t walk off, and keeping the multitude of nailed-together joints from pulling apart during a good shaking. Sections 4 and 9 contain additional information about these materials.
Anchor Bolts
Many older houses simply sit atop a foundation, without benefit of anchor bolts. There, you need to retrofit expansion bolts dropped into holes drilled through the sill and into the foundation; such bolts expand against the sides of the hole to hold the sill fast. Typically, retrofit bolts are 5/8-in. x 8 ½-in. long, spaced 4 ft O.C., and within 6 in. of board ends; any short sections of sill get at least two bolts. Center bolts in the middle of sills.
Bolt holes should be at least 4 in. deep, and preferably deep enough so that the washered bolt sticks above the sill about 1 in. Thus a 8½-in. bolt holding down a nominal 2 x 6 requires a hole about 6 in. deep in the foundation. Drill the hole through the sill and into the foundation in one operation, using a rotary hammer with a depth gauge; the hole should be the same diameter as that of the bolt. For this reason, it’s imperative that you clean the hole well, as described under “Setting Dowels”. A piece of coat hanger used as a depth gauge is also very useful to make sure that your hole is deep enough: as anchor bolts have to be pounded in with a hand sledge, it’s a nuisance to find that a hole isn’t deep enough after the bolt has been inserted.
Try to drill holes as vertical as possible, given the space constraints under your house. If the floor platform rests directly on the foundation—without a pony wall—you’ll have to bolt predrilled 3/8-in. steel plate to the side of the foundation, again using a rotary hammer. Tie the plate to concrete with ½-in. anchor bolts, and to sills with ½-in. lag bolts, As the plates should be spaced every 4 to 5 ft, this will be an arduous job. With the power of a rotary hammer, drilling is pretty straightforward, except when you hit rebar or bind the bit.
If the bit stops digging about 4 in. down, you’ve probably hit rebar: try another spot close by. If you consistently encounter rebar at that depth, insert 7-in, bolts (which require holes only 4 in. deep) spaced 32 in. O.C. (i.e., a bolt between every other 16 in. O.C. stud). Drill bits also bind, in which case you must release them from the hammer and turn them out by hand, using a large pair of Vise-Grips.
Not all foundations are strong enough to receive anchor bolts. Should your concrete be poor, you’ll discover that when you tighten down the first few anchor bolts: the bolts will turn freely in the hole or start to rise out. In that event, re-drill 5/8-in. holes and set ½-in. threaded rods in Pourstone. In fact, rods set in Pourstone are a good alternative to expansion bolts, and much cheaper.
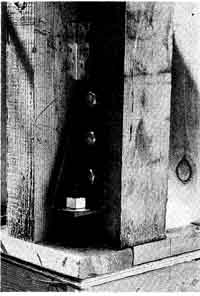
Figure 10.17 A hold-down.
Shear Walls
Shear walls are sheets of plywood nailed to a pony wall, from the top of the top plate to the bottom of the sill, primarily intended to stiffen the wall and keep it from racking during a quake. Install shear walls after you’ve retrofitted anchor bolts.
Measure the height of the walls carefully and cut plywood accordingly, favoring lengthwise cuts if they don’t waste too much wood. Every plywood joint must occur over a stud edge. Although ½-in. 5-ply plywood is sufficient for most shear walls, some builders favor 5/8-in. on side walls, where loads are greater. What makes a shear wall a shear wall is the nailing pattern. After snapping chalk lines to indicate studs and plates, nail up the sheets with galvanized 10d nails every 4 in.
When the shear wall is nailed off to studs and sills, drill two -in. vent holes per bay, to relieve moisture that might be present. Speaking of which, it’s advisable to treat the members of the pony wall with preservative before nailing up the plywood, to forestall rot and infestation. Because these chemicals are toxic and space is limited under the house, use a sprayer for installation, and get out of the area as soon as the task has been completed. Don’t return to install the shear walls until the fumes have abated. Important: See our section on applying preservatives safely. Use a fan to increase ventilation under the house, and get the best ventilator mask you can get, one with an ammonia-type filter capable of screening vapors. Check to make sure that the filter can handle the preservative you’re using.
As a final aside, make sure that the outermost joists in your floor platform have blocking to the adjacent joists. If not, add blocking to forestall their collapse during a shake- down. After the 1989 quake, some contractors advocated further buttressing shear walls with 2 x 6 braces run at a 45-degree angle from the bottom edges of joints to the mudsill, spacing such braces every 6 to 8 ft.
Metal Connectors
See elsewhere in this guide for an overview of metal connectors. Many metal connectors can be attached to framing members without disturbing exterior siding. Hurricane ties from rafters to top plates are imperative in cyclone country, where wind moving over a roof tends to lift it like an airplane wing. Such ties are desirable but not imperative in seismically active areas. Under the house, add steel tees or straps to join girders atop posts, or posts atop pier blocks. Galvanized steel plumber’s tape wrapped around the hot-water tank and nailed to framing will keep it from walking and possibly snapping a gas line.
Where you’re gutting finish surfaces in an extensive renovation, add metal hold-downs in addition to the other methods mentioned above. Ideally, these connectors run between floors. After pre-drilling for the threaded rod that joins hold-down brackets, lag- or through-bolt these brackets to studs. Attach washered nuts to threaded rods and insert them down through the two brackets; adjust and tighten the washered nuts on the floor below. Use hold downs at all corners and around any particularly large openings for doors or windows.