Fastening Objects to Masonry
In the course of most basement remodeling projects, something will have to be fastened to a masonry surface. For instance, shelf-support brackets or furring strips might have to be installed on concrete block walls, or the bottom plate of a partition wall might have to be nailed into a concrete floor. The task of fastening objects to masonry calls for special tools, fasteners, and techniques. It also calls for a protective dust mask and eye protection, as the process creates an abundance of fine, abrasive dust.
Hammer Drills. A power drill is indispensable when it comes to drilling into masonry. Consider buying or renting a hammer drill if many holes have to be drilled. This tool creates a hammering motion as the bit spins. The dual action helps shatter aggregate in the concrete and clear dust from the hole.
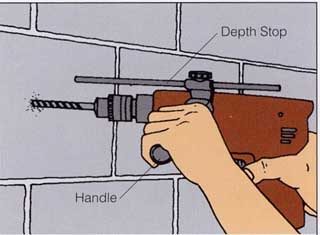
Hammer Drill. With an adjust able depth stop and auxiliary
handle, a hammer drill can be used with accuracy.
Drill Bits. A bit designed for use in masonry is recognizable by its enlarged carbide tip and unusually wide flutes. Though more brittle than steel, carbide holds up well to the abrasive process of drilling into masonry. The wide flutes help to clear dust and debris away from the hole. Bits with fast-spiral” flutes are the ones most commonly seen in hardware stores and home centers, but they are not suitable for drilling through wood and into masonry in one pass (as when setting wall plates). In this case, use a masonry bit with regular “twist” flutes. Some masonry bits have reduced shanks that fit into 3/8-inch drills.
Not all masonry bits, however, can be used in a hammer drill. The percussive action can damage or destroy some grades of carbide. Make sure the masonry bit used in the hammer drill is approved specifically for this use—look for a note on the packaging.
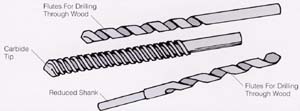
Drill Bits. The flutes of a masonry bit determine whether
or not it can be used to drill directly through wood into masonry (top and bottom). The reduced shank of some masonry bits allows them to
be used in standard 3/8-in. drills (bottom).
Drilling into Masonry
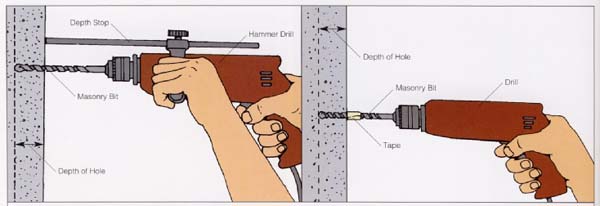
1. Marking the Depth. Every fastener has
a different depth requirement. If the drill has a depth stop, set it
so that you don’t waste time drilling deeper than necessary. If the
drill does not have a stop, fasten a piece of masking tape to the bit
as a visual reminder of how deep to drill.
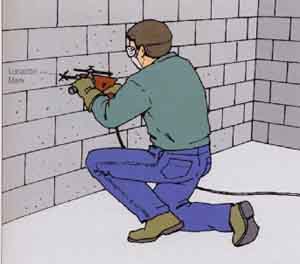
2. Drilling the Hole. Mark the location of
the hole with a large “X” as a visual cue for starting the bit on target.
Hold the drill in place, and check to see that it's perpendicular to
the surface. While wearing gloves (to cushion your hands from the percussive
motion of a hammer drill), press the bit firmly against the surface to
keep it from skating away from the mark. Then start the drill at a very
slow speed. As the bit begins to work into the surface, increase the
speed and pressure gradually until the tip of the bit is immersed completely
in the hole. Then maintain steady, firm pressure on the drill. Drill
at a relatively slow speed to keep the bit from overheating. The depth
stop halts progress at the proper depth. When drilling into a floor,
back the spinning bit out of the hole frequently to help excavate dust and debris.
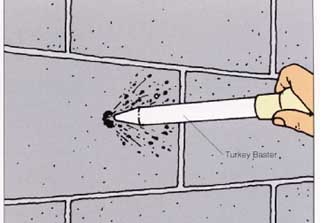
3. Cleaning the Hole. Remove all dust from
the hole. It might be tempting to lean close and blow out the dust, but
usually this results in a face full of grit. Use a rubber ear-syringe
or a turkey baster instead to blow debris out of the hole. Keep your
face well away from the action, and wear eye protection.

Clearing the Hole: If, while drilling into
concrete, progress stops before the hole is deep enough, it may be that
the bit has hit a large piece of aggregate or a length of steel reinforcing
bar (rebar). Pull the bit out of the hole, and scrutinize the tip. If
there are pieces of metal on it, the bit has hit rebar, and you’ll have
to start a new hole nearby. There is no way to drill through rebar. If
aggregate is the source of the slowdown, shatter it with a hand-drilling
hammer and a punch before resuming drilling. A hand-drilling hammer looks
something like a miniature sledge hammer, but its head is specially designed
for striking concrete nails and metal implements. While wearing safety
glasses, place the punch in the hole and strike it repeatedly with the
hand-drilling hammer until the aggregate shatters.
Masonry Fasteners
At one time, the choice for securing anything to masonry was limited to lead anchors. These days, however, there are many products from which to choose. Nearly all of them fall into one of two broad categories: mechanical anchors that grip the masonry, or chemical anchors that bond to it. For most fastening jobs encountered in the course of a basement remodeling project, mechanical anchors do quite nicely and are generally less expensive and more widely available than chemical anchors.
Lead Sleeve Anchors. The type of masonry anchor that most people know (and few love) is called a lead anchor. It consists of a lag screw and a lead sleeve that fits into a hole that's drilled in the masonry. When the screw is turned into the sleeve, the sleeve expands and grips the side of the hole. These fasteners are readily available and inexpensive, but their holding power is limited. Another disadvantage is that you have to drill two holes: a fairly large hole in the masonry (for the anchor) and a smaller one in the piece to be fastened (for the lag screw). Use them to install shelf cleats or in other situations where the screws are not subjected to a lot of pulling force (particularly if only a handful of fasteners are needed).
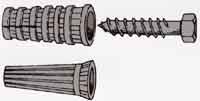
Lead Sleeve Anchors. Lead sleeves are available in one- and two-piece versions.
Plastic Sleeve Anchors. A better sleeve-type anchor has a plastic sleeve instead of a lead sleeve. Though you must still drill two different sized holes (one in the masonry and one in the workpiece), the hole for the sleeve is usually smaller than the one required for a lead anchor (a distinction that makes a big difference if you have to install many anchors). A more important advantage, however, is that a plastic anchor holds better than a lead anchor. That makes plastic a better choice for hanging heavy objects, such as cabinetry from a masonry surface.
Note: When using either plastic or lead anchors, the depth of the hole is important to consider. It must be just slightly deeper than the length of the anchor. If it's too shallow, the anchor can't seat properly and will not hold as well.
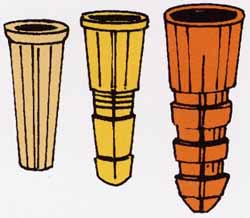
Plastic Sleeve Anchors. These are slightly tapered and hold
better than lead sleeves.
Hollow-Wall Anchors. When working with concrete block, usually it's best to drill right into the solid web of the block. This area offers the greatest holding power for sleeve- type fasteners. However, it may not be possible to guess where the web is located, or a fastener may be needed in a place where there is no web. In such cases, it's best to use a hollow wall anchor (sometimes called a toggle bolt). The most common version features a set of spring- loaded ‘wings” that are threaded to fit around a bolt. After the wings are slipped through a hole, they expand and grip the backside of the hole as the bolt is tightened. These fasteners are inexpensive but can be awkward to use—once the wings are in the hole, the bolt can't be withdrawn without losing the wings inside the wall.
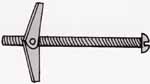
Hollow-Wall Anchors. The “wings” of a hollow-wall anchor
fold flat against the bolt so that the assembly can be inserted through
a hole in concrete block.
Concrete Screws. Though it seems implausible, certain types of specially hardened screws can be driven directly into concrete or concrete block without requiring a sleeve. These screws, often referred to by the brand name Tapcon, actually cut threads in the masonry. After drilling a pilot hole, simply turn the screw into the hole as if it were a wood screw. Though they are relatively expensive and not universally available, concrete screws are well worth the effort it takes to obtain them. They hold as well as most sleeve-type anchors and don't require two separately sized holes.
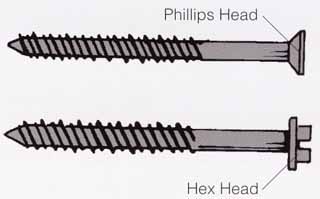
Concrete Screws. Concrete screws have two sets of threads and a Phillips or hex head.
Masonry Nails. For speedy installation, nothing beats a masonry nail. These fasteners have a thicker shank and heavier head than a standard nail of the same length; they also have flutes that lock into the masonry. When nailing into concrete, the work goes easier if the concrete has been poured within the last 30 days or so; fully-cured concrete requires more elbow grease. Though the holding power of a masonry nail is not great, they are easy to install, so you can use more of them. They particularly are useful when securing wood cleats to a wall and when fastening wall plates to a concrete floor. Masonry nails also can be used on concrete- block walls, but they should be nailed into the mortar joint rather than the blocks themselves.
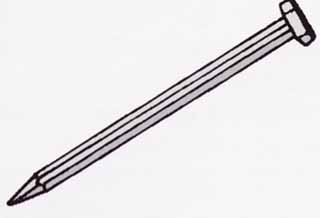
Masonry Nails. This nail has a fluted shaft and is hardened
to resist bending.
Hand-Drilling Hammer. Because masonry nails are treated with heat in a special process called hardening,” they don't bend as they are driven into masonry. Hardening, however, means that masonry nails must never be driven with a standard hammer—the nails are likely to dam age the hammer head, which can send razor-sharp metal shards into the air. Use a hand-drilling hammer or a ball peen hammer instead.
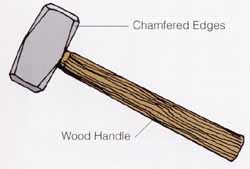
Hand-Drilling Hammer. The extra heft and special head of
this hammer make it the best (and safest) for striking masonry nails.
Always wear eye protection when working with masonry nails.
Caution: When working with masonry nails, wear eye protection to protect yourself from flying metal and masonry chips.
Chemical Anchors
Though a mechanical anchor handles most fastening tasks, in special situations a chemical anchor is needed (such as where the hole has to be made at the edge of a concrete block). Unlike chemical anchors, most mechanical anchors stress the masonry around a hole, so they are more likely to cause the masonry to crumble. The various chemical products work in similar ways. A hole is drilled in the masonry and filled with an epoxy-like mixture, and then a threaded rod is pushed into the hole and held in place until the adhesive sets. Some adhesives can be mixed thick enough to resist dripping when used on a vertical surface. Chemical anchors, though relatively expensive, tenaciously grip the masonry. They are usually available at larger hardware and home center stores.
Another anchoring product is called hydraulic cement, though it's typically used to patch masonry. This fast- setting cement expands slightly as it cures and has more compressive strength than standard concrete. It can be mixed to a stiff consistency to stay on a vertical surface or to a more liquid consistency for use on floors. Drill a hole in the masonry, remove the dust, pack the hole with cement, and imbed a fastener or anchor. This product is often used when a fastener has to be placed in a damaged portion of masonry.
Using Masonry Nails
It takes a special touch to drive masonry nails into a masonry surface, particularly if the surface is concrete. First of all, wear safety glasses and be sure to use a hand-drilling hammer rather than a standard one. Do not use nails that will penetrate more than 1 inch into the concrete—a nail longer than necessary is harder to drive and increases the chance of damaging the concrete. Make sure that the nail is perpendicular to the surface, and then gradually drive it into the wood. When you feel the nail reach the concrete beneath, strike harder, letting the weight of the hammer’s head rest against the nail at the end of each blow. Do not let the hammer “bounce” off the nail-head; it will be more difficult to strike the nail squarely with the next blow.
Partition Walls
The wide-open space of a full basement is perfect for a pool table or play area, but if the basement is going to be used for something else, it may be better subdivided into smaller areas. A partition is a wall that separates rooms. It is used to enclose a bathroom or to split the basement into a recreation room and storage area. The same framing technique is also used to build secondary walls. In any case, it's much easier to attach finished wall surfaces to wooden framing than to masonry walls.
Structural walls (those that are load-bearing) transfer loads from one part of the house to the foundation. But if partition walls are being added to a basement, they will be nonbearing. That is, they will be attached to the basement floor and to the underside of the ceiling joists and will only carry loads that are fastened to them. In most cases, it's possible to build the partitions one at a time on the basement floor and then raise them into place. Where space is limited or where obstructions such as pipes or beams make it hard to raise a partition, they can be assembled in place.
If a partition wall will run perpendicular to the joists, all that has to be done to anchor the top of the wall is to shim and nail through the plate into the joists (using 12d nails). If the wall will run parallel with the joists, install 2x4 blocking between the joists to provide a nailer. Blocks are usually set 16 inches on center, but in this case they are offset from the partition studs to make it possible to nail into them through the partition plate with a pair of 12d nails.
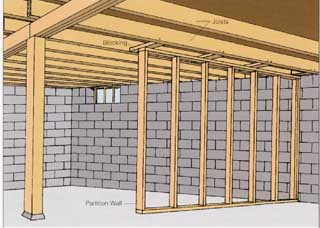
Partition Walls. If a partition wall runs parallel with
the joists, secure its top plate to 2x4 blocking nailed between the
joists.
Building a Tip-Up Partition
After the floors have been painted, subfloors have been installed, and moisture-proofing is done on the foundation walls, partition walls can be tipped up into place. Partition walls are typically built with 2x4 or 2x3 lumber and have a single top and bottom plate. Because it's not structural, the prime requirement of a partition wall is that it suitably supports finished wall surfaces.
1. Marking the Location. Mark the exact location of the bottom plate on the floor. Use a framing square and straightedge to ensure square corners and a chalk line to ensure straight lines. If working alone, wedge one end of the chalk-line box under a weight to hold it as you snap the other end. (It is easier to have a helper hold one end.)
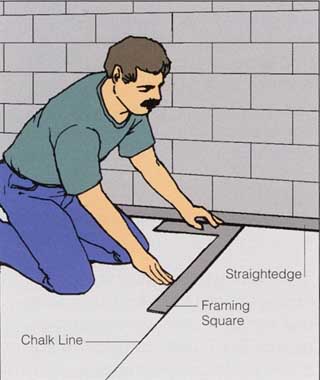
1 Determine the location of the wall. Then snap
chalk lines on the floor to provide a layout.
--
2. Laying out the Plates. Cut two plates to the length of the partition. Align the plates, and measure from one end, marking for studs at 16-inch intervals on center (the standard spacing for studs). Continue to the other end of the plates, even if the last stud is less than 16 inches from the end. To check your work, measure to a point exactly 4 feet from the starting end of the plates; done correctly, that point will be centered on one of the stud locations.
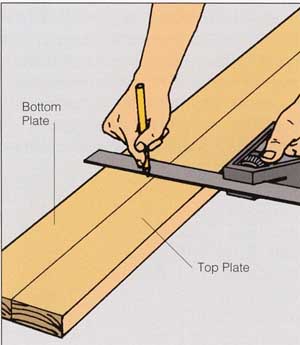
2. Mark the bottom plate for the location of studs 16
in. on center. Then use a square to duplicate the layout marks on the top
plate.
3. Cutting the Studs. Wall studs are the height of the wall minus twice the thickness of the lumber (to account for the thickness of the plates). Subtract an additional 1 inch from this figure to provide enough clearance to raise the partition. Cut all the studs that you’ll need. (To come up with this number simply count the number of layout marks on either plate.) In order for the wall to fit properly, the cuts must be square.
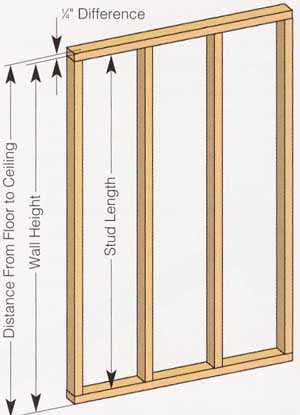
3. To allow clearance for the wall to tip into place, the
studs are reduced in length by 1/4 in.
4. Building the Frame. Separate the plates by the length of a stud, and set them on edge with layout marks facing inward. Lay all studs in approximate position, and then drive a pair of 16d nails through each plate and into the ends of each stud. Use the marks as guides to precisely align the studs.

4 Assemble the wall piece by piece, nailing into each stud
through the top and bottom plates. Make sure the edges of studs and plates are in the same plane.
5. Forming a Corner. To provide a nailing surface for drywall, add an extra stud to each end of the wall that forms an outside corner. One method of making the corner involves nailing spacers between two studs, then butting the end stud of the adjacent wall to this triple-width assembly. Another method is to use a stud to form the inside corner of the wall.
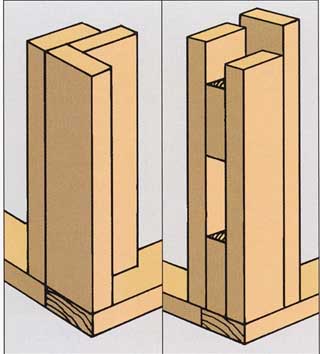
5- In the places where two walls meet, frame the corner
so that there is adequate backing for the drywall on both the inside and the outside of the corner.
6. Raising the Wall. Raise the wall by sliding the bottom plate into approximate position (using the sub- floor layout lines made in Step 1), then tipping the wall upright. Using a helper to prevent the wall from toppling over, align the bottom plate with the layout lines. Once the wall is in the proper location, nail the bottom plate to the floor. When nailing the plate to a concrete floor, use a single masonry nail every 18 inches or so. If a wood subfloor is already in place, use the longest common nails possible to nail into the subfloor with out hitting the concrete. Nail into the sleepers wherever possible. Space the nails in pairs every 24 inches or so.
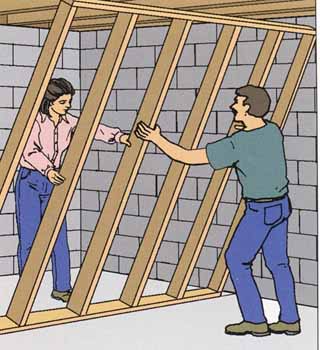
6 Once the wall is fully assembled, tip it up and use the
layout marks to align it. When it's in position, use concrete nails
(or common nails if a wood sub floor exists) to nail it to the floor.
7. Plumbing the Wall. Use a carpenter’s level to ensure that the partition is plumb, and then add shims between the top plate and each intersecting joist to take up the ¼-inch clearance. Do not over shim— by doing so you may raise the joists or bend the top plate. Just make sure the partition is wedged snugly in place and that it's square. Then nail through the top plate and shims and into the ceiling framing (or into blocking if the wall is running parallel with the ceiling framing).
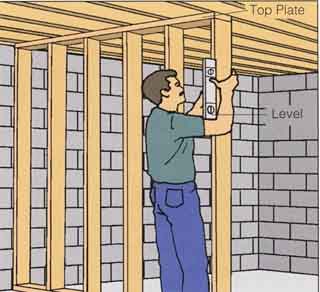
7 Place a level against the edge I of a wall stud and plumb
the wall. Check the wall in several locations before nailing through
the top plate and into the ceiling framing. Do not forget to shim.
8. Joining Intersecting Walls. In places where partition walls intersect, additional studs are installed to provide support for drywall. Add a single stud to the end of the intersecting wall. Add a pair of studs to the other wall. Use 16d nails to secure the intersections.
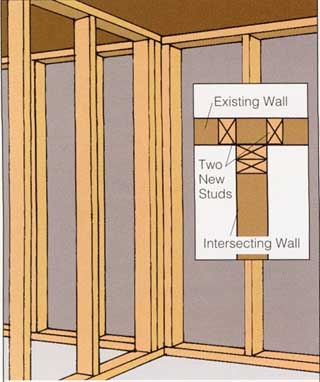
8 Frame the intersection of two walls so that there is
a full-length stud on either side of the intersection. The studs provide
a backing as well as a nailing surface for the drywall.
Building a Partition in Place
It is not always possible to raise a partition wall. For example, pipes or ducts may be in the way, or the wall may be unusually long. Instead, you can build partition walls in place by slipping each stud between plates that have been nailed to the floor and ceiling joists. There are various ways to do this, but the following method minimizes error:
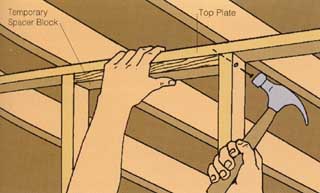
1. Installing the Top Plate. First cut both plates to the length of the partition wall, and mark the top one for the position of studs (16 inches on center). Determine where the wall will go, and use a 16d nail to attach the top plate to each intersecting joist (or to blocking between the joists). Be sure that the stud layout faces down.
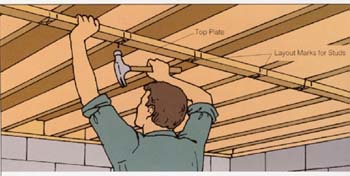
1- Mark the top plate for the stud spacing of the partition, and then nail the plate to the underside of the joists.
2. Locating the Bottom Plate. Hang a plumb bob from the edge of the top plate, transferring the position of the top plate to at least two points on the floor as shown. Align the bottom plate with these layout marks, and nail it to the floor. Use a single masonry nail every 18 inches or so if nailing to a concrete floor, or pairs of common nails every 24 inches if nailing to a wood subfloor.
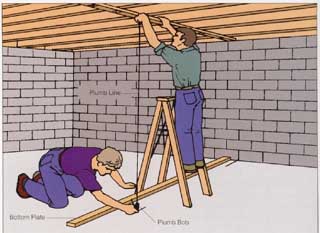
2- Use a plumb bob to lay out the position of the bottom
plate directly beneath the top plate in at least two places on the
floor. Then align the bottom plate to the layout lines.
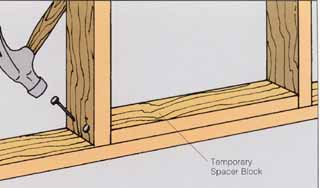
3. Installing the Studs. Measure between the plates at each stud location, and cut studs to fit. (They will be the same length unless the floor or the joists are not exactly level.) Put a stud in position; align it with the layout marks; and use a pair of 12d nails to toenail it to the top plate. To make toe-nailing easier, use a spacer block to keep the stud from shifting as you toenail. Cut the block to fit exactly between studs, (If the stud spacing is 16 inches on center and the studs are exactly 1 1/2 inches thick, the block will be 14 1/2 inches long,) Remove the spacer as successive studs are toenailed.
4. Completing the Wall. Plumb each stud, and toenail it to the bottom plate—the same spacer block can be used. If you are installing the partition directly over a concrete floor, make sure the toenails don't hit the concrete. Use three 8d nails, and start the toe-nailing high enough on the stud so that the end of the nail stops short of the concrete.
Insulating the Walls
The basement is the coolest part of the house during the winter and summer. The temperature does not vary much because basement walls are protected from temperature extremes by tons of earth. That coolness feels great on a hot summer day, but in order to be comfortable in cold weather, most basements require a supplementary heat source. Unless the foundation walls are insulated, much of that supplementary heat is wasted. All walls that face unheated space, such as the partition between a basement recreation room and an unheated basement shop, must be insulated.
There are two basic ways to insulate the foundation walls, and each one calls for a different kind of insulation. Most likely it will not be necessary to install insulation that's higher in A-value than R-11. Check with local building officials to determine the amount of insulation that's recommended in your area.
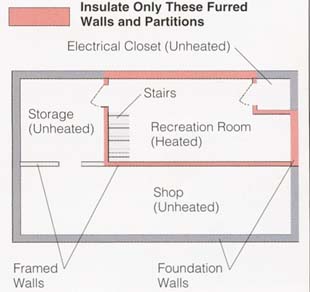
Insulating the Walls. Weather stripped doors and insulated
walls separate heated and untreated basement rooms. Insulate Only
These Furred Walls and Partitions
Insulating with Fiberglass
One way to insulate a foundation wall is to build a secondary 2x4 wall between it and the living space. This nonbearing wall can be insulated with R-11 fiberglass batts and blankets and finished the same as other framed walls. Install it after the wood subfloor is installed.
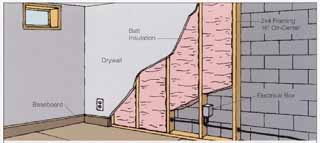
Insulating with Fiberglass. A 2x4 frame wall placed against
the foundation walls is a good way to provide insulation. It also is
a convenient route for wiring and plumbing runs.
If there is no subfloor, install the wail directly over the concrete. One advantage of building a secondary wall is that it's easy to install wiring (particularly electrical boxes) and plumbing runs into it. Also, installing the insulation is just as easy as installing it in a standard partition. On the negative side, however, a secondary wall takes up floor space that already may be in short supply. You must take extra care in detailing the framing around windows and doors that are located in basement stud walls.
Before the secondary walls are built, make sure the foundation walls are free from moisture problems. Patch all cracks, and use masonry waterproofer to seal the walls. Moisture that collects behind the framing eventually leads to problems that are difficult to correct.
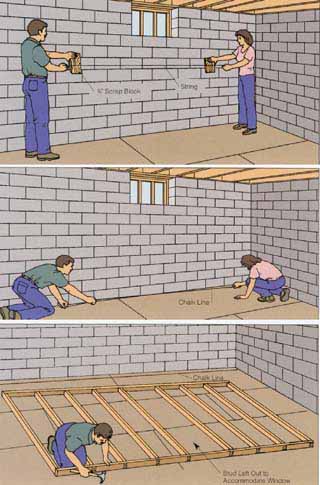
1. Checking the Foundation. A secondary wall can rest directly against the foundation wall, but not all foundation walls are perfectly plumb and straight. To assess the situation, use a 3-foot (or longer) level to make sure the walls are plumb. Then, with an assistant holding one end, stretch a string across the length of the wall and hold it about 3/4 inch away from the wall at each end, If the wall touches the string, it's bowed inward; if the gap between string and wall is greater than 34 inch, the wall is bowed outward.
2. Laying Out the Secondary Wall. The framework is positioned so that it's straight and plumb. This might mean that in some places it has to stand slightly away from the foundation wall. Locate the innermost line, and then measure 3 1/2 inches in and snap a chalk line to re present the face (the side drywall will be attached to) of the studs.
2- Snap a chalk line to mark the front face of the stud wall. Position it so that the wall, when installed, is plumb and straight. It must stand clear of high spots on the wall.
3. Framing the Wall. You frame a secondary wall the same way you build a basement partition, including the 1/4-inch clearance that enables the walls to be tipped into place. In other words, cut the studs so that they are 3 1/4 inches less than the distance between floor and joists. If there is a window in the foundation wall, adjust the layout so that there is one stud on either side of it. For the moment, leave out the framing between these two studs.
4. Shimming the Top Plate. When you have assembled the frame work, raise and align it with the layout marks on the floor. Have an assistant hold one end while you stretch a string across the length of the wall. Hold the string about inch away from the studs at each end. If the wall touches the string, it's bowed inward; if the gap between string and frame-work is greater than 3/4 inch, the wall is bowed outward. Use wood shingles to shim between the top plate and the under side of each joist. Make sure the wall is plumb, and then nail through the top plate and into the joists using two 1 2d nails at each location.

5. Nailing the Bottom Plate. Once you have securely fastened the top plate to the joists, check the position of the bottom plate against the lay out lines, and double-check the studs for plumb. Then nail through the bottom plate as if nailing a partition wall.
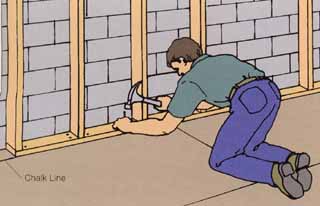
5- Align the bottom of the framework with the chalk line,
then nail through the plate into the floor.
6. Framing the Window. Cut a 2x4 sill to fit between the studs on each side of the window. Position the sill 1/2 inch below the window. This allows room for drywall on the sill. If there is masonry over the window, you’ll also need a header block, set 1/2 inch above the window. Fill in framing beneath the lower block as needed to maintain 16-inch on-center spacing along the wall. To let more light into the basement, angle the drywall away from the window and reposition the sill accordingly. (Later, we will show another way to frame around windows.).
43--3.jpg 6-- Cut a sill to fit between studs, and then nail it into place beneath the window. Add framing as needed to fill in beneath the window plate, and toenail it to the bottom plate.
7. Installing the Insulation. The secondary walls must have a vapor barrier on the warm side of the studs. It prevents moist air from flowing through the framework and condensing on the cooler surface of the masonry walls. One way to provide the vapor barrier is to insulate with foil-faced fiberglass batts. Staple the flanges of insulation to the studs, and eliminate all gaps.
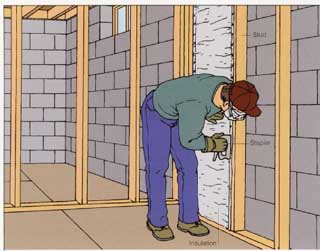
7. When installing foil-faced fiberglass batts, staple
their flanges to the studs. Do not leave gaps.
Caution: When working with insulation, protect yourself from the fibers that inevitably are released into the air. Wear a dust mask, eye protection, a long-sleeve shirt, a hat, gloves, and long pants during the installation and whenever insulation is cut or moved.
When using fiberglass batts, don't leave areas of the wall, including the rim joist, uninsulated. Insulate behind all plumbing pipes they must be located on the warm side of the insulation. Partition walls between heated rooms need not be insulated.
At this point, the framework is ready for drywall or paneling.
Installing Rigid Insulation
Instead of building secondary walls solely for the purpose of holding fiber glass insulation, an option is to apply rigid insulation directly to foundation walls. This product, which has insulation values that range from R-4 to R-7 per inch, is made from a variety of plastic materials, including expanded polystyrene, extruded polystyrene, polyurethane, and polyisocyanurate. All of the products come in easy-to- handle sheets, and some are designed specifically for insulating foundation walls. Some products (at least one brand of extruded poly styrene) have rabbeted edges that can be held in place with 1x3 wood cleats. Although extruded polystyrene is very resistant to moisture, the foundation walls must be dry before they can be insulated.
The following system features extruded polystyrene that's rabbeted on the edges and held in place with wood cleats. The insulation itself is 1 1/2 inches thick and has an R-value of 7.5. Sheets are 2x8 feet, so the cleats are installed on 24-inch centers. Drywall also is nailed on 2-foot centers instead of the more typical 16-inch centers. Installing this way works because the drywall is fully supported by cleats and insulation. Check with local code officials, how ever, to make sure this method is permitted in your area.
1. Cutting Sheets. Measure for the cut, and mark it by scoring the insulation lightly with the tip of a nail. Use a utility knife to cut partway through the sheet, and break the piece off over the edge of a work surface. Use this method to cut each panel so that it fits exactly between floor and wall. Cut 1x3 wood cleats to the same height as the insulation.
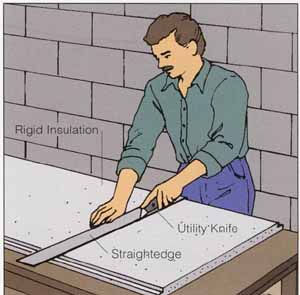
1 Use a utility knife guided by a metal straightedge to
cut insulation. Support the insulation fully on a worktable; then snap
it along the cut. It is not necessary to cut all the way through the
material.
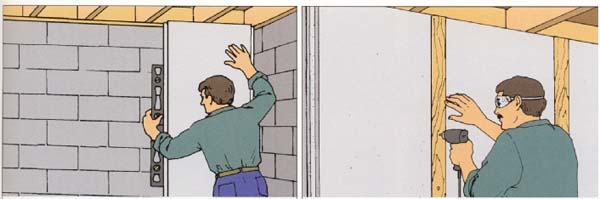
2. Placing Sheets. Start at one corner of the wall. Hold a sheet of insulation against the wall and plumb it. (Trim one edge, if necessary, to fit into an out-of-plumb corner.) This first sheet determines how plumb adjacent sheets will be, so make sure it's done right.
2 Start at one corner of the wall. Hold a panel against the
wall, and plumb it. The panel must fit tightly in the corner.
3. Installing Cleats. Hold a second sheet against the first, and slip a 1x3 wood cleat into the channel between them. Drill three or four pilot holes through the cleat and into the foundation. Pull away the cleat, and deepen the holes as needed. Then clear debris from the holes, and use concrete screws to secure the cleat. Continue working along the wall in this fashion. Periodically check the insulation for plumb.
3--Drill through the cleat and into the foundation. Then use
concrete screws to secure the cleat. Make sure the head of each screw
is flush with the surface of the cleat.
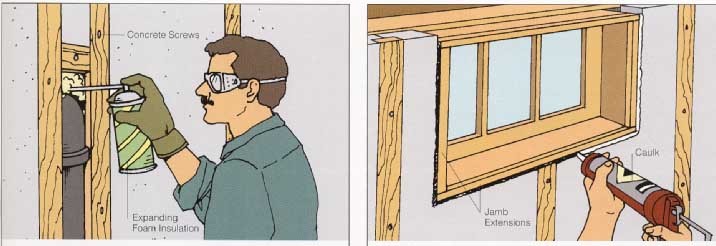
4. Working around Obstructions. If small pipes or other obstructions can't be moved, work around them by placing cleats on either side. Odd-shaped spaces can be filled with expanding spray foam, but it must be a type that's compatible with the insulation. Continue laying out the sheets; make sure the cleats maintain the 24-inch on-center spacing.

4--Use cleats to box-in plumbing pipes and other obstructions.
Use expanding foam sealant to fill gaps. Wear gloves and eye protection
when using this product. Do not overfill gaps.
5. Sealing the Edges. Cut jamb extensions to a size equaling the combined thickness of insulation and drywall, and nail them to window jambs and doorjambs. (Jamb extensions are slender pieces of wood that are nailed to the jambs with finishing nails. They are used to extend the jambs so that they are flush with the finished surface of the adjoining wall.) Use a table saw to cut jamb extensions from Y stock. Once you have attached the extensions, use latex caulk to seal small gaps where the insulation meets window or door framing.

5--Use finishing nails to nail jamb extensions to the edges
of windows and doors. Butt insulation to the extensions, and use caulk
to seal gaps between them.
6. Detailing the Corners. A solid support must be provided for the edge of each drywall sheet, particularly at corners. At inside corners, place two cleats edge to edge with a square strip of wood in the corner between them. For outside corners, rip nailing strips to fit the corner. In this case, the strip has to be at least 1½ inches thick and 3 inches wide, so a 2x4 is a good fit. Screw the strip into the corner.
6-At an inside corner, use 1x2 U cleats and a wood spacer
to ensure proper nailing for the dry wall (top). At an outside corner,
rip nailing strips to the thickness of the insulation, and screw one
side to the wall (bottom).
7. Installing the Drywall. When the insulation is in place, the drywall is installed and finished in the usual way. However, note that the nailing is done on 24- inch centers instead of 16-inch centers. This spacing works because the insulation provides a firm backing for the drywall rather than a partial backing that's common to a framed wall. Code requires that all areas of rigid insulation that face a living space must be covered, usually by drywall. This is because rigid insulation is combustible; leaving it exposed in living areas poses a fire hazard.
Optional Insulation Method
This method of installing rigid insulation provides the chance to use a greater variety of rigid insulation sheets and allows for a variety of insulation thicknesses. It does not, however, result in an unbroken insulating layer.
First screw or nail 1x2 wood nailers, called furring strips, to the walls. Then fit sheets of ¾-in. rigid insulation between them, and staple a plastic vapor barrier over the assembly. A dab of compatible adhesive caulking holds the sheets in place until you have covered the assembly with drywall. Be sure that the foundation walls are free from moisture problems before installing the insulation. Drywall or ¼-in. wood paneling (or thicker) can be nailed or screwed directly to the furring strips.