
1. Use a cold chisel to enlarge the crack. Undercut the crack slightly
to provide a key for the patching compound. (Concrete shown in cross-section.)

2. Vacuum the crack to remove debris; then flush it with water to prevent
dry concrete from wicking moisture away from the patching cement. (Concrete
shown in cross-section.)

3. Use the edge of the trowel to pack the patching cement into the crack.
Then smooth the cement flush with the surrounding surface. (Concrete shown
in cross-section.)
Repairing a Concrete Floor
It is a rare to find a floor slab completely free of cracks and damage. Minor cracking and small areas of damage are handled easily, though larger areas may call for partial removal of the slab and the advice of a contractor. In any case, repairs must be made before a subfloor or a finished floor is added. Always use safety goggles and gloves when removing concrete or working with patching products.
Floor Overlays: If the surface of the slab has minor damage over a wide area or if the surface is too rough to serve as a finished floor, it can be topped with a new surface. Overlay compound is a gyp sum-based liquid product that's self-leveling. It is poured over the floor to a thickness of up to inch and spread with a floor squeegee. The floor, when fully cured, is smooth and uniform. Follow instructions on the product label. Note that it's necessary to contain the product as it's being installed to keep it from flowing into drains.
Repairing Cracks
Cracks up to 3/8 inch wide can be patched with hydraulic cement. If you have wider cracks, you probably have serious foundation problems and should consult a foundation contractor. Hydraulic cement sets in 3 to 5 minutes, so mix up only what you can use in that amount of time and clean up overspread material promptly. It is wise to wear gloves when handling cement.
1. Clearing the Crack. If the crack is wide enough that the blade of a cold chisel fits into it, open it up and undercut the sides so that the beveled edges anchor the patch. A cold chisel, made of less brittle steel than a wood chisel, is designed for masonry work. Use a wire brush to remove loose debris from the edges of the undercut area; then vacuum out the debris and dust. Use hydraulic cement to make the patch itself.
2. Preparing the Crack. Before using some brands of hydraulic cement, the area to be patched must be soaked with water to keep the concrete from wicking moisture away from the patch. Once the standing water has been absorbed by the concrete, proceed with the patch. Follow instructions found on the manufacturer’s label.
3. Filling the Crack. Mix a batch of hydraulic cement, and force it into the damaged area. Use the edge of a trowel to tamp the material into place; then use the flat surface of the trowel to level and smooth the patch.
Painting a Concrete Floor
Paint is an excellent choice for those who want to keep remodeling costs way down or if the basement simply will be used as a workshop. A painted floor prevents stains from reaching the concrete itself, making them easier to clean up. It also seals the surface against dusting, a powdery residue that sometimes forms on the surface of the concrete. A properly prepared concrete surface, along with the right type of paint, ensures success.
Concrete gains most of its strength soon after being poured but continues to cure for years afterwards. If the house is new let the concrete cure for at least two years before painting it. Make sure moisture problems found in an older house are solved before the floor is painted.
Concrete Paints
The paint used on a concrete floor must be abrasion-resistant and have the same rate of expansion and con traction as the concrete itself. Epoxy- based paint fits this description, though it can be expensive and difficult to apply. Its durability and high bonding strength make it a suitable product to use on floors that are expected to receive wear and tear. Masonry paint, on the other hand, is compatible, durable, and relatively inexpensive. It has a latex base and forms a tough skin that resists abrasion, as well as the alkaline chemistry of concrete. Yet another product, called cement paint (regardless of its name), is not suitable for cement floors. It is used to seal walls and can't withstand toot traffic.
Painting the Floor
An etching liquid is used to rough up a smooth, shiny surface. This product contains a mild acid, however, so follow the manufacturer’s application and safety instructions to the letter. Rubber gloves and eye protection are mandatory. It the concrete already feels slightly rough to the touch, use trisodium phosphate (TSP) or a phosphate-free cleaner to clean stains and heavily soiled areas. Just before painting, vacuum the floor to remove dust. Pour modest amounts of paint directly onto the floor, and then use a medium-nap roller to spread it. The idea is to keep the leading edge of the painted area wet so that the roller strokes blend together. Spread it evenly, otherwise the paint will not dry properly. Apply a second coat after the first is dry (usually within 24 hours).

Painting the floor: Pour a modest amount of paint directly
onto the floor, and spread it with a roller. Keep the leading edge
of the painted area wet so that the roller strokes blend together.
Don’t paint yourself into a corner.
Installing an Insulated Subfloor
Most likely, there is no insulation beneath your basement slab (one exception might be an unfinished daylight basement where at least one wall is exposed to the grade). Contact the builder, if possible, to determine whether insulation exists. An uninsulated slab is uncomfortably cold in the winter.
An insulated subfloor isolates the finished floor from the slab, resulting in a warmer floor. It also helps to pre vent moisture from damaging the finished flooring. The insulated sub- floor consists of plywood that's nailed to sleepers (2x4s laid flat). Rigid insulation fits between the sleepers. Subflooring plywood comes in two edge configurations: square edge and tongue-and-groove edge. Either configuration can be used for a basement subfloor, but tongue-and-groove plywood eliminates the need for blocks placed beneath unsupported edges of the plywood. Remember, there must be at least 90 inches of headroom (84 inches in kitchens, hallways, and bathrooms) after the insulated subfloor has been installed.
1. Putting Down a Vapor Barrier. After sweeping the floor slab, cover it with 6-mil polyethylene. Overlap each seam by a minimum of 6 inches. Lift up the edges of the polyethylene, and use a caulking gun to put down dabs of caulk to hold it in place.
2. Installing Perimeter Sleepers. Use 2 1/4-inch-long masonry nails to nail sleepers around the perimeter of the room. If the lumber is dry and straight, a nail or two installed every several feet suffices. Mark these perimeter sleepers for additional sleepers 24 inches on center. This spacing is suitable for Y plywood.
3. Installing Interior Sleepers. Align the interior sleepers square to the marks on the perimeter sleepers. Use one nail at the end of each board and one about every 4 feet. If one sleeper does not extend completely across the room, butt two sleepers end to end.
4. Inserting Foam. Medium density extruded polystyrene foam is best for concrete floor slabs. Use a thickness that matches the thickness of the sleepers. Cut each piece to fit between the sleepers, and insert them.
5. Attaching the Subfloor. Use 3/4- inch-plywood subflooring (straightedge or tongue-and-groove). Cut the plywood to span across, rather than parallel with, the sleepers. Start alternate courses with half-sheets of plywood to stagger end joints.
Step-by-step:
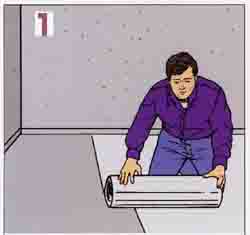
1. Roll polyethylene over the floor, and overlap the seams by at least
6 in. Press the poly ethylene into dabs of caulk on the slab.
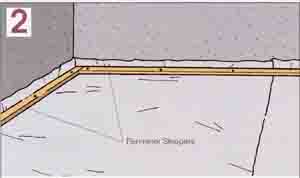
2. Nail sleepers around the perimeter of the room, butting joints as
needed. The pieces must be straight and flat. Use masonry nails spaced
every few feet to secure them to the slab.
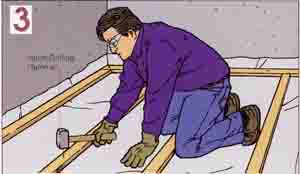
3. Space 2x4 sleepers 24 in. on center. Align them to provide solid
bearing for the plywood, and then nail them to the floor.
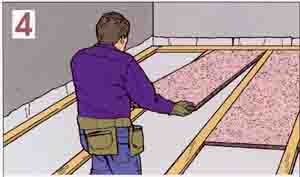
4. Cut rigid foam to fit between the sleepers, and drop it in place.
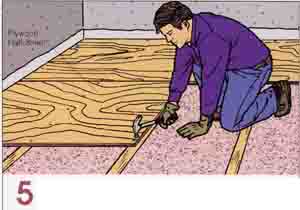
5. Use 6d nails to attach plywood to the sleepers. Drive the nails at
6-in. intervals into the end sup ports of each panel and 12 in. over
intermediate supports.