A household water emergency can vary as much in degree as in origin; but whether it’s due to a natural or environmental disaster, the aftermath of a fire, a faulty plumbing system, a leaking or overflowing appliance, or a hole in the roofing, siding or foundation, the damage to the structure of your home can be extensive. Refer to Cleaning Up (132) following a major water disaster and to Plumbing (96) in the event of a water emergency with a toilet, sink, bathtub, water pipe or other component of your plumbing system. Often, however, the source of a water emergency is difficult to trace; the water you detect running down a wall or dripping from a ceiling may have traveled a long, circuitous and hidden route. Fortunately, there are ways to minimize the damage of most water emergencies until the source can be located and repaired.
The Troubleshooting Guide on pages 67 and 68 places procedures for handling a water emergency at your fingertips and refers you to pages 69 to 77 for quick-action steps you can take. Know where the main water shutoff valve for your home is located (99) as well as the shutoff valve or valves for each fixture (100). To contain a leak in the basement, plug any crack in a masonry wall (69). If water leaks into the attic or from a ceiling, install a temporary water barrier in the attic (69) or pierce any water-laden ceiling (70). Act quickly to cope with a leaking or overflowing appliance (70) or a leaking water heater (71).
Ventilate your house (137) as soon as possible after a water emergency. To remove any standing water, use a submersible pump, a wet-dry vacuum or a mop (72); for more than 18 inches of standing water, use a trash pump (136). Air out any wet electrical box (73). Ventilate each inside (73) and outside (75) interior wall that water has penetrated or remove any damaged section of plaster (74), drywall (76) or wood panels (77).
The list of Safety Tips at right covers basic guidelines for preventing and handling a water emergency; refer to page 67 for tools and supplies you may need. A water emergency can turn electricity into a deadly hazard by making your body a convenient path for current; in wet or damp conditions, don’t touch any electrical unit—even a switch or power cord. Before coping with a leaking or overflowing appliance or leaking water heater, airing out an electrical box, or ventilating any wall or removing a damaged section of it, shut off power to the circuit of the appliance or water heater, the circuits of the room (83) or the system (82).
When in doubt about your ability to handle an emergency, don’t hesitate to call for help. Post the telephone numbers for your water utility, your electricity utility, a 24-hour plumber and your insurance agent near the telephone. Also seek technical help when you need it; if you are ever in doubt about the structural soundness of your roofing or siding, for example, have it inspected by a professional. Even in non-emergency situations, a certified home inspector or other qualified building authority can answer questions concerning the condition of your home.
SAFETY TIPS
1. Locate and label or tag the main shutoff valve for your home’s water supply (99) as well as the shutoff valve or valves for each fixture (100); in the event of an emergency, you will want anyone to be able to find them quickly.
2. Label the main circuit breaker, the main fuse block or the service disconnect breaker for your electrical system; also map the circuits of your home and label them at the service panel (84). In the event of an emergency, you will want anyone to be able to shut off the power quickly.
3. Before entering a flooded room, shut off power to it (83) or the system (82); if the service panel is wet or the area around it’s flooded, call your electricity utility to have power to your house shut off.
4. Don’t touch a leaking or overflowing appliance or a leaking water heater; shut off power to the circuit of the appliance or water heater, the circuits of the room (83) or the system (82).
5. Never work with electricity in wet or damp conditions and don’t use any electrical appliance, tool or extension cord if it’s wet or damp. If an appliance falls into a sink, bathtub or toilet, don’t reach in to retrieve it.
6. Before removing the cover plate for an electrical box, turn off power to the circuits of the room (83) or the system (82). Leave a note on the service panel to keep anyone from restoring power while you are working.
7. Before ventilating a wall or removing any damaged section of it, make careful exploratory holes with a hand drill to check for hidden electrical wires, pipes and insulation; work carefully around any obstruction.
8. After a major water disaster, re-enter your house safely (135). Check the ceiling for bulges and other signs of damage, and release any trapped water.
9. Don’t attempt a repair to your roofing or siding when it’s wet or windy. Never work on the roof if it’s wet or laden with snow or ice. Never undertake a repair on the roofing or siding near an overhead utility line.
10. Keep a roll of heavy-duty plastic sheeting on hand for use as a temporary water barrier in the event of an emergency.
11. Each spring and fall, check the roofing and siding system of your home—the attic, the vents, the siding material, the roofing material, the gutters and downspouts, the flashing, and the fascia boards. Have any repairs required undertaken as soon as possible.
12. Have your plumbing system inspected periodically and have any problem you detect remedied as soon as possible. Regularly check that any sump pump installed in your home is in good working order.
13. Wear the proper protective gear for the job: safety goggles when working above your head; work gloves when handling fiberglass insulation; rubber gloves when working with hydraulic cement; a hard hat to protect your head against falling debris.
14. To avoid inhaling plaster dust and mineral or glass fibers, wear a dust mask when breaking out drywall or plaster and when removing fiberglass insulation.
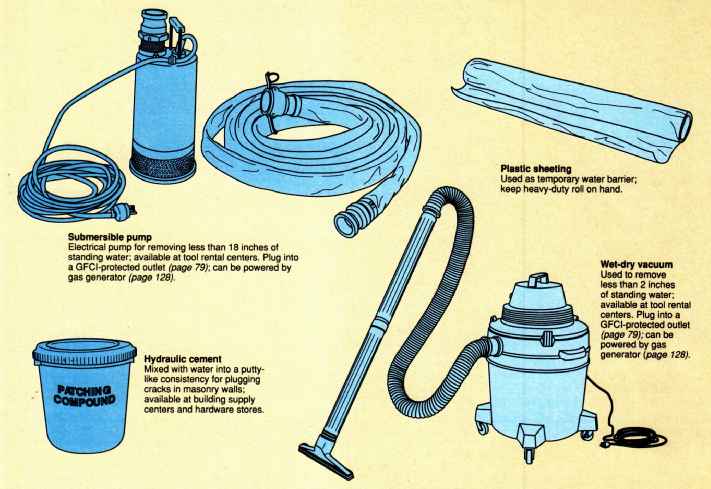
Submersible pump---Electrical pump for removing less than 18 inches
of standing water; available at tool rental centers. Plug into a GFCI-protected
outlet (79); can be powered by gas generator (128).
Hydraulic cement---Mixed with water into a putty- like consistency for plugging cracks in masonry walls; available at building supply centers and hardware stores.
Plastic sheeting --- Used as temporary water barrier; keep heavy-duty roll on hand.
Wet-dry vacuum---Used to remove less than 2 inches of standing water; available at tool rental centers. Plug into a (3FCI-protected outlet (79); can be powered by gas generator (128).
TROUBLESHOOTING GUIDE
SYMPTOM |
PROCEDURE |
Room flooded |
Do not enter room Shut off electricity to circuits of room (83) or system (82); if service panel wet or area around it flooded, call electricity utility to shut off system Remove standing water with trash pump (136); submersible pump, wet-dry vacuum, mop (72) Air out electrical boxes (73) Ventilate inside (73) and outside (75) interior walls; remove damaged wall sections of plaster (74), drywall (76) or wood panels (77) Ventilate house (137) |
Basement flooded |
Do not enter basement Shut off electricity to circuits of basement (83) or system (82); it service panel wet or area around it flooded, call electricity utility to shut off system Remove standing water with trash pump (136); submersible pump, wet-dry vacuum, mop (72) Air out electrical boxes (73) Ventilate house (137) |
Wall wet; water running down it |
If plumbing system problem suspected, shut off main water supply (99) Shut off electricity to circuits of room (83) or system (82) Contain water in attic (69) or release water from ceiling (70); plug leak in masonry wall (69) Remove standing water with wet-dry vacuum or mop (72) Air out electrical boxes (73) Ventilate inside (73) and outside (75) interior walls; remove damaged wall sections of plaster (74), drywall (7 or wood panels (77) Ventilate house (137) |
Ceiling wet; water dripping from it |
Do not stand under wet ceiling If plumbing system problem suspected, shut off main water supply (99) Shut off electricity to circuits of room (83) or system (82) Contain water in attic (69) or release water from ceiling (70) Remove standing water with wet-dry vacuum or mop (72) Air out electrical boxes (73) Ventilate house (137) |
Appliance leaking or overflowing; water pooling on floor around it |
Do not touch appliance Shut off electricity to circuit of appliance (83) or system (82) Cope with leaking or overflowing appliance (70) Remove standing water with wet-dry vacuum or mop (72) |
Water heater on floor around leaking; water pooling it |
Do not touch water heater Shut off electricity to circuit of water heater (83) or system (82) Cope with leaking water heater (71) Remove standing water with wet-dry vacuum or mop (72) |
Service panel wet |
Do not touch service panel Call electricity utility to shut off system |
Appliance, water or other electrical heater, outlet, switch unit wet |
Do not touch appliance, water heater, outlet, switch or other electrical unit Shut off electricity to circuit of appliance or water heater, circuits of room (83) or system (82) Air out electrical boxes (73) |
Inside interior wall water-damaged |
Shut off electricity to circuits of room (83) or system (82) Air out electrical boxes (73) Ventilate inside interior walls (73); remove damaged wall sections of plaster (74), drywall (76) or wood panels (77) Ventilate house (137) |
Outside interior wall water-damaged |
Shut off electricity to circuits of room (83) or system (82) Air out electrical boxes (73) Ventilate outside interior walls (75); remove damaged wall sections of plaster (74), drywall (76) or wood panels (77) Ventilate house (137) |
|
|
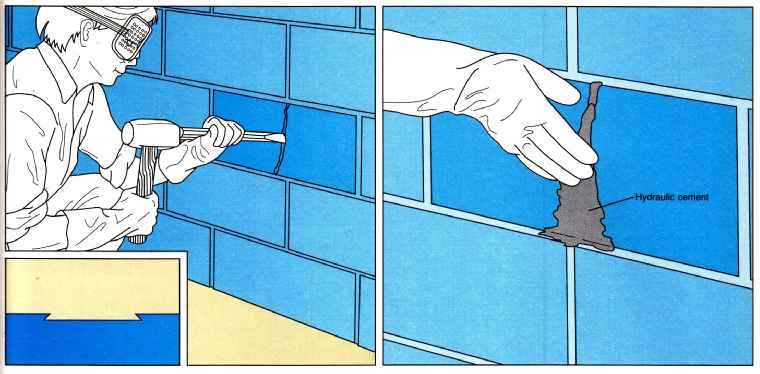
MINIMIZING LEAK DAMAGE: Containing a leak in the basement. If water collects
in the basement from a crack in a masonry wall, plug the crack with hydraulic
cement. Wearing work gloves, and safety goggles, use a cold chisel and a small
sledgehammer (above, left) or ball-peen hammer to prepare the crack for
plugging, undercutting it in a dovetail shape --. Brush out loose particles
with a stiff fiber brush and flush the crack with clean water. Wearing
rubber gloves, prepare the cement according to the label instructions,
mixing only as much as you can use in 3 minutes. Work the cement into
a plug with your hands, adding just enough water to give it the consistency
of putty. Starting at the top of the crack, press in the cement with
your fingers (above, right) and hold it in place until it sets—about
3 minutes. Continue the procedure until the entire length of the crack
is plugged. Then, remove any standing water (72).
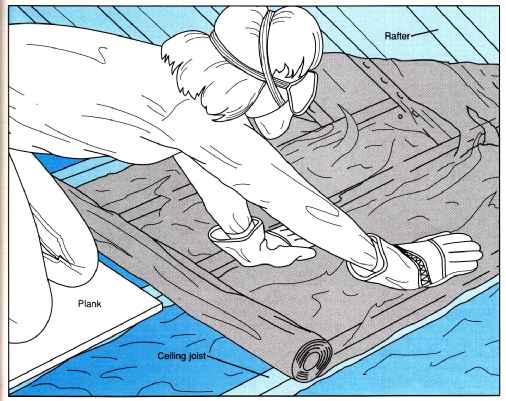
Containing a leak in the attic. If water collects in the attic
from a leak in the roofing or siding, contain it with plastic sheeting;
if there is a large amount of water above a ceiling, release it (70).
If there is no floor in the attic, position planks across the ceiling
joists to use as a walkway. Wearing work gloves, safety goggles and a
dust mask, remove any water-laden insulation between the joists and bag
it for disposal; if there is little headroom in the attic, wear a hard
hat. Working across the attic, lay the sheeting across the ceiling joists
(left) or on the floor; overlap parallel lengths of sheeting by 12 to
18 inches and seal the seams with duct tape. To minimize water runoff,
use a staple gun to staple the outside edges of the sheeting to the rafters
and studs along the attic perimeter. Remove standing water as it collects
on the sheeting using a mop (72). When repairs are made, take out the
sheeting and replace any insulation you removed.
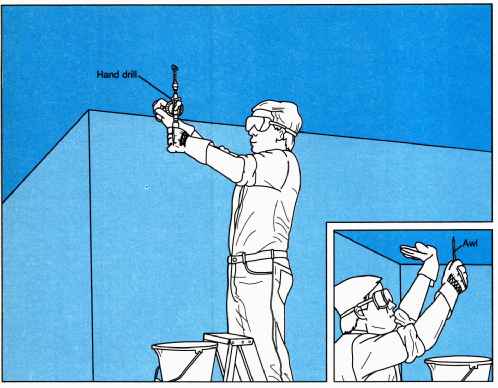
Releasing water from a ceiling. Caution: To prevent electrical
shock, turn off power to the circuits of the room (83) or the system
(82); it you suspect water is leaking from a plumbing pipe, also shut
off the main water supply (99). Before entering the room, check the ceiling
for bulges and other signs of damage; if necessary, release trapped water
at the doorway (135). If there is water trickling through the ceiling
and it cannot be contained in the attic (69), pierce the ceiling and
collect the water in a bucket. Set up a stepladder under the wet ceiling
with the bucket on it. Wearing safety goggles, pierce a drywall ceiling
with an awl -- or an ice pick, twisting it to enlarge the hole. Pierce
a plaster ceiling using a hand drill (left) or a long nail and a hammer.
Caution: Do not use an electric drill. Pierce the ceiling in as many
places as necessary to release the water. Then, remove any standing water
(72).
COPING WITH A LEAKING OR OVERFLOWING APPLIANCE
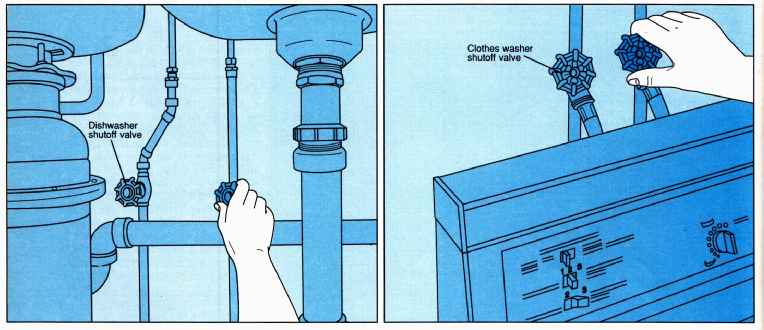
1. Shutting off the water supply to the appliance. Caution: To
prevent electrical shock, do not touch the appliance; turn off power
to its circuit (83) or the system (82). Then, turn off and unplug the
appliance. Locate each shutoff valve for the water supply to the appliance
and turn the handle fully clockwise: for a dishwasher, usually one valve
under the sink (above, left); for a clothes washer, usually two valves
behind it (above, right). For a portable appliance, turn off the sink
faucets. If a valve leaks or there is no valve, turn off the main water
supply (99).
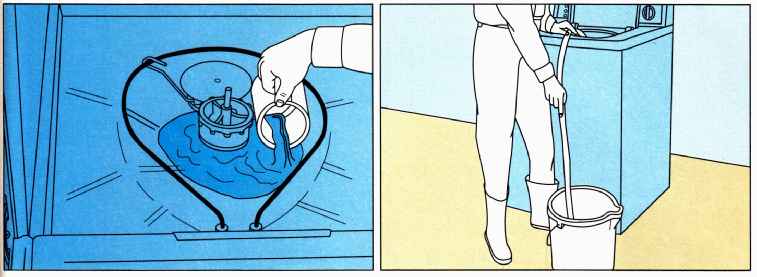
2. Emptying water from the appliance. Allow the water in the
appliance to cool. Before opening the door of a dish washer, place rags,
towels, newspapers or plastic sheeting on the floor around it and set
up a large, shallow container to collect any water that gushes out. Open
the door of the appliance and use a container to bail out the water (above,
left). Or, use a length of hose to siphon out the water into a bucket
set on the floor. Place one end of the hose in the water and suck on
the other end of it to start the water flowing, then set the end in the
bucket (above, right); the water will continue flowing as long as the
end of the hose is lower than the level of the water in the appliance.
Bail or siphon most of the water out of the appliance, then use a sponge
or towel to soak up the remaining water. Remove any standing water on
the floor (72).
DRAINING A LEAKING WATER HEATER
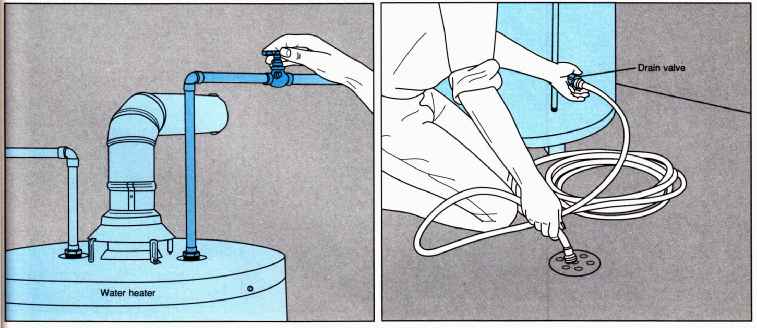
Turning off and draining a water heater. Caution: To prevent
electrical shock, do not touch the water heater; turn off power to its
circuit (83) or the system (82). With a gas water heater, also turn off
the gas supply to it (92). Locate the shutoff valve for the water supply
to the water heater, usually found near and above it, and turn the handle
fully clockwise (above, left). If the valve leaks or there is no valve,
turn off the main water supply (99). To drain the water from the water
heater, connect a garden hose to the drain valve and run it to a floor
drain (above, right); or, set up a bucket under the drain valve. Then,
open the drain valve, turning the handle fully counterclock wise. Allow
the water to drain from the water heater; to speed up the draining, open
the hot water faucet of a sink, If you are draining the water into a
bucket, close the drain valve when the bucket is full, then empty the
bucket and repeat the procedure until the water heater is empty. Remove
any standing water on the floor (72).
REMOVING STANDING WATER
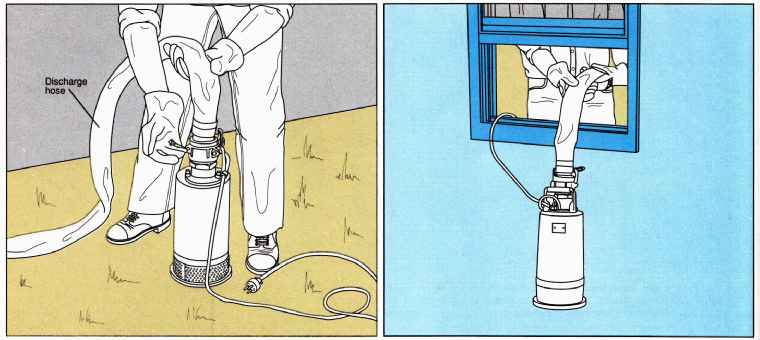
Using a submersible pump. To remove 18 inches or more of standing
water, use a trash pump (136); for less than 2 inches of standing water,
use a wet-dry vacuum (step below, left) or a mop (step below, right).
Otherwise, use a submersible pump, available at a tool rental center;
rent a discharge hose long enough to reach to an outdoor municipal storm
drain. Push the discharge hose onto the discharge pipe, then close the
clamp (above, left). Holding the pump by the discharge hose, lower it
into the water through an open window (above, right) until it sits level
on the floor. Position the discharge hose at the storm drain, then plug
the pump into a dry GFCI-protected outlet (79) and turn it on; if necessary,
set up a gas-powered generator (128) to run it. Turn off the pump when
it no longer sucks up water. Remove any remaining standing water with
a wet-dry vacuum or a mop.
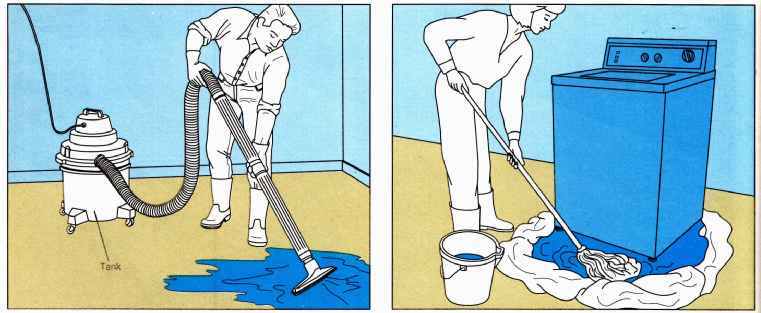
Using a wet-dry vacuum. To remove 2 inches or more of standing
water, use a submersible pump (step above) or a trash pump (136). Otherwise,
use a mop (step right) or a wet-dry vacuum, available at a tool rental
center. Wearing rubber boots and rubber gloves, push the intake hose
onto the intake fitting, then plug the vacuum into a dry GFCI-protected
outlet (79) and turn it on; if necessary, set up a gas-powered generator
(128) to run it. Work the vacuum back and forth across the floor (above)
until the water is removed. If necessary, turn off and unplug the vacuum
to empty the tank.
Using a mop. To remove 2 inches or more of standing water, use a submersible pump (step above) or a trash pump (136). Otherwise, use a wet-dry vacuum (step left) or a mop. Wearing rubber boots and rubber gloves, roll up rags, towels or newspapers and place them on the floor around the water to contain it. Work the mop back and forth across the floor (above), soaking up the water. Wring the water out of the mop into a bucket and repeat the procedure, continuing until the water is removed. Dispose of the material used to contain the water or hang it up to dry.
VENTILATING ELECTRICAL BOXES
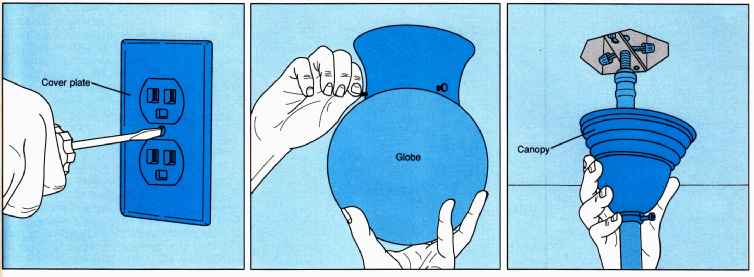
Airing out electrical boxes. Shut off power to the circuits of
the room (83) or the system (82). To release trapped water from an outlet
or switch box, unscrew the cover plate (above, left) and lift it off
the wall. To release trapped water from a fixture box covered by a globe,
loosen any retaining screws holding the globe (above, center) and take
it off; keep a bucket on hand to collect water. Unscrew the light bulb,
then remove the mounting screws or locknut holding the fixture and pull
it away from the ceiling or wall. Caution: Do not touch any bare wire
ends. To release trapped water from a fixture box covered by a canopy
or plate, remove any screws and loosen any retaining screw, locknut or
cap holding the canopy or plate and pull it away from the ceiling (above,
right) or wall. Before restoring power, have the wiring professionally
inspected.
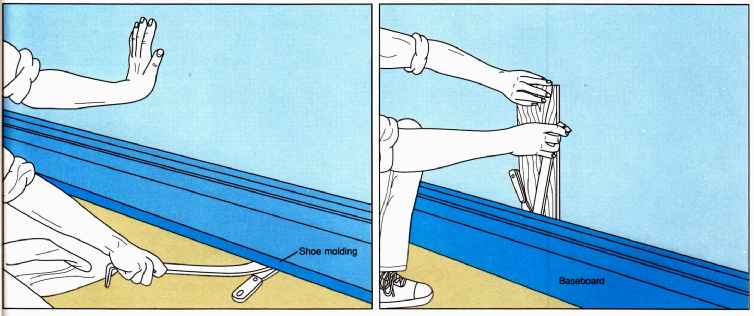
1. Removing the shoe molding and baseboard. Shut off power to
the circuits of the room (83) or the system (82) and air out any wet
electrical boxes (step above). To ventilate a wall of aster or remove
a damaged section of it, break away as much plaster s necessary (74).
To ventilate an interior wall of drywall or wood panels or remove a damaged
section at the bottom of it, take off the shoe molding and baseboard.
Remove any obstructing cable and jack or the telephone or cover plate
for an outlet box. Starting at one end the wall, work a putty knife between
the molding and the floor, then gently insert a pry bar and ease up the
molding (above, left). If the molding is nailed to the baseboard, leave
it in place and take it off with the baseboard. Otherwise, continue along
the wall the same way until the molding is removed. To take off the baseboard,
start at one end of the wall and work the putty knife between the top
of the baseboard and the wall, then insert a wood shim. Gently fit the
pry bar between the putty knife and the shim, then ease out the baseboard
(above, right). Continue along the wall the same way until the baseboard
is removed.
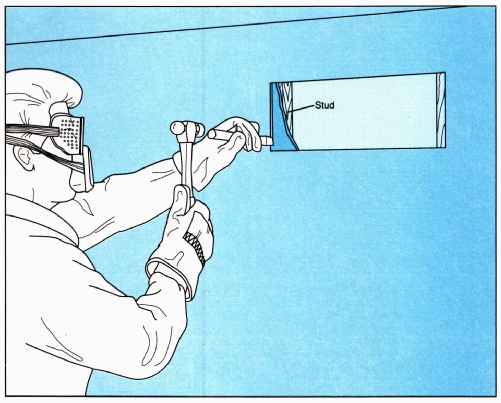
2 Cutting ventilation holes. To ventilate a wall of wood panels
or remove a damaged section of it, take oft as many panels as necessary
(77). To remove a damaged section of drywall, break away as much of the
wall as necessary (76). To ventilate an out side interior wall of drywall,
break away enough of it to remove any wet insulation (75). To ventilate
an inside interior wall of drywall, protect the floor with a drop cloth
and cut holes about 6 inches high in the wall between studs: at the top
4 to 6 inches below the ceiling; at the bottom 2 to 4 inches above the
floor. If necessary, locate the studs—usually 16 inches apart—by tapping
along the wall and listening for a change from a hollow to a solid sound;
or, use a stud finder or a density sensor. Mark each hole on the wall,
then wear work gloves to score along the marks with a utility knife and
a straightedge. Wearing safety goggles and a dust mask, use a cold chisel
and a ball-peen hammer (left) or small sledgehammer to break away the
drywall. Use the same procedure to cut as many holes in the wall between
studs as necessary to ventilate it. Also air out the house (137).
REMOVING DAMAGED PLASTER
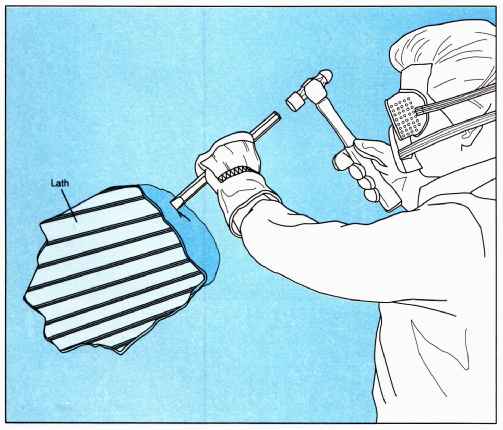
Breaking away the plaster. Shut off power to the circuits of
the room (83) or the system (82) and air out any wet electrical boxes
(73). To ventilate the wall or remove a damaged section of it, protect
the floor with a drop cloth and break away as much plaster as necessary;
holes about 6 inches high at the top of the wall 4 to 6 inches below
the ceiling and at the bottom of the wall 2 to 4 inches above the floor
are usually sufficient to ventilate the wall between studs. Wearing work
gloves, safety goggles and a dust mask, use a cold chisel and a ball-peen
hammer (left) or small sledge hammer to break away the plaster, exposing
the lath strips behind it. Knock out loose pieces of plaster from between
the lath strips. If the wall can be replastered, work carefully to avoid
damaging any lath strip; if the wall is repaired or replaced with drywall,
the shoe molding and baseboard may have to be removed (73) along with
the lath strips. Continue the procedure until the hole is large enough
to ventilate the wall or the damaged plaster is removed. Also air out
the house (137).
VENTILATING AN OUTSIDE INTERIOR WALL
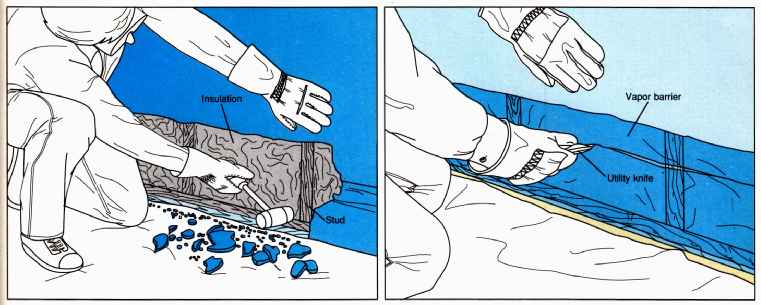
1. Breaking away the wall. Shut off power to the circuits of
the room (83) or the system (82) and air out any wet electrical boxes
(73). To ventilate a wall of plaster or wood panels or remove a damaged
section of it, break away as much plaster (74) or remove as many panels
(77) as necessary. To remove a damaged section of drywall, break away
as much of it as necessary (76). To ventilate an inside interior wall
of drywall, cut ventilation holes (74). To ventilate an outside interior
wall of drywall, remove the shoe molding and baseboard (73), protect
the floor with a drop cloth and break away enough drywall to remove any
wet insulation. Wearing work gloves, use a utility knife and a straightedge
to score along the wall about 4 inches above the damaged section. Wearing
safety goggles and a dust mask, break away the drywall using a mallet
or small sledgehammer; if necessary, also use a cold chisel and a ball-peen
hammer. Then, use the utility knife to cut away any plastic, foil or
paper vapor barrier about 3 inches below the bottom edge of the remaining
drywall—leaving enough of it exposed to overlap comfortably with a new
section of vapor barrier.
2. Removing the wet insulation. Wearing work gloves, safety
goggles and a dust mask, use a board to compress the insulation and as
a straightedge for cutting it with a utility knife; remove fiberglass
batt insulation or plastic foam insulation the same way. Position the
board between two studs just above the wet insulation and use the utility
knife to slice along it through the insulation (above, left); if necessary,
hold up the bottom edge of the remaining vapor barrier to avoid damaging
it. Pull the wet insulation out of the wall cavity and bag it for disposal.
Continue along the wall the same way until all the wet insulation is
pulled out. Remove any loose dirt and debris from the wall cavity using
a putty knife (above, right) or a stiff-bristled brush, then clean and
disinfect it (138). Also air out the house (137).
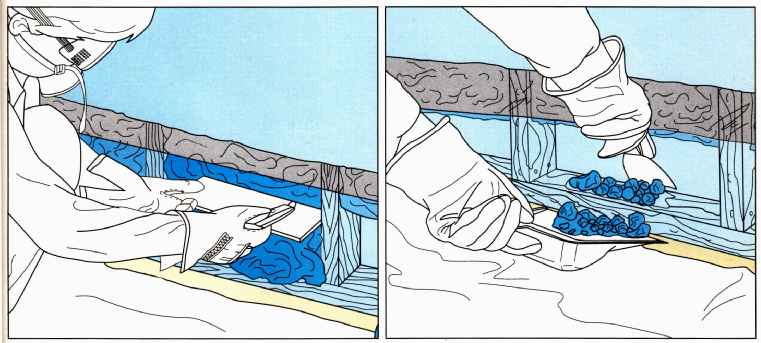
REMOVING DAMAGED DRYWALL

1. Breaking away the drywall. Shut off power to the circuits
of the room (83) or the system (82) arid air out any wet electrical boxes
(73); if the bottom of the wall is damaged, also remove the shoe molding
and baseboard (73). To remove a damaged section of the wall, protect
the floor with a drop cloth and break away the drywall between studs.
Wearing work gloves, safety goggles and a dust mask, start at the top
of the damaged section at least 4 inches below the ceiling and break
away the drywall using a mallet (above, left) or small sledgehammer.
Use a pry bar to pull out fasteners and remove pieces of drywall from
the studs (above, right). To break away the drywall along the top of
the wall at the ceiling, use a cold chisel and a ball-peen hammer or
small sledgehammer. Continue the procedure, working down and across the
wall until the damaged drywall is removed. To check if the remaining
drywall is dry and can be left in place, use a hand drill to drill small
holes in it at several locations—the drywall dust should be chalky and
powdery. If the drywall dust is chalky and powdery, snap off the remaining
drywall cleanly along studs (step 2); otherwise, continue breaking away
the drywall.
2. Snapping off the drywall along studs. If the remaining dry
wall is dry and can be left in place, snap it off vertically along the
nearest stud on each side of the damaged section; if the damaged section
does not extend the full height of the wall, also snap off the remaining
drywall horizontally between the studs. Using a pencil and a carpenter’s
square, mark the wall vertically along the midpoint of each stud and,
if necessary, horizontally between the studs --.
Then, wear work gloves to score the wall along the marks with a utility knife and the straightedge (above, left). Wearing safety goggles and a dust mask, grasp an edge of the remaining drywall and pull it out sharply (above, right), snapping it off cleanly along the scored line. Continue the procedure until the remaining drywall is snapped off cleanly along each scored line. Remove any wet insulation (75), using the utility knife to cut away any vapor barrier. Also air out the house (137).
REMOVING DAMAGED WALL PANELS
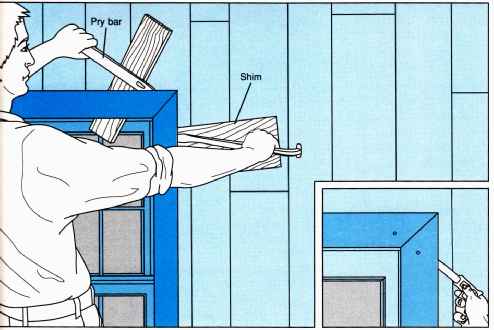
1 Removing the trim. Shut off power to the circuits of the room
(83) or the system (82) and air out any wet electrical boxes (73). Then,
remove the shoe molding and baseboard along the bottom of the wall (73).
To ventilate the wall or remove a damaged section of it, take off any
obstructing cover plate for an outlet or switch box or fixture. To remove
the trim around a window or door, work a putty knife between the trim
on the side and the wall, then insert a wood shim. Gently fit a pry bar
between the putty knife and the shim, then ease out the trim. Continue
along the trim the same way. At a corner Joint, the trim on each side
may be nailed together; use a nail set and a hammer to drive the nails
through the trim or ease out the trim on each side of the corner together
(left). If the trim starts to split, fit a keyhole saw or hacksaw blade
behind it and saw through the nails --.
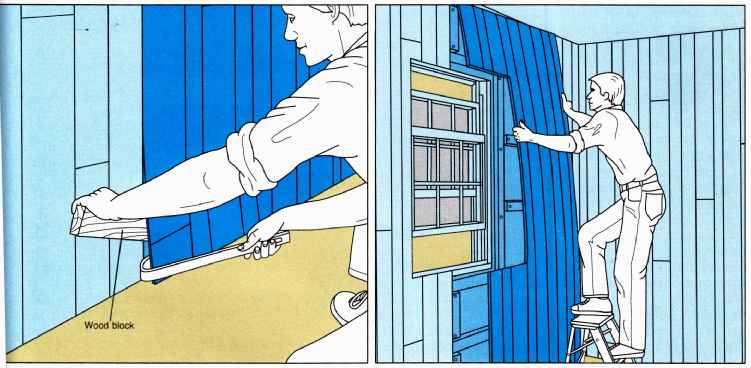
2. Prying off panels. Check the grooves of the panel for nail
heads; if they are small, drive them through the panel with a nail set
and a hammer. Starting at the bottom of the panel at a joint, work a
putty knife under one side of it and insert a wood block to wedge it
open. Fit a pry bar under the panel and ease it out. Continue along the
panel the same way until the side is loosened, then repeat the procedure
along the other side of it. If the panel resists being loosened, it may
be glued in place and have to be taken off in sections. When each side
of the panel is loosened, pull it off: if necessary, have a helper support
one side of it. Take off as many panels as necessary the same way. Remove
any wet insulation, using the utility knife to cut away any vapor barrier.
Also air out the house.