Plywood has considerable strength. Obviously it's stable compared with a covering of many independent boards. It holds framing and other parts in shape and is strong in itself. Much more strength comes from the skin than does an assembly with other covering. This fact applies if the plywood is on one side only, but if it's on both sides, a very rigid structure results. Even if there is only air between the skins, that provides some insulation. If you fill spaces with insulating batting or other materials, a good, all-weather building results.
The building shown in figr. 3-14 is intended to have plywood inside as well as outside. Its sizes are arranged to cut standard sheets of 4-x-8-feet plywood economically. Two windows are suggested, but you can arrange others to suit your needs. The end door is far enough from one side to allow wide shelves there or a bench for a gardener’s use. A bench for a hobby could go under the end window. If this is to be a year-round workshop a wooden floor is advisable.
Overall sizes are shown in figr. 3-15A. For sides and ends, use the plywood sheets vertically. Arrange roof sheets similarly, with joints halfway along the roof. All of the framing is 2-inch-square wood.
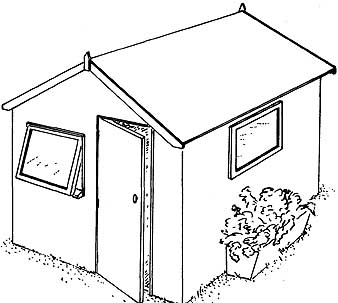
figr. 3-14. This small workshop has a skin made of plywood.
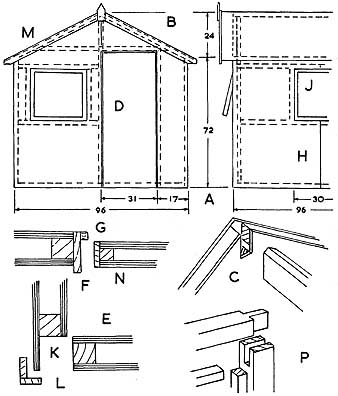
figr. 3-15. Sizes and details of the stressed-skin workshop.
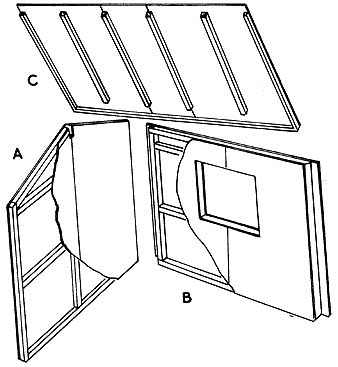
figr. 3-16. Wall and roof details of the stressed-skin workshop.

figr. 3-17. Door and window construction for the stressed-skin
workshop.
Begin construction with the closed end (figr. 3-16A). Mark out and cut the slopes of the roof (figr. 3-15B). Fit framing all around. You do not need to cut joints between the strips. Nail through the plywood at about 6 inch intervals. Use glue as well for the strongest construction. Add a central upright and strips across at the eave’s level and midway between that and the floor. If you are planning to build in benches or shelves, there may be other pieces included in suitable places to provide secure fixing points. Cut away to take a 2-inch x 3-inch ridge piece (figr. 3-15C). Before adding the inner skin, use this assembly as a guide when making the other end.
Make the door end the same way, but allow for the door opening and a window opening by putting framing strips in suitable places (figr. 3-15D). Add additional framing where needed for shelves or benches. Arrange the bottom of the window to come a few inches above your bench and allow headroom in the doorway by keeping the cross member above eaves level.
When you are satisfied with the framing of both ends and the inner plywood, level the edges (figr. 3-15E). At window and door openings, use strips to cover the plywood and extend them forward (figr. 3-15F). Include strips at the inner edges to act as stops and provide draught-proofing (figr. 3-15G).
The sides (figr. 3-15H and 3-16B) are plain, rectangular assemblies on two pairs of upright sheets of plywood. Mark the height from the ends and bevel the tops to match the roof slope.
For a plain side, framing the edges should provide sufficient strength. Use a strip as a cover piece centrally and put a central, horizontal strip the other way. You might need other strips to provide places for benches or shelves. It is a good idea to put a window, the same size and height as the one in the end, in one side (figr. 3-15J). Arrange horizontal framing to suit, with suitable uprights. Cover the sides inside and out in the same way as the ends, except at the corners allow the outer plywood to extend over the end assemblies (figr. 3-15K). When you put the building together, the corners will look neat and you will protect the edge-grain of the plywood if you nail on thin, wooden strips (figr. 3-15L).
If you make the roof to finish flush with the ends, you will only need central joints. It will look better if it extends about 6 inches at each end and if you use sheets 48 inches wide; there will have to be pieces 12 inches wide as well. Allow a 6 inch overhang at the eaves.
Erect the building without its roof, and cut the top plywood to suit. There should be sufficient stiffness from the edge supports, plus intermediate strips (figr. 3-16C). Put strips around the projecting edges. Cover with tarred felt or other material, wrapping it over the edges and nailing underneath. You can improve appearance by nailing on bargeboards. Arrange them to stand slightly above the roof surface and cut off the lower corners (figr. 3-15M). Upright, pointed pieces at the center will finish the decoration.
Make the door with plywood on both sides and 1V4-inch-square framing. Include at least two cross members for stiffness (figr. 3-17A). If there is to be a lock, put a block inside. Do the same to take screws from hinges, if you will be using T or other hinges that extend. Make the door an easy fit in its opening, allowing for covering strips around the edges (figr. 3-15N).
Materials List for Stressed-Skin Workshop:
2 end uprights 5 end uprights 5endrails 5 side uprights 7 side rails 7 short rails 4 end slopes 2 door frames 1 door frame 8 window frames 8windowframes 1 ridge 8 roof frames 2 roof edges 4 roof edges 4 bargeboards 8 windows 8 windows 2 doors 4 doors 8 corners Covering from 22 sheets |
2 x 2 x 96 2 x 2 x 74 2 x 2 x 96 2 x 2 x 74 2 x 2 x 96 2 x 2 x 48 2 x 2 x 60 ¾ x 3½ x 75 ¾ x 3½ x 32 ¾ x 3 x 30 5/8 x ¾ x 30 2 x 3 x 96 2 x 2 x 52 1 x 1 x 96 1 x 1 x 60 1 x 5 x 60 1¼ x 1¼ x 30 ¾ x ¾ x 30 1¼ x i¼ x 75 1¼ x 1¼ x 30 ½ x 2 x 72 sheets ½- x -48- x -96 plywood |
For fixed windows, you can put glass against the inner strips and either putty to them or add other strips, as described for the last project. Alternatively, you can make one or both windows to open. In any case, it's better to have a wider, sloping sill at the bottom, to shed water (figr. 3-13A).
You can make a window which opens with molding and mortise-and-tenon joints, in the same way as for a house. You can simplify the construction for this shed, however, by using bridle joints and separate strips to make rabbets for the glass (figr. 3-15P and 3-17B). Use putty or second strips to hold the glass. Hinge each window at the top and have a locking strut at the bottom.
Exterior-grade plywood should have quite a long life if left untreated, but cover the edges to prevent the entry of water, preferably by bedding the covering strips in waterproof glue. You will improve appearance and increase durability if you thoroughly paint the building. A green finish under a black roof and bargeboards should look smart and blend in with most surroundings.