Even the smallest building is usually bigger than the majority of wood working projects you normally make, and its size introduces a few special considerations. Instead of doing layout and squaring assemblies on the bench, you are faced with floor areas and structures larger than your normal equipment can span. It would be unwise, for instance, to use a 12-inch square and extend its line to 6 feet, as the possible error at the limit could be more than would be acceptable. Instead, it's better to use geometric methods, preferably to a size larger than the final result has to be so you can avoid possible errors.
It should be safe to assume that the corners of a sheet of 4- x -8-foot plywood are square, so within the limits of that size, you can use a sheet of plywood for marking and checking corners. It might be worthwhile making a 45-degree triangle by cuffing from the corner of a sheet equal lengths along each side. You could use the edge of a sheet of plywood as a straightedge, but it would be better to find your straightest piece of wood of greater length than that and use it as a straightedge. You can check its straightness by drawing a line against it on a flat surface, then turning it over to see if the line matches (figr. 1-1A).
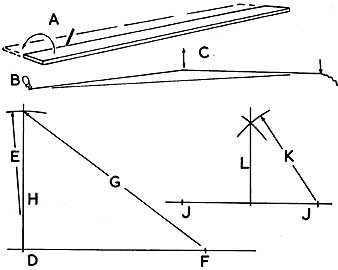
figr. 1-1. Check straightness by turning a board over (A).
Striking a cord (B) will pro duce a long line. Make right angles by measuring
(D,E,F,G,H) or drawing arcs (J,K,L).
If you want to mark long lines, it's better to use a chalk line. Have a piece of fine line (crochet cotton is suitable) and rub it with chalk, without jerking it so the chalk is shaken off. Have an assistant hold one end down, or use an awl (figr. 1-1B). Stretch the line and hold it down. Reach as far along as you can, then lift the line a few inches and let it go, to deposit a fine line of chalk on the floor (figr. 1-1C). If the length is so great that you can't reach near the middle of the line, get someone else to “snap” the line at its center.
If you need to get a large corner square, as you would for a foundation or floor, draw a baseline longer than you will need. On it mark where the square line is to come (figr. 1-1D). Now use the geometric property of right-angled (90 degrees) triangles with sides 3:4:5 proportionally. The right angle is between the two shorter sides.
Choose sizes for the sides of the triangle that will result in the square line you draw being at least as long as the final size you need. Suppose you need 12 feet. If that's the “3” side of the triangle, the unit to use is 4 feet, making the triangle sides 12 feet, 16 feet, and 20 feet. Use a steel tape measure or other convenient means of measuring to draw a short arc from the point on the baseline at 12 feet radius (figr. 1-1E). The arc should swing over what obviously will be the position of the square line. From the point, measure 16 feet along the baseline (figr. 1-1F). From that point, measure 20 feet to a position on the arc (figr. 1-1G). From the starting point, draw a line through the mark on the arc with a chalk line or a long straightedge (Ill. 1-1H). This line will be square to the baseline. Measure other lines parallel to it or the baseline.
If you want to erect a line square to the baseline away from a corner, you can measure equal distances on each side of where it's to be (figr. 1-1J), then swing arcs from these points (figr. 1-1K). Draw your square line through the point on the baseline and the crossing of the arcs (figr. 1-1L). Arrange sizes so the radii of the arcs come at about 45 degrees to the baseline to get a crossing high enough to give a length of square line as big as you need.
The best way to check the squareness of anything you assemble, when opposite sides are the same length, is to compare diagonal measurements. In an ordinary rectangular frame, measure corner to corner (figr. 1-2A) and adjust the frame until these lengths are the same. You do not have to use the extreme corners. If it's more convenient, take other points that should be square or measure along the sides from the corners (figr. 1-2B). You can use the same technique to check the symmetry of anything that's not square (figr. 1-2C). As assembly of a building progresses, you can compare diagonal or other measurements that should be the same. As the building takes a cubic form, you can compare the distance from the top corner of one side with the bottom corner of another.

figr. 1-2. To check squareness and symmetry, compare diagonal
measurements.
RIGIDITY OF SMALL BUILDINGS
It is useless frying to achieve squareness if what you make is so poorly designed or made that it goes out of shape. The ability to hold a shape depends mainly on triangulation. If you join four pieces loosely at the corners and one corner is pushed, the frame will go out of shape (figr. 1-3A). If you make a three-piece frame (figr. 1-3B), nothing can push it out of shape. Put a diagonal piece across the four-sided frame and you have two triangles (figr. 1-3C). Providing no parts bend, this framework will hold its shape. Smaller triangles might be sufficient (figr. 1-3D). If you cover a framework with plywood, you have thoroughly triangulated it, and its shape will hold, but if you nail boards across, movement is still possible and it's advisable to add one or more struts to provide triangulation.
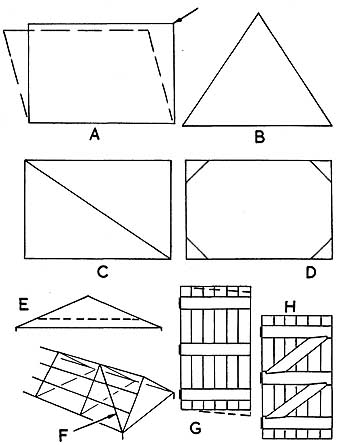
figr. 1-3. A four-sided assembly might push out of shape (A).
A three-sided figure will not push out of shape (B). Stiffen four-sided
frames by triangulating them (C,D,E,F). To prevent a door from sagging,
use diagonal braces (G,H).
In a roof truss, you have the rigidity of a triangle, whether the tie in is at the eave’s level or higher (figr. 1-3E) to provide headroom. Any other framing in a roof truss is there to provide stiffness, but it also contributes to rigidity.
In a large roof, you support the covering on lengthwise purlins attached to the rafters. The assembly is comparable to a squared framework. Some stiffness comes from the building below, but triangulating the roof will relieve that of the excessive load, If the roof covering is made up of large sheets of stiff plywood rigidly fixed down, that will be sufficient, but if the covering is made of many sheets of corrugated metal or plastic, or something similar, movement is possible and diagonal wind bracing (figr. 1-3F) might be advisable.
Similar needs for triangulation might be necessary in smaller assemblies, such as doors. If you make a door with several upright boards and ledges nailed across (Ill. 1-3G), the door will soon sag. To prevent this sagging, add braces (Ill. 1-3H), preferably notched into the ledges. If the door tries to sag, the compression loads on the braces stop it.
If you are making the side of a shed or something similar, consider all the parts that are being built in, such as windows and doors, or anything that will be inside and attached. If there will not be an absolutely rigid skin and the lines are all parallel in two directions, add some diagonal struts to keep the assembly in shape. Long struts are most effective, but smaller, diagonal braces can give considerable stiffness.