Adding vents and an exhaust fan can make the attic and the entire house more comfortable by increasing ventilation. You can also expand the storage capability of your house by using space in the attic—for example, by adding shelves and installing a pull-down ladder for easy access.
Increasing Ventilation
During warm months, an improperly ventilated attic can trap heat, causing the rooms below to get unbearably hot. There are several ways to avoid this problem and make your home more comfortable: insulating the attic, adding eave vents, and adding rooftop or gable ventilation.
Adding Eave Vents
In a house with a sloped roof, air enters the attic area through the eave vents and exits through vents located at higher positions. As air is heated by the sun, it rises and escapes through the uppermost vents, drawing cooler air in through the lower eave vents. This process of natural circulation helps to cool the rooms below. Adding more ventilation can help to improve the flow of air through the attic and aid in keeping the house cooler.
The best eave venting is found in homes with soffits (the panel that closes off the area at the roof overhang between the exterior wall and the ends of the rafters) with a continuous-strip vent. No improvement is needed with this type of eave venting.
Most homes have screened vents in place of some of the blocks between the rafters. Since these blocks provide some structural support to the roof, not every one of them can be replaced with a vent, but it's usually safe to double the number of vents that exist.
Remove every third block with a large hammer and a pry bar. You can then retrofit the empty holes with a screened vent attached from the exterior of the house with screws or nails. (Although the original vents are usually attached from the attic side, retrofit eave vents are made that can be installed from outside the attic.)
Circular eave vents are inexpensive and easy to install. Simply use a hole saw to drill the right-sized port into an eave block or a soffit and then attach it permanently with two small brads or screws.
Adding Rooftop Vents
Rooftop vents can be laced into the shingles near the ridge (peak) of the roof, the higher the better. There are two basic types of rooftop vents. The better of the two is the continuous ridge-mount type, because it's mounted at the highest point of the roof, continues for the full length of the ridge, and moves more air than the roof- mount vent. However, this type of vent is expensive, and installation requires soldering, making the job difficult for most do-it-yourselfers.
The other type, the roof- mount vent, is less effective than a continuous ridge-mount type because it moves less air. However, it's far less expensive to purchase, can be quickly and easily laced into the existing roof covering, and has no moving parts, making its installation maintenance free. Lacing in a new roof-mount vent is easy. A good installation results when the roofing paper overlaps the top of the base of the vent and when the bottom part of the base of the vent lies firmly atop a lower layer of roofing paper.
Adding a Rooftop Exhaust Fan
Exhaust fans help to drive hot air out of the attic. There are two types—motor driven (electric) and wind driven.
An electric attic fan is the more cost-effective of the two because it's thermostatically controlled, so it operates only when needed. When it's not running, louvered doors close and prevent rain and wind from getting into the attic. Al though an electric fan is more expensive to purchase and install than a wind-driven fan, in the long run it's a better investment.
The wind-driven type of fan is a familiar sight to most—a round metal sphere with slots about an inch apart all the way around. The wind blows through the slots, turning the sphere and exhausting air from the attic.
The wind-driven fan comes in two parts (the base and the fan), which makes installation easy. First, you lace the base into the roof covering, and then you mount the fan onto the base. A rotating concentric sleeve is a part of the base and allows you to mount the fan straight regardless of the slope (angle) of the roof.
Wind-driven roof fans can be noisy, and they require maintenance. They should be lubricated once a year and should be covered in the winter to prevent water from get ting into the attic.
Install a wind-driven fan only when your budget does not allow for the cost of an electric exhaust fan. A wise prospective buyer will know the pitfalls of having to deal with a wind-driven exhaust fan as opposed to the convenience and ease of operation of an electric exhaust fan.
Adding a Pull-Down Ladder
A pull-down ladder provides access to the attic and is easy to install. If you’re selling your house, a prospective buyer will appreciate the convenience of this upgrade.
Pull-down ladders are made to fit between ceiling joists that are 24 inches apart. Installation will be easier if you can find a pair of ceiling joists that run parallel to each other in an area where the long side of the pull-down ladder will fit. Carpentry skills are important if alterations are needed to the joists.
Look in the attic to make sure that the location you have selected is not restricted by plumbing, heating, or electrical lines. It is also important to place the ladder in a location where there is at least 30 inches of headroom in the attic above the opening.
To build the rough opening, you must cut out the ceiling wallboard or plaster. The width of the cutout should equal the distance between the two ceiling joists (slightly larger than the width of the ladder frame). The long cut will equal the overall length of the frame of the ladder plus about 3/4 inch.
Nail a solid block of wood the same size as the ceiling joist at each end of the opening, to create a four-sided box. The new end blocks should be flush with the edge of the opening. Then attach the ceiling material to the end blocks to hold the ceiling in place. Use three fasteners at each end. (Wallboard screws are best, even for plaster.)
Use cedar shims to fill the gap between the ladder and the ceiling frame. Attach the ladder to the opening with box nails (16 penny) or 3½-inch wallboard screws.
Finally, cover the gap between the frame and the ceiling with casing (trim).
Creating Attic Storage Areas
The attic is an ideal place to store lightweight items, such as luggage, infrequently used household items, off-season clothes, and sporting goods. Heavy items are best stored elsewhere (see the next section), since ceiling joists are usually not designed to handle heavy loads.
If you want to store heavy items in the attic, it's wise to consult a civil or structural engineer about how to strengthen the framing so that it will hold additional weight. Sometimes this can be achieved with cross- bracing between the rafters and ceiling joists or by adding larger ceiling joists. Even if the floor of the attic is covered with plywood or floorboards, do not use it to store heavy loads with out first consulting an engineer. Overloading an area with insufficient bracing can cause the ceilings of the rooms below to sag or crack.
Creating Below-Stair Storage Areas
Below-stair storage is an ideal place for items too heavy to be stored in the attic. Adding this type of storage is another inexpensive project that can make life easier and also add substantial value to a home.
This project, which might take two or three weekends to complete, usually consists of adding wallboard and a door. Since the walls below the stairs often support the stairs, it's important when installing a door to install a header across the top of the newly created door opening. The width of the opening should not exceed 3 feet, and the header should be a 4 by 4. The rule of thumb for sizing a header in a 4-inch-thick wall is 1 inch of header height for each foot (or portion thereof) of opening width.
Building codes dictate that fire-rated wallboard ( thick Type X) must be used on the walls and ceiling of the new closet. Although the wall board need not be finished with a texture, it must be connected at all joints with standard joint compound and tape. This is called fire taping.
Also, all wallboard joints must be located over solid wood. This means that you must cut the wallboard to fit from the center of one stud to the center of the next. If horizontal joints will occur when the wallboard is applied, add 2-by horizontal blocks before applying the wallboard so that those joints will also be located over solid wood.
Use a solid wood door; it's more fire-resistant and takes longer to burn than a hollow- core door.
Why all the concern about fire? Stairs are the primary means of getting from one floor to the next in most homes. When stairs are not fire protected, they could burn quickly trapping occupants on the floors above. This is the reason that current building codes do not allow gas-operated appliances, such as furnaces and water heaters, to be placed below stairs.
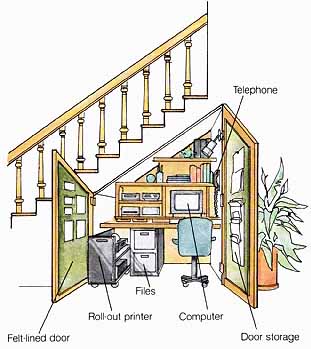
Creating Below-Stair Office Space