Pre-hung doors eliminate most of the work that was once required to install and fit a new door. Clearances are machine checked and casings are already attached to the jamb, which comes in two interlocking halves. To erect the door, you simply pull the two halves apart, push one half into each side of the door opening, make adjustments, and nail the assembly in place.
Purchase Options: Most home centers stock prehung doors in at least
two styles: louvered and flush. Doors are 6’ 8” high and come in a variety of widths: 24” for closets and small bathrooms, 32” for most other rooms, and 30” for locations where a wider door would obstruct traffic when open. For walls covered with wallboard, buy a door with a 4 5/8” jamb. Plaster walls are thicker and commonly require a 5 3/8” jamb. Both right-handed and left-handed doors are available; to make sure you order the correct one, consult the box below.
When to Install: Put in the door after the wallboard or other wall covering is complete but before you install new flooring or baseboard. Once the carpet or other floor covering is in place, you may need to trim the bottom of the door for clearance.
Pre-hung doors often come with holes predrilled in order to accommodate a standard lockset. After installing the door, put in a lock- set according to the manufacturer’s instructions.
TOOLS
- Hammer
- Utility knife
- Nail set
- Screwdriver
- Framing square
- Circular saw with a fine-toothed blade
•MATERIALS
- Wood shims
- Finishing nails (2.5”, 3.5”)
- Wood putty
BE SAFE! Protect your eyes with safety goggles as you hammer nails or saw lumber.
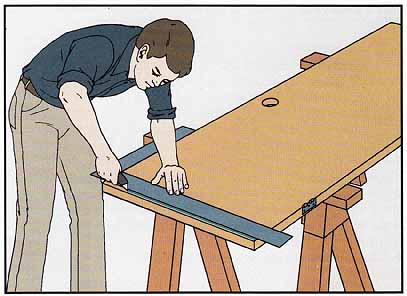
Before buying a door, stand in the rough opening with your back against the intended hinge location. Extend an arm in the direction you would like the door to swing. If you reach to the right, as pictured here, the door is considered right-handed; if you reach to the left, it's left-handed.

Which Way a Door Opens: As you stand in the opening,
double-check whether the door will create an obstruction. Two open doors
may block each other, a bathroom door may bump into the sink, and any door
may hide a light switch or thermostat, Selecting a door that opens the
other way—or installing the hinges on the opposite side—may solve the problem.
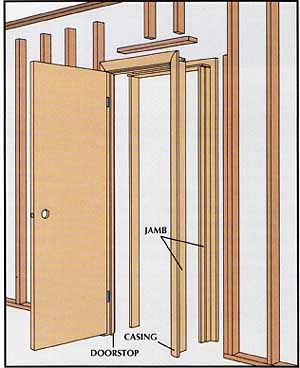
A prehung door.
This prefabricated unit consists of a door hinged at the factory to the inside of a jamb, with the casing and doorstop attached. The jamb comes split so that the halves can be pushed into the rough door opening from opposite sides. The doorstop hides the tongue- and -groove joint that joins the two halves. Before installing such a door, separate the jamb halves by removing the shipping braces and pulling the nail that holds the door closed.
INSTALLING THE JAMB
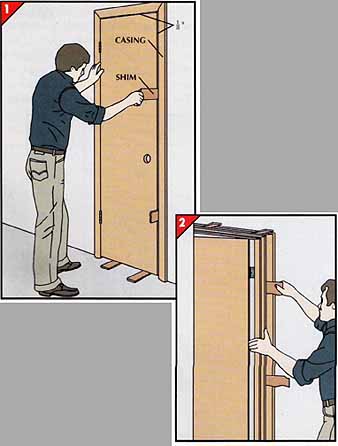
1. Setting the door in place.
• Slide the half jamb attached to the door into the rough-framed wall opening.
• Support the door on wood shims.
• If the door comes without card board strips inserted between the door and jamb, slip wood shims between the two to maintain a 1/8” clearance.
• Avoid gaps greater than 1/8” between the door and the top and strike sides of the jamb by adjusting the position of the jamb—it has about 0.25” of play. If necessary, you can trim the bottom of one of the jamb legs to maintain even clearance at the top of the doorway after the side jambs are adjusted.
• Fasten the casing with 2.5” finishing nails driven every 12” into the 2-by-4 frame of the rough opening.
2. Shimming the jamb.
• On the other side of the opening, insert two shims between the top of the jamb and the rough-opening frame to prevent the jamb from bowing outward over the years. In a properly made rough frame for a door there is a space of 0.25-0.5” between the frame and the jamb.
• Insert three more shims along each side of the jamb; on the hinge side, place two shims just below the hinges and the third in the center.
• Score the shims with a utility knife at the jamb’s edge, then break off the protruding ends by smacking them with a hammer.
• At each shim, drive two 3.5” finishing nails through the jamb and shims and into the rough frame.
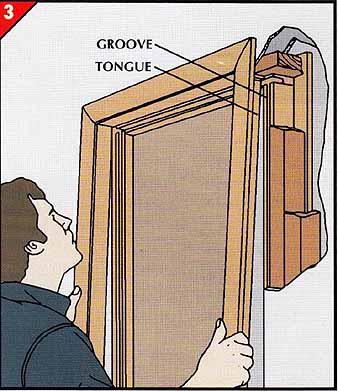
3. Completing the jamb.
• Slide the other half of the doorjamb into position, taking care to engage its tongue in the groove of the jamb half already in place.
• Press the casing snugly against the wall and nail it in place with 2.5” finishing nails driven through the casing and into the framing every 12”.
• Drive 3.5” finishing nails through the jamb and into the rough framing at similar intervals.
• Remove the shims wedging the door closed.
• Set all nails with a nail set and cover the heads with wood putty.
FINE-TUNING THE FIT
Making final adjustments.
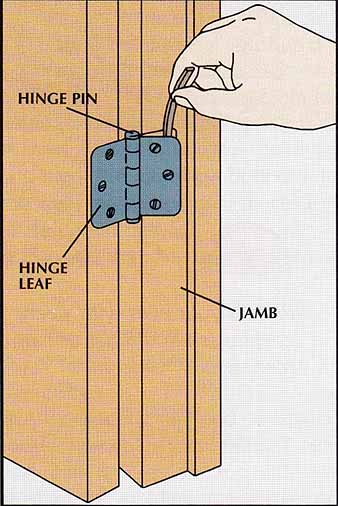
Check the swing of the door to see whether it binds or is too far from the strike side of the jamb. Correct either problem as follows:
• Loosen the screws that anchor the hinge leaf to the jamb.
• Insert a narrow strip of cardboard behind the hinge leaf. Position this shim along the edge near the hinge pin to move
Trimming the bottom edge.
After flooring is installed, make sure the door is at least inch above the finish floor. If it's not, adjust the length of the door as follows:
• With the door in place, measure from the lower edge of the bottom hinge to the floor. Subtract 0.25”.
• Insert a screwdriver below the cap of each hinge pin and tap it with a hammer. Lift the pins out and remove the door.
• Transfer the measurement onto the door’s edge, measuring from the base of the hinge down. Extend the mark across the door with a framing square.
• Score the line with a utility knife to prevent chipping.
• Cut along the line with a circular saw equipped with a fine-toothed blade.
• Slip the door back into place. Reseat the hinge pins.
the door away from the hinge side of the jamb and toward the strike side; position it along the edge farthest from the pin to move the door in the opposite direction.
• Retighten the hinge-leaf screws.
The elimination of a bind at one point may create a bind at another. If you can't straighten the door by shimming, remove it and plane the edges.