A garbage disposer’s motor powers a flywheel that flings waste food against a shredder. The resulting biodegradable pulp is easily flushed down the waste line. Most units are of the continuous-feed type: a wall switch controls the unit and lets you scrape in waste while the motor runs. A batch-feed garbage disposer must be loaded before it can be turned on; the switch, located in the unit’s sink mounting bracket, is activated by inserting and turning the stopper. Except for the switch, batch-feed disposer repairs are the same as those for the continuous-feed model featured here. If you suspect a switch problem in a batch-feed unit, test the switch as you would an on-off switch (see General troubleshooting).
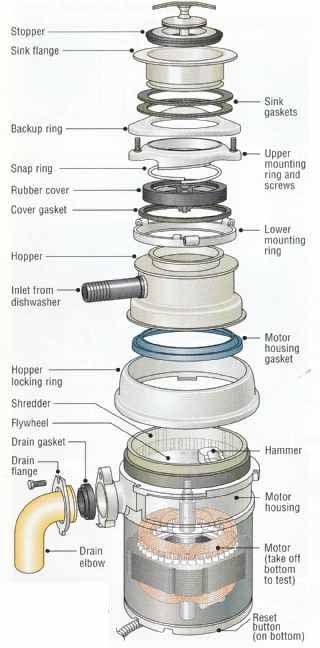 above: labels are: Stopper;
Sink flange; Backup ring; Snap ring; Hopper; Inlet from; Flywheel; Drain
gasket; Drain flange; Sink gaskets; Upper mounting ring and screws; Lower
mounting ring; Motor housing gasket; Hammer; Motor housing; Motor (take
off bottom to test).
above: labels are: Stopper;
Sink flange; Backup ring; Snap ring; Hopper; Inlet from; Flywheel; Drain
gasket; Drain flange; Sink gaskets; Upper mounting ring and screws; Lower
mounting ring; Motor housing gasket; Hammer; Motor housing; Motor (take
off bottom to test).
Note: Details of repair and disassembly may vary, depending en appliance model. If your garbage disposer differs markedly from this one, consult your owner’s manual.
To prevent jamming, avoid packing a disposer tightly. Don’t grind bottle tops, clamshells, glass shards, or other hard waste, although grinding bones is OK and even helps prevent buildups inside the unit. Keep the cold- water faucet fully open when running a disposer. Cold water helps congeal grease, aiding its removal. After turning off a disposer, let the water run for about a minute to clear the drain line. Never use chemical drain cleaner; it can damage internal parts.
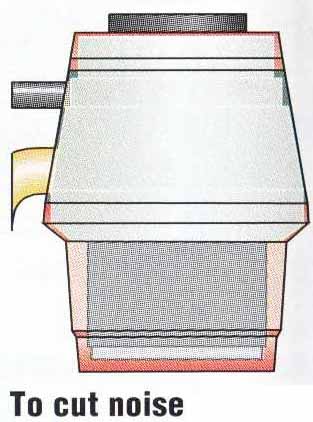
above: To cut noise, most disposers are covered by plastic foam in a hard shell.
Troubleshooting:
SOLUTION: |
POSSIBLE CAUSE: |
SYMPTOM: |
Grinds slowly Noisy Wont stop Won’t run Won’t run; motor hums Drains poorly Leaks
|
No power Overload protector tripped Faulty wall switch Faulty split-phase motor Jammed flywheel Faulty split-phase motor or centrifugal switch Insufficient water flow Clogged drainpipe Dull shredder ring or damaged flywheel Loose drain gasket flange Poor seal at sink gasket Defective motor housing gasket Insufficient water flow Improper hard waste in disposer Dull shredder or damaged flywheel Foreign object in disposer Loose mounting screws Broken flywheel Faulty split-phase motor Faulty wall switch. |
See General troubleshooting. Wait 15 mm., then press reset button. Test and replace. See General troubleshooting. Replace unit if faulty. Clear jam. See General troubleshooting. Replace unit if faulty. Open cold-water faucet fully. Clear Replace. Tighten gasket screws. Tighten screws or apply sealant. Replace Open cold-water faucet fully. Remove with tongs. Replace Remove with tongs Tighten screws Replace See General troubleshooting. Replace unit if faulty. Test and replace |
[Degree of difficulty: Simple -- Average --Complex -- Volt-ohm meter required ]
Gaining access:
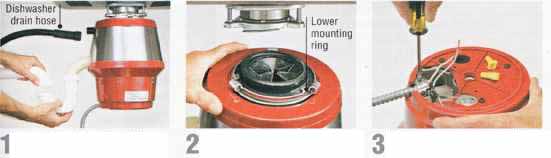
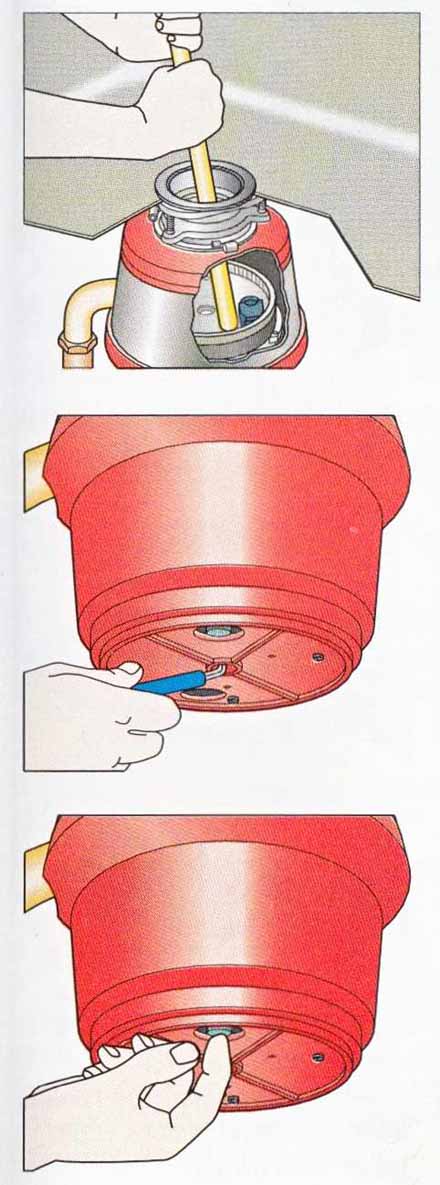
1. Shut off power to unit at service panel. Unclamp dishwasher drain hose and pull it off. Loosen slip nuts on drainpipe and disconnect trap.
2. Supporting unit from below, rotate & the lower mounting ring a quarter turn to free disposer. On some models, you need to take out screws first.
3. Remove cover plate from under side of disposer. Label wires; then unscrew wire connectors from power cord and pull cord free.
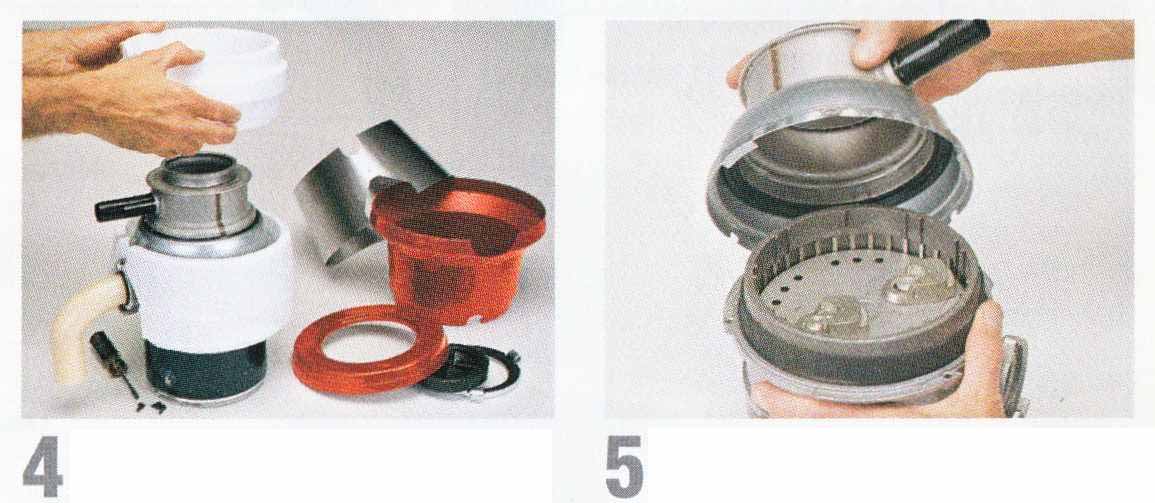
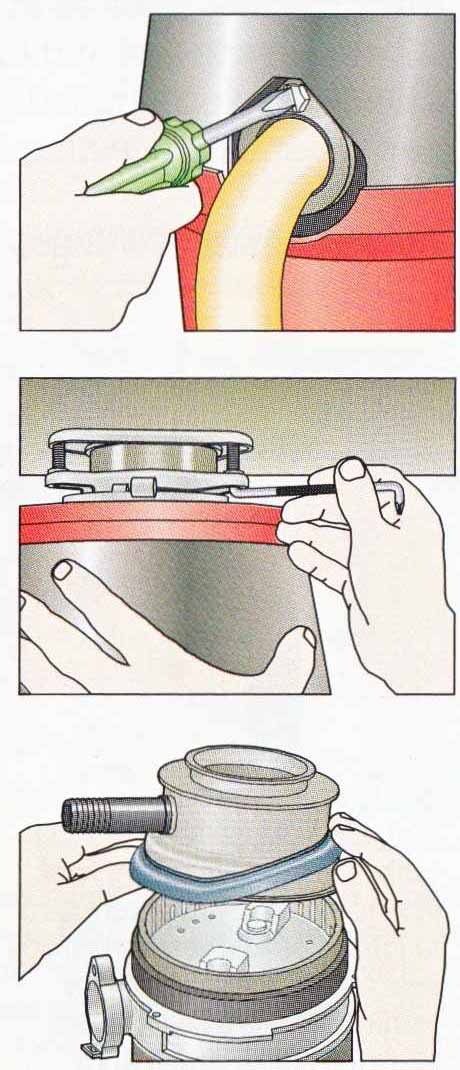
4. Unscrew and take off disposer outer shell; then lift off sound-insulating plastic foam. On some models, just unclip and unwrap insulation.
5. To open hopper, use a heavy hammer with protective wood block to rotate hopper locking ring and unlock the tabs. This requires extra force.
Clearing a jam:
To un-jam disposer, shut off power to disposer and move fly wheel back and forth by pushing broom handle against hammer. This will release any problem-causing object, such as silverware. Then lift out object with tongs.
CAUTION: Never put your hand into the disposer.
On unit with hex-key opening on base, use hex key to turn motor shaft and flywheel. Rotate them in both directions to make sure they’re fully free before removing any foreign object or using the disposer. You can use the hex key alone or in conjunction with broom handle.
If disposer won’t start after un-jamming, wait 15 mm. for motor to cool fully, then press reset button—if there is one— on underside of unit and try again. (Make sure power has been restored.) After un-jamming, drop in several ice cubes and grind them to help remove any remaining residue.
Stopping leaks:
Most disposer leaks are caused by loose screws or damaged gaskets at the sink, the drainpipe, or between the hopper and the motor housing. Check all three sites if you see water dripping from the unit.
To stop leak at drainpipe, tighten the drain gasket screw with screwdriver, nut driver, or socket wrench. If leaking persists, take off trap (Gaining access, Step 1) and drainpipe, and replace gasket.
For leak at sink, tighten screws on sink mounting ring with an offset screwdriver (or a hex key). If it still leaks, shut off power and remove disposer (Gaining access, Steps 1 and 2); then remove ring and replace sink gaskets.
If leak is between hopper and motor housing, replace motor housing gasket. Shut off power, remove and disassemble disposer (Gaining access, above). Lift off gasket. Coat top of new gasket lightly with silicone seal ant before reassembling unit.
Replacing the flywheel and shredder:
Before you can free the flywheel on many disposers, the shredder must be pried out, as shown.
Install a new seal when you replace the shredder.
Replace a stretched motor housing gasket.
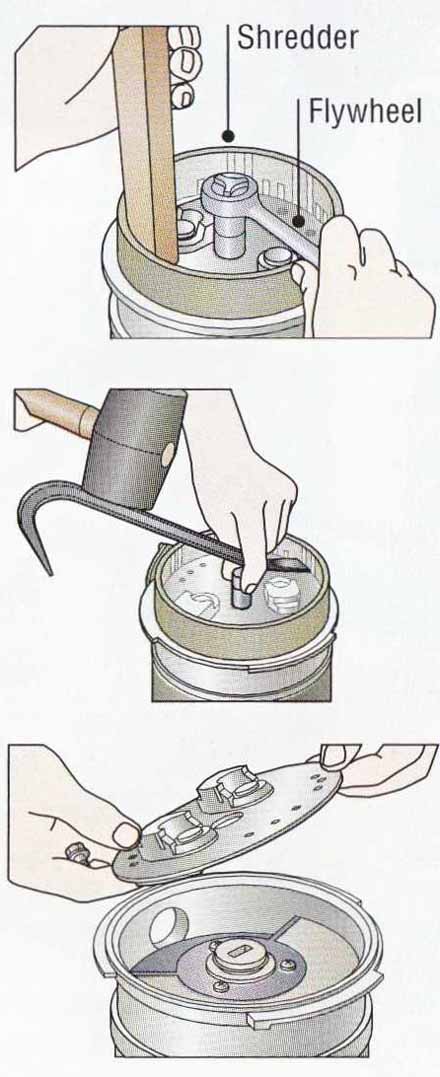
1. Disassemble disposer (Gaining access, above). Pry out any plastic cover over flywheel bolt. Immobilize flywheel by jamming wood between one of its hammers and the shredder. Use a socket wrench to loosen bolt; don’t remove it.
2. Remove shredder: Place a socket from a socket wrench over flywheel bolt and use it as a pivot with a small pry bar and rubber mallet to pry off shred der. Work carefully around the shredder, prying it loose a bit at a time until it comes off.
3. Take out the flywheel bolt and lift off the flywheel. Reverse steps to replace fly wheel and shredder. Replace the seal on the lower edge of the shredder, and use a rubber mal let to gently tap shredder in place.
