|
To begin stitching, run the serger without fabric under the presser foot to create a chain of stitches about 2” (5 cm) long. A thread chain at the start and end of seams prevents stitches from raveling. Operating a serger without fabric doesn't damage the machine or break threads, because stitches are formed on the stitch fingers (prongs).
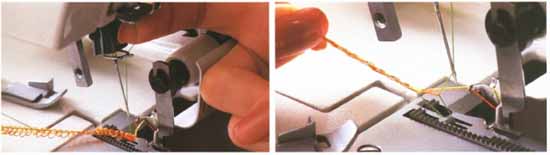
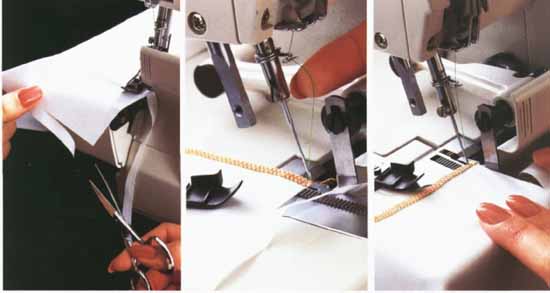
The throat plate on most sergers has one (1) or two (2) stitch fingers. Stitches are formed around the stitch finger so that, with the correct tension, the width of the stitch finger determines the width of the stitch. A special throat plate with a narrow stitch finger (3) is used to sew a rolled hem or seam. The presser foot may also contain a stitch finger (4). Machines with this type of presser foot use a special presser foot for a rolled hem or seam. How to Change a Thread1. (left) Cut each thread near cone, and remove cone. Tie new thread onto each thread in machine, using small overhand knot. Clip thread ends 1/2” (1.3 cm) from knot. 2. (middle) Release tensions, or set tension controls on 0. Cut needle thread in front of needle. Pull on tail chain to separate threads. 3. (right) Pull threads one at a time through thread guides, upper looper, and lower looper. Pull needle thread until knot reaches needle eye. Cut off knot; thread needle with tweezers. How to Clear the Stitch Fingers1. Raise presser foot. Turn flywheel to raise needle. Place left hand on thread chain behind presser foot. To slacken needle thread, pull it gently above last thread guide before needle. (Presser foot has been removed to show detail.) 2. Pull straight back on thread chain behind presser foot until threads separate and stitch fingers (prongs) of throat plate or presser foot are empty. How to Start a Seam1) Make thread chain. Stitch seam for one or two stitches. Raise presser foot; turn flywheel to lift needle. Clear stitch fingers. Run your fingers along thread chain to make it smooth. (Presser foot has been removed to show detail.) 2) Bring thread chain to the left, around and under presser foot. Place thread chain between needle and knife. Hold thread chain in position, and lower presser foot. 3) Stitch seam over thread chain for about 1” (2.5 cm); then swing thread chain to the right so it's trimmed off as you continue to stitch seam. How to End a Seam1) Stitch past end of seam by one stitch, and stop. Raise presser foot and needle to clear stitch fingers. (Presser foot has been removed to show detail.) 2) Turn seam over, and rotate it to align edge of seam with edge of knife. Lower presser foot. Turn flywheel to insert needle at end of seam and at left of edge the width of stitch. 3) Stitch over previous stitches for about 1” (2.5 cm). Stitch off edge, leaving thread chain. With scissors or serger knife, trim thread chain close to edge of seam. How to Stitch Inside Corners and Slits1) Finish seams of inside corners by aligning raw edge of fabric with knife of serger. Stitch, stopping before corner. 2) Fold the fabric to the left to straighten edge. This may create a tuck, which will not be stitched. 3) Resume stitching, holding fabric in straight line. Once past corner, fabric can be relaxed. How to Stitch Curved Edges1) Begin cutting at an angle, until you reach the desired cutting or stitching line. 2) Guide fabric in front of presser foot so knives trim raw edge to curved shape. While stitching, watch knife, not needle. 3) Stop when stitches overlap previous stitches. Lift presser foot. Shift fabric so it's behind needle; stitch off edge to prevent gradual looping over edge of fabric. (Presser foot has been removed to show needle position.) How to Stitch Outside Corners1) Trim off seam allowance past corner for about 2” (5 cm). If making napkins, placemats, or similar projects, you can cut fabric to finished size and omit this step. 2) Sew one stitch past end of the corner, and stop. Raise presser foot and needle to clear stitch fingers and slacken needle thread slightly. (Presser foot has been removed to show needle position.) 3) Pivot fabric to align raw edge of trimmed seam allowance with knife. Insert needle at serged edge. Lower presser foot, and continue stitching. How to Remove Stitches(left) 2-thread stitch. Cut threads by sliding seam ripper or blade of scissors under the stitches. Remove cut threads. (center) 3-thread or 4/3-thread stitch. Clip needle threads every three or four stitches, working from upper side. Pull both looper threads straight out at edge. Remove cut threads. (right) 4/2-thread stitch. Working from under side, pull on looper thread to remove chain-stitching. Remove over-edging as described for 2-thread stitch, left. |
 |
PREV: Creating the Perfect Stitch | NEXT: Essential Equipment and Supplies |  |
Friday, 2016-12-30 7:41