|
Much as it's a good idea to read the whole recipe before cooking something new, it's a good idea to read the pattern instructions before laying out the pattern pieces and cut ting the fabric. Once you have purchased the pattern, take out the pattern instructions and read them. The instructions contain lots of information about the garment you are making and even about sewing in general. Read the instructions The pattern instructions include line drawings of the garment and the pattern pieces. Typically, there is a short glossary of sewing terms, instructions on how to lay out the pat tern pieces, information on which pieces to interface or line if that’s appropriate, and the step-by-step sewing process you will follow to construct the garment.
Find and cut the pieces On the instructions, note the list of pattern pieces; most are numbered as well as labeled. If there is more than one garment in the pattern, the instructions will indicate which pattern pieces are needed for each garment. Find the pieces you need for the garment you are making and cut them out, following the line for your size. Cut the pieces exactly on the cutting lines—don’t leave any tissue. It will be easier to cut the fabric if you do this. After cutting, set the pieces aside. Identify the pattern symbols Looking at the pattern pieces, you will see that each piece has a variety of symbols (see the illustration below). First, a straight line with an arrow at each end indicates the grainline. If the piece is to be cut on the fold, the symbol on the pattern will be along the side to be placed on the fold. The symbol for this is a straight line with two arrows bent toward the edge of the pattern piece, pointing to the fold. Some pattern companies provide written instructions rather than symbols. “Place on fold of fabric” will be printed along the edge that's to be placed on the fold. Other symbols to look for include notches on the edges of the pattern pieces and large or small dots or a combination of both. More complicated patterns have large and small dots, squares, and triangles. Notches indicate match points along the edges of the seams. Dots and other small shapes can also indicate match points but these are generally away from the edge. On tops, two small, adjacent dots typically indicate the shoulder. On skirts, the same mark might indicate the side. The glossary section of the pattern instructions will define the basic symbols: notches, foldline, and grainline. The others are referred to in the sewing instruction section of the pattern instructions. TIP: If the layout section of the pat tern instruction sheet becomes confusing, circle the drawing of the layout you need. This will help you stay focused on the correct drawing. == Wiki Sewing ==
FABRICS -- Woven versus Knit Most fabrics are either woven or knitted. Because all knits have stretch, a woven fabric is the best choice for beginners to use to learn to sew and for experienced sewers to test-drive a new sewing machine. In general, woven fabrics are less likely to have distorted results because they don't stretch. Woven fabric is composed of threads running horizontally and vertically, weaving in and out to form the fabric. Knit fabric is composed of threads that form loops. These loops allow the fabric to stretch. ======== Fabric Nap and One-Way Designs Fabric nap isn't that the fabric needs to take a snooze! Fabric printed with one-way designs and fabric with nap need all of the pieces to be cut in one direction. Nap is the way the pile of the fabric lays. Fabrics such as velvet, velour, and corduroy are fabrics with nap. If the fabric looks like a different shade from different angles, it must be handled as fabric with nap. One-way designs are prints that need to be cut facing in one direction. For example, a print with chairs on it, as shown on the right, would need to be cut out so that the chairs are oriented with the chair legs down. TIP -- Exceptions to the Rule -->> Any fabric can be an exception to the rule. Fold and place the fabric on a table top so that you can see it from both directions and step back. If you see any difference in the two directions, use the with-nap cutting layout in the pattern directions. Lay out the pattern pieces Referring again to the pattern instructions, locate the section for laying out the pattern pieces on the fabric. Find the layout that pertains to the garment style and size you are making, as well as to the width of your fabric. It may take a bit of time to figure out the drawing. Just as the right side of the fabric is often shaded differently from the wrong side, the right side of a pattern piece is also shaded differently from the wrong. The pattern also indicates selvages and fold of fabric, but there is often an abbreviation for these terms (S/L for selvage; F/L for foldline). Note the way the patterns are laid out: Are the tops all at one end? Where are the grainlines? TIP: Orient the pattern instructions so that they correspond to the way you have your fabric. If the fold of your fabric is on the left, turn the instructions so that they match the way your fabric is placed. Then you are ready to place the pattern pieces on the fabric. For ease in laying out the pattern on the fabric, work on a fiat table that's at least 1 yd. long. The fabric is typically folded in half the long way, which means along the lengthwise grain. Line up the selvage edges and make the fabric lie flat. The cut ends are not always even, so sometimes you have to gently tug the fabric on the diagonal to flatten it, especially if the fabric has been washed and dried (see image below). If needed, pin the selvages together to help you keep the fabric even. Prepare the entire length of fabric even though your work surface may not be very long. Roll up or fold up the pinned fabric that would otherwise drape off your table while your work on the unpinned section. The weight of fabric hanging off the edge of a table can distort the fabric. I use a stool to catch the excess at one end; the back of a chair would work well, too.
Pin the pieces When pinning, work with one pattern piece at a time. Place the pattern piece on the fabric, find one end of the grainline, and then pin it through all thicknesses of the fabric. Measure from the pin to the selvages (see image). Find the other end of the grainline, then make sure the distance is the same between the grainline and the selvages and pin. Once you have the grainline right, you can pin the rest of the pattern piece—first pinning the corners, then every 5 in. or so. Everybody pins differently—I pin pointing out. TIP: When pinning, it's important that the pattern stays flat on the fabric and that you don’t pin outside the lines. For a pattern piece that's positioned on the fold, pin along the folded edge before smoothing out and pinning the remainder of the piece. You don't have to measure to the selvages to make sure the grain is straight with pieces placed on the fold. Since you were careful folding the fabric exactly in half, the fold is parallel to the selvages. Work from one end of the fabric to the other, pinning all the pieces and folding up the fabric as you go (see image below). It is important to note that not all patterns are laid out on fabric that's folded in half length wise. In some layouts, the pattern pieces are positioned on a single thickness of fabric and cut twice, while on others pattern pieces are placed on partially folded fabric. The layouts provided in the pattern instructions will indicate what to do. If you are confused, call that sewing friend of yours or go back to the fabric store and ask for help. In any event, whenever possible, lay out and pin all the pattern pieces before you cut any of them. Cut out the fabric pieces
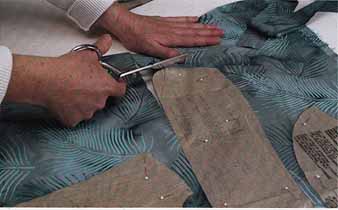
Cutting the pattern pieces is straightforward. Cut right along the edge of the pattern piece (which is why you should cut excess tissue away). Don’t take short, choppy cuts but rather use the length of the scissor blade. I am right- handed, so I use my left hand to keep the fabric flat, and I turn the excess fabric out of the way as I cut around each pattern piece (see image above). I also move around the table, keeping the fabric flat and not pulling it toward me, which might distort the layout. Sewing Basics -- A Quick-start GuideBefore you begin sewing, know about ...
|
| PREV: Choosing fabric | NEXT: Marking the pieces | Home |
Sunday, 2012-04-22 12:30