Savory Dairy Treats Preserve Fresh Milk's Nutritional Values
Dairying--the collection and processing of milk into such foods as cheese, butter, and yogurt--has been practiced since man first domesticated wild animals. Cheese, in fact, is one of the first man-made foods: well-preserved cheeses were found in the tombs of the pharaohs, and in 1948 a 2,000-year-old cheese was discovered in Siberia--reportedly still edible.
The reason for most milk processing is preservation.
Milk is an almost perfect food, containing most of the essentials for human nutrition: protein for growth and muscle development, fat for digestion and warmth, carbohydrates for energy, vitamins and minerals for general health and well-being. But milk spoils rapidly in its natural state. By converting it into dairy by-products, its nutritive value can be retained for long periods of time.
Different regions of the world have developed their own recipes and methods for handling milk. In Eastern Europe and the Middle East yogurt is particularly popular.
Calabash, an African specialty, is a form of fermented milk named for the dried and hollowed gourds in which it is made and stored. In Europe and America more than a thousand varieties of cheese have been developed over the centuries.
If you have your own milk animals or a supply of raw milk or un-homogenized pasteurized milk, you can separate cream to use fresh or make into butter, buttermilk, and ice cream. The remaining skimmed milk can be converted into yogurt or cottage cheese. With a plentiful supply of raw milk you can also learn the intricacies of cooking, pressing, and aging your own cheeses.
Good Milk Makes Good Dairy Foods
Almost all milk sold in supermarkets and grocery stores has been pasteurized to destroy bacteria and homogenized to break up butterfat particles. This commercial milk can be used for making yogurt and kefir but will only make soft low-quality cheeses and cannot be used at all for making butter, since the cream will not separate out. Reconstituted instant dried milk will produce a good soft cheese and some simple hard cheeses.
However, to make a full range of dairy products, you will need a source of raw milk. If you do not have your own milk animals, you may be able to buy raw milk from health food stores or other outlets. In some states you can purchase raw milk direct from the farm, but be sure that the animals have been tested for disease and have been milked under hygienic conditions.
Over the centuries a variety of butter churns were developed, all designed to ease the tedium and effort involved in the weekly butter-churning chore. The Victorian advertisement at left features the latest in 19th century centrifugal churns, a sophisticated model that is geared for rapid churning and can be operated with only one hand. The drum of the churn is made of wood, a material that does not react with the lactic acid in milk.
Many old dairying items are now sought-after antiques.
Cheese presses, decorative butter stamps, molds, scales, and ice cream makers all command premium prices. in addition, a lively business has sprung up in working replicas of these old implements. As a result, almost any dairying tool you need is available in its old-fashioned form as well as its modern equivalent.
---------

The diet of milking cows and goats will affect the quality and flavor of their milk. Goats should be allowed to browse over weeds and scrub, since such plants provide the extra minerals and proteins that the animals need. Cows will produce their best milk on rich pasturage. Any strong smelling foodstuff, including turnips, wild onions, or garlic, can flavor the milk.
After an animal gives birth do not use its milk for four days (in the case of goats) or for two weeks (in the case of cows). During these periods the milk is of a special type called colostrum, high in protein, minerals, vitamins, and antibodies but low in sugar and fats. It is unsuited for most dairy uses. Moreover, colostrum is essential to the health of the newborn animals. You should also avoid using milk from cows or goats that appear to be sick. If an animal is treated with antibiotics or other drugs, wait at least three days after the treatment before using its milk. When processing or storing milk or cream, use wooden, glass, ceramic, enamel, or stainless steel equipment; milk contains lactic acid, a substance that reacts with many metals.
About 6 percent of Americans have difficulty in digesting cow's milk. In infants the problem is usually manifested by symptoms of stomach upset. As the baby grows older and its digestive system develops, the problem often disappears, but in some cases a more-or-less permanent allergy develops. If undetected, the allergic reaction can be severe, even fatal, particularly in infants less than six months old. Goat's milk is often helpful for children and adults who have problems digesting cow's milk. It is easier to digest and does not contain some of the complex proteins found in cow's milk, which are the usual causes of allergy.
Hygiene Is Vital When Processing Milk
All fresh milk contains bacteria, most of them harmless, some beneficial to the human digestive system, and others vital in the production of cheese and butter. Certain strains, however, are pathogenic and can transmit diseases, such as brucellosis (undulant fever) and tuberculosis. If you intend to use raw milk for dairying purposes, it is of the utmost importance that it be taken from cows or goats that have been tested and found free of disease. This is just as important whether the milk is from your own animals or has been purchased elsewhere.
Even though your milk may be good to start with, it can quickly go bad. Your dairy hygiene should aim to prevent contamination by pathogenic bacteria and inhibit the excessive multiplication of all bacteria. If you milk your own animals, maintain strict standards of cleanliness while milking, and take the milk from the milking shed to your dairy room as soon as it is collected. Once in the shed, cool the milk quickly to about 40°F and maintain it at that temperature until it is used. To eliminate any possibility of harmful bacteria, pasteurize your milk by heating it gently to 145°F for 30 minutes or to 158°F for 15 seconds. Cool it immediately after it has been pasteurized. Pasteurization, however, can interfere with some dairying processes.
The dairying room should be cool, dust free, well ventilated, and well lit. All dairying equipment must be kept scrupulously clean and should be free from cracks, sharp corners, nicks, or other spots where dirt can collect. Clean the equipment immediately after it is used. First rinse it in cold water, then wash it in warm water with a dairy detergent. (Standard detergents may leave a residual flavor that will spoil the taste of the milk.) Next, scald the equipment by pouring boiling water over it. The equipment can then be left to air dry. Every few weeks, completely sterilize all your dairy implements by washing them in a chlorine solution or placing them in an electric oven at 250°F for 15 minutes. From time to time clean off any milkstone--a hard, transparent milk residue--that may have formed on your equipment. Use commercial milkstone solvent, a product that is available from dairy suppliers.
Keep milk away from any strong barnyard, household, or food smells, since milk, particularly goat's milk, absorbs odors very easily, and never use milk that seems abnormal.
An unusual flavor in fresh milk can mean contamination and a high bacteria count. If fresh milk tastes off or sour, check your dairy hygiene and the health of your livestock as well as their diet.
Separating Cream From Milk
To extract cream from cow's milk, put fresh, chilled milk in shallow dishes in a cool place. After 12 to 24 hours the cream will have risen to the surface. Gently skim it off with a spoon or ladle until you come to the bluish "skim milk" underneath. Store the cream in the refrigerator in a clean, covered jar.
The cream obtained from goat's milk, unlike cow's cream, is pure white. It is also lighter, easier to digest, and whips to a greater bulk. Unfortunately, goat's cream is very finely emulsified within the milk and several days are needed for even a small amount to rise to the surface.
During this period the cream, which picks up odors very easily, often takes on an unpleasant flavor. Although separation can be speeded by adding cow's milk, the best way to obtain significant quantities of goat's cream is to use a separator, a centrifuge-like device that automatically splits whole milk into skim milk and cream. Separators are expensive, however, unless you are lucky enough to find a used one--even a low-priced separator will cost several hundred dollars if it is bought new. As a result, a cream separator is worthwhile only if you are milking several animals. If you are thinking of getting a separator, be sure it can be adjusted finely enough to work with goat's milk.
One solution to the problem of getting cream quickly and easily is to make Devonshire cream. Set whole cow's or goat's milk in heat-proof pans for 12 to 24 hours, then warm the pans gently to 187°F. When the surface of the milk begins to wrinkle and crack, remove the pans from the heat. When the milk is cool, skim off the surface. This will produce a rich, delicious, thick-textured cream.
A time-honored way to get cream is to leave fresh cow's milk overnight in large, shallow pottery bowls. The next day the cream can be scooped off with a wooden or brass skimmer.
Churning Fresh Butter Out of Your Cream--Butter can be made from cream that has been ripened (slightly soured) or from fresh cream. Ripened cream churns more rapidly and produces butter with more flavor; sweet cream butter is comparatively bland. To ripen cream, let it stand at room temperature for 12 to 24 hours until the surface appears glossy and the cream has a slightly acid taste. If it is allowed to stand longer, the butter may have a sour flavor.
Any form of agitation--the dairyman's term is concussion--that brings together the globules of butterfat that are suspended in cream will yield butter. The equipment need not be expensive. Even a hand whisk or an electric beater will work for small quantities of cream. Some people churn butter simply by shaking cream in a covered jar. In the Middle East butter was once made by filling leather bags with cream, then strapping the bags onto the backs of horses. If you intend to make butter for your family on a regular basis, however, it would pay to invest in a home churn. Most are powered by an electric motor and can process from 1 to 5 gallons of cream at a time, but several types of manual churns are available.
Bring the temperature of the cream to about 60°F before churning. This is an important step; if you churn cream at a higher temperature, the butter will be soft and keep poorly, while if you churn at a lower temperature, the butter will take much longer to form, or come.

------------- Old-fashioned wooden barrel churn allows more cream to be
processed at once. Butter-making equipment is available from mail order firms,
online sources, and country stores.
After 15 minutes of churning, the cream should begin to feel heavy. If it does not, check the temperature. When using goat's cream, it helps to add a tablespoon or two of cold skimmed cow's milk at this stage. After another 10 to 20 minutes the cream should separate into buttermilk and grain-sized pellets of butter.
Once the granules have formed, stop churning, drain the buttermilk from the churn, and thoroughly rinse the butter with cold water. The buttermilk should be saved for later use--it can be used in baking or consumed directly by drinking it plain or in milkshakes. The butter can be rinsed in the churn, but a better way is to place it on a cheesecloth in a colander and let cold water run over it. Next, work the butter granules together with a butter paddle or wooden spoon. You will probably want to add salt at this time--1/4 to 1/2 teaspoon per pound of butter--since unsalted butter spoils quickly. Wrap the finished butter in wax paper and place it inside a refrigerator to protect it from light and air.
If you use ripened cream, you can avoid any risk of an unpleasant taste by pasteurizing it first. Heat the cream in a double boiler to a temperature of 180°F to 200°F for 40 minutes. Then let the cream cool for 12 hours, and add a small amount of starter, such as cultured buttermilk, sour cream, or yogurt, before churning. Follow the same procedure if the cream comes from an animal that is near the end of lactation; cream taken at that time will be difficult to churn into butter.
For Flavor and Health Try Fermented Milks
Any milk or cream that is allowed to stand at room temperature will soon ferment and curdle because of bacterial action. With careful timing, thorough sterilization of the milk or cream, and the use of pure cultures of desirable bacteria, this natural spoiling process can yield such healthful and delicious cultured milk products as yogurt, sour cream, buttermilk, and kefir.
Cultured milks not only taste good, but they are also easy on the stomach. Part of the reason is that lactose, a complex, hard-to-digest milk sugar, breaks down during fermentation. In addition, the bacteria used in making cultured milks help relieve certain stomach upsets and can restore the natural bacterial balance of the stomach after antibiotic treatments.
Raw milk, pasteurized milk, powdered milk, and homogenized milk can all be used to make cultured milk products. Raw milk must be pasteurized before it is used, but pasteurized milk need not be repasteurized if the containers are kept sealed until use.
---------- Making Butter With a Hand Churn ---------

1. Bring cream to temperature of 60°F before churning (a degree or two warmer if the dairying room is cold). Temperature can be adjusted by placing cream jar in warm or cool water.
2. Fill churn partway with cream (one-third for maximum concussion), and begin churning immediately. Butter should "come" within 30 minutes. if it does not, check temperature.

3. Pour off buttermilk, and rinse butter granules several times in cold water until the water runs completely clear. Any buttermilk left behind will make the butter taste sour.
4. Work the butter with a butter paddle to remove remaining moisture and to mix any salt that has been added. Put butter in molds or shape pats with paddles and stamps.
In addition to the milk or cream that will form the base of your yogurt or other fermented product, you will need a starter--a culture of the proper strain of bacteria.
The safest and surest way is to buy a fresh, unadulterated starter from a dairy supplier. You can also achieve good results, with less work, by using a portion of a store-bought fermented milk product as your starter, provided it does not contain flavoring or sweetener. Check to make sure that the product has not been repasteurized after culturing, since repasteurization destroys most of the desirable bacteria.
Preservatives will also affect the bacteria adversely.
Once you begin producing a cultured milk, you can keep making it again and again by reculturing--using a portion of the old batch to begin a new batch. It is important to re-culture within 10 days after the first batch has been made, since the bacteria will be destroyed by long refrigeration.
Cover all containers tightly during culturing and refrigeration (except for kefir), and maintain strict hygienic standards to avoid contamination. Eventually, however, a starter will lose its vigor. If the flavor of a freshly cultured milk product appears to be inferior or the product takes longer to thicken, it is time to buy a new starter. The flavor and texture of cultured milk products will improve if they are refrigerated for at least a few hours after being cultured.
Buttermilk is a term applied to two different products.
One is simply the milk fraction left over after butter is made; the other, cultured buttermilk, is produced like yogurt--by the fermentation of skim milk. Buttermilk from churned butter varies in taste depending on whether the cream was ripened or not and on which bacteria happen to develop.
To make cultured buttermilk-a much more consistent product--allow 1 quart of low-fat milk to reach room temperature, then add 1/4 to 1/2 cup of previously cultured buttermilk and leave overnight in a warm place (80°F to 85°F). Refrigerate as soon as the milk reaches the desired level of acidity. Buttermilk adds flavor and lightness to baked goods and is useful as a starter for cheeses.
Yogurt, a centuries-old favorite of Middle Eastern peoples, has become the best known and most popular cultured milk product sold in America. By making your own yogurt, you can experiment with different milks, starters, incubation temperatures, and culturing times to produce the flavor you like best.
Begin by sterilizing a quart of low-fat milk by heating it briefly to 180°F. Allow the milk to cool to about 105°F (just above body temperature). Add 2 tablespoons of starter from a dairy supplier or 4 tablespoons of store-bought yogurt. Stir in thoroughly, then set the cultured milk to incubate undisturbed at 105°F to 112°F for two to three hours. Yogurt can be cultured at any temperature between 70°F and 120°F, but it takes longer to thicken at the lower temperatures and may have a sour flavor. As soon as the yogurt retains the impression of a spoon pressed into its surface, stop incubation and refrigerate. This will prevent the yogurt from becoming very acid and help it keep longer.
If the yogurt is lumpy, it means too much starter was used.
For a richer, sweeter yogurt, use whole milk or a mixture of milk and cream. For a thicker curd, add up to 3 tablespoons of powdered milk per quart of milk. After the yogurt has thickened, you can add fresh fruit, fruit preserves, nuts, honey, maple syrup, or even a strong brew of sweetened coffee as flavoring.
Sour cream is thicker and stronger tasting than yogurt and is generally eaten in conjunction with other foods. It makes an excellent base for dips and goes well with salads, potatoes, and some soups. Use fresh, heavy cream that has been pasteurized at 150°F to 160°F for 30 minutes. Mix 1 cup of cream with 1 1/2 cups of pasteurized whole milk, then add 1/2 cup of cultured buttermilk. Raise the temperature of the mixture to that of a warm room (68°F to 70°F), and let it stand for 12 to 24 hours or until it is sufficiently sour and thick enough to cling firmly to a spoon.
Keep it in the refrigerator until you want to use it. For a richer, heavier sour cream combine 2 cups of pasteurized heavy cream with 5 teaspoons of cultured buttermilk and incubate as before. For better texture refrigerate for 24 hours before serving.
Cultured milks must be kept warm while they develop.
The top of a refrigerator or warming oven of a wood stove are good locations. A pan set on top of a radiator or stove top pilot light also works well. Another method is to place the warmed containers in a picnic carrier filled with crumpled newspaper.

----------

--------- Cheese-making implements should be made of stainless steel, enamel, glass, or wood and should be kept scrupulously clean. You will need a 4- or 5-gal. pot and a somewhat larger pan that can hold the pot. When heating the milk, fill the pan partway with water and set the pot in it so that the combination functions as a double boiler; leave enough space between to test the temperature of the water. Other useful supplies include a good dairy thermometer, a long knife for slicing the curdled milk, a large ladle, and several yards of cheesecloth. A cylindrical mold, or cheese hoop, and a cheese press--both required for making hard cheese-can be improvised or purchased.
Kefir, sometimes called the champagne of milk, is similar to yogurt but thinner, milder, and easier to culture.
Kefir starter consists of individual grains made up of a combination of yeast and several strains of bacteria. The yeast gives kefir a slight fizz and a small alcoholic content.
Kefir grains are difficult to obtain. Some firms sell them in a milk base or in freeze-dried form. The more widely available powdered cultures do not seem to produce as good results as the grains.
To make kefir, add 1/2 to 1 cup of grains to a quart of skim milk. Cover, but do not seal the mixture, and allow it to stand at room temperature for 12 to 48 hours until it has a mild acid taste and has achieved the desired degree of carbonation. Strain the grains from the milk and rinse them thoroughly in cold water, then add them to a new batch of milk. Refrigerate the cultured milk. To slow down the process, culture the kefir at a lower temperature of 55°F to 60°F.
The grains multiply rapidly, so some must be removed periodically to prevent the kefir from becoming too thick. To preserve grains that have been removed, wash them thoroughly, then let them dry between two pieces of cheesecloth in an airy location. To revive dried grains, place them in a cup of milk for 24 hours; drain, rinse, and add another cup of milk. After two days the amount of milk can be gradually increased to a quart.
Cheese: The Most Varied Of the Milk By-products
According to legend, cheese was discovered by a Middle Eastern traveler named Kanana, who was carrying milk in a bag made from a lamb's stomach. When Kanana paused to drink, he noticed that his milk had coagulated into a custard-like mass. More daring than most, he sampled this odd substance and found it surprisingly pleasant. What had happened was that rennin-an enzyme found in the stomachs of newborn lambs, kids, and calves-had transformed the milk into curds and whey. The process is known as curdling, and it is the fundamental step in the production of all cheeses.
There are two types of cheese: soft and hard. Soft cheeses are made from unpressed curds and must be eaten within a week or two. Hard cheeses take longer to prepare but keep better in storage. Cow's milk is the most popular base for both types of cheese. Goat's milk cheese can be quite mild when fresh but tends to develop a strong ammonia taste if kept for long. Sheep's milk is employed for genuine Roquefort, while traditional mozzarella is made from the milk of the water buffalo. The richest, creamiest cheeses are made from whole raw milk. However, skim milk and reconstituted dried instant milk can be used for most cheese recipes and are particularly suitable for cottage cheese. If you use pasteurized milk, ripen it by adding cultured buttermilk or a cheese starter. Do not use homogenized milk; it will produce weak curds and a watery cheese.
Rennet, the substance that contains the chemical agent rennin needed to curdle the milk, is available at dairy suppliers and some pharmacies, often being stocked as junket tablets. If you use junket tablets, be sure they are unflavored. Originally, rennet was simply dried pieces of stomach from newborn calves.
Making Basic Hard Cheese
Large cheeses tend to ripen better, so start with at least a gallon of milk-enough to make 1 1/2 to 2 pounds of cheese. Either raw milk or un-homogenized pasteurized milk is satisfactory. The ideal milk for making cheese is a blend of equal parts of raw morning milk (fresh milk that has just been collected) and evening milk (milk that was collected the night before and allowed to stand at room temperature overnight). If pasteurized milk is to be used, it must first be ripened. Heat the milk in a double boiler to 86°F and stir in 1 cup of unpasteurized, preservative-free cultured buttermilk per gallon of milk. Let the milk stand for 30 minutes if you want a mild cheese or up to three hours for a sharp, strong-tasting cheese.
Once the milk is ready, the next step is to add rennet to coagulate, or curdle, it. Rennet tablets are sold for use in junket making and, in more concentrated form, for cheese-making. For basic hard cheese, use one-eighth of a cheese rennet tablet or 1 1/4 junket tablets per gallon of milk. Dissolve the rennet in 30 to 40 times its volume of cool water before putting it in the milk. Once the rennet is added, stir the milk thoroughly and place it in a warm location where it will not be disturbed.
After about 45 minutes a thin layer of watery whey will appear on top, while the firm, custard-like curds will form beneath. Cut the curds immediately, since they soon begin to deteriorate. Slice them into even-sized cubes so they will all cook at the same speed. Cubes measuring about 1/2 inch will produce a moist cheese; smaller 1/4-inch cubes will give a dry cheese. Next, mix the cut curds for 10 minutes, then start to heat the curds and whey very slowly. If the curds are heated too quickly, they will become tough on the outside but remain watery inside. When stirring the curds, do so gently to avoid crushing them.
After the curds are cooked (they will be slightly firm and will not stick together), strain off the whey and mix in approximately 3 teaspoons of salt per gallon of milk. Salt improves flavor while slowing the ripening process. Put the curds in the cheese press, applying gentle pressure for the first hour or two to avoid bruising them. Later, for a harder cheese with improved keeping qualities, add more weight.
After the cheese has been pressed, allow it to dry in a cool, airy place for four to five days, turning it over twice a day.
Next, coat the cheese with paraffin, butter, vegetable oil, or salt, and allow it to ripen in a cool, well-ventilated area.
Most cheese will improve in flavor for several months. After a month, sample the cheese and reseal it if it is not ready. If mold develops, scrape off the moldy parts, rub with salt, and reseal. Date your cheeses, making a note of any special method used so that you can develop your own recipes.
Cream cheese: an easy-to-make treat

----Combine 2 cups heavy cream with 2 tbsp. buttermilk, then suspend the mixture
in a clean piece of cloth over a bowl for 24 hours or until the cream thickens.
(The longer you leave it suspended, the drier the cheese will be.) season with
salt and herbs to taste. For a tangy cream cheese with less fat, use yogurt
in place of the cream and buttermilk.
Two presses you can build yourself
---------

Simple cheese press is made from an empty coffee can. Use an awl to pierce the bottom and sides of the can. These are the holes through which the whey will escape. Pierce from the inside out so that metal will not project inward. Next, use a coping saw to cut a circular "cheese follower" out of 3/4-in.-thick wood. The circle need not be precise but the follower must be able to slide inside the can easily. several bricks serve as weights to press the follower downward and squeeze the whey out of the curds.
Sterilize the bricks first, then wrap them in foil. Place a smaller coffee can on the follower, then stack the bricks on it.
Old-time Favorites For the Adventurous
Early settlers in America, more concerned with survival than with gourmet dining, made only simple cheeses. As the population grew and living conditions became less harsh, a number of entirely new cheeses were created, often inspired by recipes brought over by immigrants. Together with the nation's immense dairy production, these new local varieties have helped make the United States one of the world's major cheese producers.
One of the best known of the homegrown American cheeses is Monterey Jack, a descendant of a cheese developed by early Spanish settlers in California. Its name comes from a California Scotsman named David Jacks, who began manufacturing the cheese in 1916, exporting it from Monterey. In taste and consistency Monterey Jack is a member of the Cheddar family. Another cheese developed in America is Colby. The first Colby cheeses were manufactured in Wisconsin in 1882 by Ambrose and J. H. Steinwand. Colby is related to Plymouth cheese, a granular variety still produced in small quantities in Vermont.
Liederkranz and Wisconsin brick are two entirely new cheeses created in America.
Cheesemaking is not an easy art, and homemade cheeses can vary from batch to batch depending upon temperature, humidity, and which bacteria are most active.
However, with careful hygiene they should almost all be good tasting and long lasting. And if a cheese is not quite good enough to eat plain, it can be used for cooking, salad dressing, or in a cheese spread. If you are interested in trying your hand at cheesemaking, start with a simple hard cheese or cottage cheese. Once you feel confident with a basic cheese, try making Cheddar, Colby, or Wisconsin brick cheese.
Cottage and Farmer Cheese
The key to success for both small-curd and large-curd cottage cheese is to warm the curds gently and gradually.
Step by Step From Raw Milk to Finished Cheese

------------ 1. Allow milk to stand for a few hours at room temperature.
Mix in rennet and leave milk to stand undisturbed in a warm place (86°F).

------------ 2. When the white curd can be separated cleanly from the side
of the pot with a knife, the milk has coagulated and is ready for cutting.

------------ 3. The cuts should be 1/2 in. apart across the curd. Make
the first cut at a 45° angle, but change gradually so that final cut is vertical
(A). Using the same surface marks, make similar cuts sloping the other way
(B). Turn the pot and make similar cuts at right angles to the first two sets
(C and D).

----------- 4. Mix the curds gently with your fingers to break up any
large pieces. Continue for 10 to 15 minutes to give the curds time to release
the whey.

-------------- 5. Heat curds for about an hour to 102° F. increase heat
by no more than 2°F every five minutes and stir frequently. Remove from heat.

--------- 6. Leave curds in hot whey until they separate after being
held together in your hand. strain through cheesecloth and add salt a little
at a time.

--------------7. Leave curds in cloth, and either put into mold or bandage
with a strip of strong material folded double. Push curds into shape to avoid
airspaces.

-------------- 8. Fold cloth over top, put cheese in press, and weight
lightly for about two hours. Turn cheese, and increase weight for another 12
hours.

-------------- 9. To prevent mold from developing, dry cheese for four
days, then coat in hot paraffin. Dip one half, allow to dry, then dip other
half.

------------- When rinsing cottage cheese, first remove cooked curds from heat.
Drain through cheesecloth, allow to stand for a minute or two, then lift up
the corners of the cheesecloth to make a bag. Dip the bag several times into
warm water, rinse for two minutes in ice water to chill the curds, and let
the water drain off.

------------- Farmer cheese can be made by using either of the cottage cheese
recipes, but use whole milk rather than low -fat milk. After coagulation
cut curd into 1/4-in. cubes.
Heat slowly to 104°F and continue to cook until curds retain shape after being pressed. Drain, rinse, and pour into oblong shape on a clean, folded cheesecloth. Wrap cloth over and press lightly with board.
Small-curd sharp cottage cheese is made by allowing the milk to coagulate, or clabber, without rennet. Heat a gallon of skim milk to about 72°F and add 1/2 cup of buttermilk. Stir thoroughly. Cover the milk and let it stand undisturbed in a warm place for 16 to 24 hours until it coagulates. You can use raw milk, but because of the risk of unfavorable bacteria developing, you will probably have better results with pasteurized milk. Do not let the temperature drop below 70°F during clabbering, as this will slow the process, increasing the likelihood of bacterial growth.
When the milk has clabbered, cut the curds into 1/4-inch cubes, mix, and allow to rest for 10 minutes. Then slowly raise the temperature to 104°F, increasing it by 5°F every five minutes. Continue to cook at 104°F for 20 to 40 minutes or until the curds feel firm. The curds should not stick together when squeezed, and the inside of the curds should appear dry and granular. If necessary, raise the temperature as high as 120°F. When the curds are cooked, drain and rinse them. Add a teaspoon of salt for every pound of curd. For a creamed cottage cheese add 4 to 6 tablespoons of sweet or sour cream.
Large-curd sweet cottage cheese is made with rennet.
Heat 1 gallon of skim milk to 90°F (no higher), and add 1/4 cup of buttermilk. Dissolve 1 1/4 junket tablets or an eighth of a cheese rennet tablet in a glass of cool water, add it to the milk, and let stand at 90°F. Test the milk for coagulation after a few hours. When the milk has coagulated, cut the curd into 1/2-inch cubes, allow them to rest for 10 minutes, then heat to 110°F by raising the temperature 5°F every five minutes. Test as for small-curd cottage cheese, and raise the temperature as high as 120°F if the curds are not ready. Drain, rinse, and cream as for small-curd cottage cheese.
Cheddar Cheese
The basic Cheddar recipe was developed in Somerset, England, four centuries ago as a way of reducing contamination in the local cheeses. The word "Cheddar" comes from Cheddar Gorge, where the cheeses were ripened, and the term "cheddaring" has come to mean the reheating process used in making the cheese.
To make a 1 1/2-pound cheese, combine 2 gallons of whole milk with 3/4 cup of buttermilk, and allow the mixture to ripen at room temperature overnight. The next day warm the milk gently in a double boiler to 86°F, mix in one cheese rennet tablet dissolved in a glass of cool water, and let the mixture coagulate undisturbed. When the milk curdles (about 45 minutes later), cut the curds into 3/8-inch cubes.
Mix the curds and allow them to stand 15 minutes, then heat very slowly to 100°F. Cook for about an hour until a piece of cooled curd retains its shape when squeezed. If it crumbles, it needs more cooking. Drain the curds for a few minutes and rinse out the double boiler, then cheddar the curds as shown for two hours (longer for a strong flavor).
After cheddaring, cut the resultant cheese strips into cubes and gradually mix in 1 tablespoon of salt, being careful not to bruise the curds. Let the curds stand for 10 minutes, put them into a cheesecloth, and press them with 15 pounds for 10 minutes, then with 30 pounds for an hour. Remove the cheese from the press, unwrap it, dip it in warm water, and fill in and smooth off any cracks or unevenness. Rewrap in a clean cheesecloth and weight with 40 pounds for 24 hours; then remove from the press and let the cheese dry for four to five days in a cool, airy location. Turn the cheese twice a day during this period, and wipe it dry each time with a clean cloth. When a hard, dry skin has formed, rub it with oil or seal it with paraffin. Cheddar can be eaten after six weeks but is best if aged six months or more. American cheese is actually a mild variety of Cheddar.
Cheddaring imparts a characteristic nutty flavor and dense texture to cheese. After the curds have been drained, return them to the double boiler and spread over a rack lined with cheesecloth. Cover and reheat at about 98°F for 30 to 40 minutes until the curds form one solid mass. Remove the curds, cut them into strips 1 in. wide, and return them to the pan. Turn the strips every 15 to 20 minutes for an hour.

------------
Colby Cheese
Making Colby cheese involves the unusual step of adding cool water to the curds after they are cooked. The result is a mild, moist, porous cheese. Because of its high moisture content, Colby does not keep well.
To reduce the risk of the Colby having an off flavor, use pasteurized whole or skim milk. Heat 2 gallons of milk to 88°F and add 1/2 cup of buttermilk. Stir thoroughly and allow to stand for 30 minutes. Dissolve 1/4 cheese rennet tablet or 2 1/2 junket tablets in a glass of water and add to the milk, stirring vigorously to mix it well. Allow the milk to coagulate (about 30 minutes), then cut the curds into 3/8 inch cubes. After mixing the curds for 10 minutes, heat them very gently to 98°F, increasing the temperature about one degree every three minutes. Continue to cook at this temperature for 40 minutes, then slowly add cool water until the temperature drops to 80°F and remains stabilized at that point. Turn off the heat and gently mix the curds for 15 minutes.
Drain the curds and gradually mix in 6 teaspoons of salt.
Put the curds into a cheese hoop or mold and press them lightly for half an hour, then add more weight for an hour and a half. Coat with paraffin when the surface has dried, or rub with vegetable oil or salt. Ripen in a cool place (40°F to 45°F) for two to three months.
Wisconsin Brick Cheese
To make Wisconsin brick, first warm 2 gallons of whole, pasteurized milk to 90°F. Next, add 2 tablespoons of buttermilk. Stir thoroughly, and add half a cheese rennet tablet dissolved in water. When the milk coagulates, cut the curd into 1/4-inch cubes, and mix gently for 15 minutes.
Then increase the temperature 1°F every five minutes to 96°F. Maintain this temperature for 20 minutes while stirring gently, then remove from heat, spoon out as much whey as possible, and transfer the curds into a mold with plenty of drainage holes. (A perforated bread pan will give the characteristic brick shape.) Add the follower and weight with a brick.

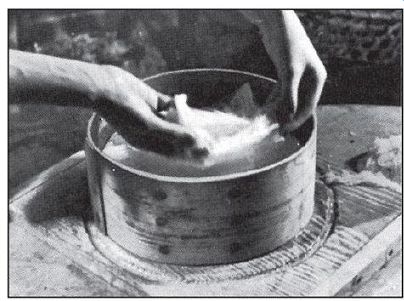
------------ 1. Rennet is added to a kettle of milk that has been warmed by
an open fire.

------------ 2. Curdled milk is cut with a traditional five-pronged curd
cutter.

------------ 3. Large, shallow ladle is used to remove as much whey as
possible from curds.

------------ 4. Curds are transferred to old-style ash splint basket lined
with cheesecloth.

----------- 5. Curds are gathered up in the cheese cloth to put inside
a cheese hoop.

------------ 6. Curds are gently pushed into the shape of the hoop to remove
airspaces.
------------ 7. Extra cheesecloth is neatly folded over the curds before
adding the follower.

------------ 8. Cheese is slid into an old-fashioned press. Note follower
and wooden block.

----------- 9. Final step is to rub cheese with salt to prevent mold and
help form hard skin.
After 12 hours remove the cheese from the mold and weight it so it stays submerged in a salt solution (1 teaspoon of salt per cup of water). After 24 hours remove the cheese and rub its entire surface with rind from a piece of Wisconsin brick or Limburger. Each day for the next two weeks, rub the surface with a mild brine solution (1/2 teaspoon of salt per cup of water). During this period, keep the cheese at about 60°F in a very moist atmosphere.
(Place it in a sealed container along with two or three bowls of water, sprinkling it with water occasionally.) The last step is to apply paraffin and age the cheese in a cool place (about 40°F) for eight weeks.
Making Cheese in Colonial Days
Before the development of thermometers, cheesemaking was a very inexact skill. Housewives heated their milk in large copper pots in front of an open fire until it was warm to the touch. For rennin they added either brine solution in which a calf's stomach had been kept or a fingernail-sized piece of dried calf's stomach. Another method was to use a little of the dried contents of a newborn calf's stomach. The cheese being made below follows a recipe that was used in the Hudson Valley in the late 18th century. The curds are pressed directly after being cut and drained. After several days in the press the cheese is removed and rubbed several times with salt before being stored on long benches in a cool dairy room. Cheese made this way did not have any distinctive flavor. Its main virtue was that it preserved the summer surplus of milk for use during the winter.
Sources and resources
Books and pamphlets:
Carroll, Robert, and Ricki Carroll. Cheesemaking Made Easy: 60 Delicious Varieties. Charlotte, Vt.: Garden Way Publishing, 1982.
Duback, Josef. Traditional Cheesemaking: An Introduction. New York: Intermed Technology Development Group of North America, 1988.
Hobson, Phyllis. Making Cheese and Butter. Charlotte, Vt.: Garden Way Publishing, 1984.
Hunter, Beatrice Trum. Fact Book on Yogurt, Kefir and Other Milk Cultures New Canaan, Conn.: Keats Publishing, 1973.
Stoner, Carol Hupping, ed. Stocking Up III. New York: Fine Communications, 1995.
U.S. Department of Agriculture. Cheeses of the World. New York: Dover, 1972.
===