Creating a Homestead Out of Sun-Dried Mud
Adobe, or sun-dried mud, is among the most ancient and widely used building materials. The ingredients for making adobe—soil, water, and straw—are cheap and abundant, and the bricks themselves are easy to make, easy to use, and durable. Perhaps most important, adobe is an energy saver. Thick-walled adobe homes provide interior environments that are thermally stable, resisting both the penetrating heat rays of the sun during the day and the outward flow of warmth from within during cool nights.
Adobe is an arid-climate material; unless it is specially treated, it tends to decompose in humid conditions. But in regions to which it is suited, adobe brick will last almost indefinitely. Remains of adobe structures 700 years old and more still stand in parts of Arizona and New Mexico. The famous Thos Pueblo of New Mexico, an enormous adobe complex, has been the home of unbroken generations of Indians since long before their first encounter with the Spanish conquistadores in 1540. With such a long history it is not at all surprising that the architectural style of adobe that evolved over the centuries—a blend of ancient Indian technology with later Spanish stylization—is both in harmony with nature and perfectly adapted to the resources of the region.
How to Tell If Your Soil Is Suitable for Adobe
The ideal soil for making adobe has little or no organic matter and contains sand, silt, and clay in roughly equal proportions. The ingredients work much like ordinary concrete: the sand and silt act as filler, the clay as binder. Too much filler results in bricks that crumble easily; too much clay results in bricks that crack as they dry. Organic soil is not acceptable, since the bricks will be weak and harbor vermin.
The knack for choosing adobe soil is not hard to acquire. Start by looking at different soil samples: squeeze them and smell them to detect organic content. Next, perform the tests shown at right. The tests are easily done and will give the approximate proportions of sand, silt, and clay. If you find some likely adobe, check further by digging samples from several spots, mixing them thoroughly to obtain an average profile. Further tests using sample bricks are shown on the next page. As a final step, have a commercial laboratory perform a detailed composition analysis. This will probably be required by the local building code in any case.

---- Put handful of soil in a jar of water, shake thoroughly,
and allow to settle 24 hours. Coarse sand will settle at the bottom, silt in
the middle, clay at the top. Proportions should be roughly equal, with at least
23 percent clay. Organic material will float; very little should be present.
---- Mix soil with a little water and roll into cylinder ¾ in. in diameter and 8 in. long. Soil should not stick to hands. Cylinder of good adobe soil will break at between 2 in. and 6 in. when held out straight. If it breaks at less than 2 in., add clay. If it breaks beyond 6 in., add sand

---- In dry regions building with adobe brick is both practical
and economical. Traditional Spanish style wood framing and trim enhances the
beauty of the thick earthen walls.
------------
Making Adobe Brick
The traditional way of mixing adobe—in a hand-dug pit is simple but physically demanding. Much labor can lie saved by using a rotary tiller to dig up the soil and a power cement mixer to blend it with water and straw.
There are two ways of casting adobe bricks: gang mold and cut slab. In the former method each brick is separately cast; in the latter a large slab is cast and then cut into bricks. With either method bricks should be at least 4 inches thick and of manageable weight. The most commonly used dimensions are 4 by 10 by 14 inches (~35 pounds) and 4 by 12 by 16 inches (about 50 pounds). Newly formed bricks must dry uniformly; otherwise they will crack. For this reason, wet brick should be protected from uneven exposure to wind and suit. Cover new bricks with burlap after the forms are off, and turn the bricks on edge as soon as they are firm. Cure bricks at least 10 days before stacking them. Do not make bricks when temperatures fall below freezing.
Local building codes usually call for laboratory tests of adobe to determine moisture absorption, compression, and breaking strength. The last two tests can be approximated as shown below. Experiment with sample bricks made of different soil mixes and keep accurate records to help determine the best formula.

---- Cement mixer can he bought or rented. Commercial 4-cu-ft.
size makes B to 10 bricks per load. Place chicken wire over mixer’s mouth to
screen oversize material. Add about 8 gal. water, about 250 to 300 lb. of dirt
(30 to 40 lb. per brick), and a double handful of straw cut into 2-in, lengths.
Gang-mold method:


1. Before use, form should be cleaned and soaked in motor oil. Pour mix into
center of form (it should flow easily, barely sticking to hoe), then spread
it outward with hands.
2. Smooth off top by drawing trowel or 2 x 4 across form with sawing motion. Remove form promptly to prevent sticking. Brick should sag downward no more than 1/4 in. if mix is correct.

3. Dry bricks on edge as soon as they are firm enough to stand (one to three
days). Herringbone bracing pattern keeps rows from toppling. Cure bricks until
they are hard days or longer.
4. Stack bricks against central column to distribute weight evenly. Cover top to protect from rain but leave sides open. For long-term storage, stack on wooden plat forms, cover sides with plastic.
Cut-slab method

Wooden frame is set directly on packed level ground.
Frame is 4 in. deep and sized to yield several mixer loads of bricks. Sides
must be at least 1½ in. thick and should be clamped together with bars. After
mud is poured and smoothed, score surface to brick dimensions, knock down frame,
and cut as shown with piano wire stretched across wooden or steel frame. Turnbuckle
facilitates tightening the wire.
Testing the strength of your bricks

---- Compression strength can be measured with homemade
device. Use pipe sections to cast 2-in.-long, 2-in-diameter adobe cylinders.
After standard curing, place cylinders in oven at 150° F for two hours to ensure
uniform drying. Cap bearing faces with plaster of Paris. Test shown applies
pressure of 300 lb. per square inch—a safe figure for adobe.

Modulus of rupture test determines breaking strength or cured
brick. Suspend four-week-old sample brick be tween two others. Brick should
support 160-lb. man. Brick should not break if dropped from shoulder height;
adobe that fails test normally needs additional clay. Building codes require
that tests be verified by laboratory.
-------------
A Strong Foundation For Massive Walls
Building an adobe house requires careful planning, but actual construction is comparatively simple. The building site and concrete foundation should be prepared according to standard building methods. Walls are constructed by laying the adobe blocks like ordinary bricks; adobe mud, without the straw, serves as mortar. Adobe does not hold nails, so wooden inserts must be set in place as construction proceeds. After the walls are up a continuous bond beam of wood or concrete is set in place to tie the walls together and distribute the weight of the roof. Floors are generally made of brick or adobe, al though concrete slab floors or wooden floors laid atop joists anchored to the foundation are also used. Decide plumbing and electrical arrangements prior to construction. Also determine the locations of fireplaces beforehand; fireplaces made of adobe are heavy and require thick foundation slabs.

---- Use either transit or builder’s level to lay out site
plan. Helper holds vertical rod to stake out corners precisely and to determine
grade levels if excavation is required. Batter boards are then set up near
corners of site and notched with a saw. String stretched between notches outlines
foundation.

---- Corner blocks may have to be cut to size with trowel to maintain 4-in, overlap. 1 Bricks and mortar are J laid according to lines on a story pole. Check 12 corners for right angles regularly.
Twine acts as guide, ensuring level courses. Stretch it between nails set in precisely aligned corner bricks. Walls are heavy and must be precisely vertical.
Wall building begins at corners and proceeds toward middle. Lay bricks so vertical joints are offset at least 4 in. between courses. Height of wall to bond beam must not exceed eight times wall thickness. Build no more than six courses per day. Mud for mortar should be screened to remove particles bigger than ¾ in. Traditionally, vertical joints are left open. When walls are plastered, openings will give plaster better grip.
Rough in plumbing before foundation is built. Pipes can be concealed in hollow frame wall, often shared by
Adobe is heavy and needs massive footing. Poured concrete, reinforced with ½-in. rebars (steel reinforcing bars), is cast atop undisturbed earth dug below frost line. Footing must be at least B in. thick and 4 in. wider on each id than wall above. Stem is built of hollow cement block packed with adobe and capped with cement to prevent moisture damage. Stem blocks rise from footing a minimum of 16 in. above grade for ground water protection. Non-weight-bearing interior walls require no footing.
Brick or adobe floors can be laid directly on earth. Wood floors re quire crawl space to prevent rot. A concrete slab floor should be 4 in. thick with insulation between slab and footing to provide room for expansion.
-------------------------
Doors, Windows, Beams, and Wires

Bond beam is a continuous beam made of concrete or wood that
ties walls together and distributes roads. Concrete bond beam must be at east
4 in. thick. It is poured in place in a wooden form and has rebars embedded
in it for strength. Carriage bolts or metal strips are also embedded to provide
anchors for a 2-in.-thick nailer. Lintels can be built into a bond beam by
extending the form downward. Additional rebars should extend through lintel
2 ft. into bond beam.
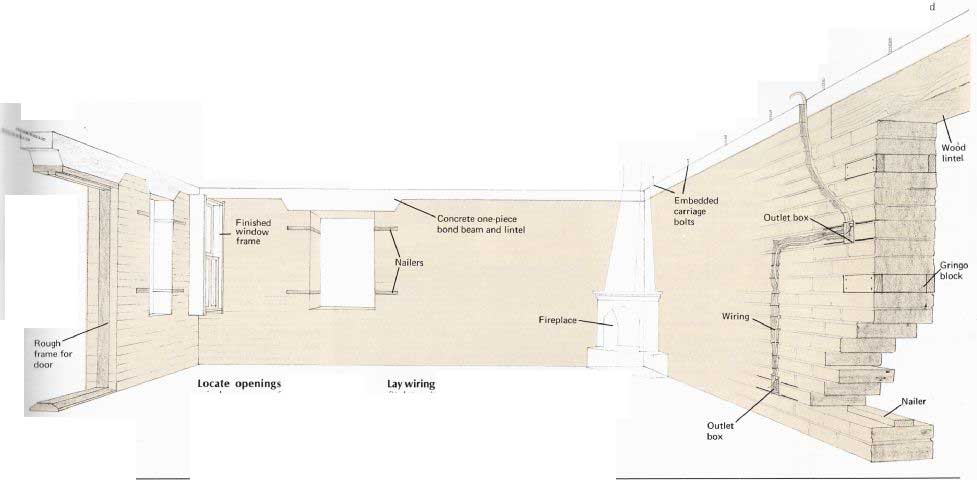
Locate openings for doors and windows away from corners to preserve wall strength. Rough frames are set into place as wall is built or attached later to gringo blocks. Allow 3/4 in. for vertical settling of walls and lintels.

To make wood-faced bond beam, use quality lumber as form,
set form flush with wall, leave in place as decorative facing. Concealed beams
are poured between parallel courses of 4 in.-wide adobes.
Lay wiring inside walls as courses proceed or fit later into channels gouged with claw hammer. Drop cable from ceiling or run beneath wood floor. Have electrician super vise. Anchor outlet boxes with horizontal metal strips embedded in joints and extending 12 in. on each side. Record wiring locations before plastering.
Wooden lintels must be at least 6 in. thick and extend 18 in. on each side of wall opening. Check local code.

Wooden bond beams are more attractive than concrete but are
expensive, subject to shrinkage, and may not be allowed by the local building
code. Corner joints must be rigid. Use either pegged half-lap or dovetail.
Providing surfaces for interior nailing

Rough frames afford surfaces for attaching doors or window frames. Use 2 x 4’s or wider. Recess frames into notched adobe bricks. Drive 16d nails partway into frame at joint lines before blocks are laid to anchor mortar.

Gringo block—a wooden box made of 2 x 4’s—is a simple, traditional
way to provide a nailing surface. Set it in place of brick at nailing point
and fill it with adobe. Use two on each side for windows; three on each side
for doors.

Nailing surface of another kind is made by fitting 1-in. stock into mortar
joints. Such horizontal nailers can be used either as gringo blocks or as fastening
surfaces for shelves and wall hangings or as framing for interior walls.
---------------------
From Floor to Roof: The Final Steps
Since roofs and ceilings must be designed with the load-bearing capacities of walls and foundations in mind, it is essential to have professional assistance when planning them. This is particularly true for old-style earth roofs; although they provide excellent insulation and economy, they are extremely heavy. Asphalt or tile roofs are lighter and offer greater architectural freedom. A roof must also protect the walls from water runoff. This is accomplished by channeling roof drainage into protruding gutters called canales.

Canales: Roof drainage is provided by canales. Locate them along low side of roof, level with decking. They must project enough to prevent water from running down the walls.

Classic adobe ceiling uses large peeled logs called latillas to
support narrower peeled saplings called Ia6IIas. Natural taper of vigas creates
drainage slope. Latillas are nailed in herringbone pattern to accommodate
differences in viga diameters.

Milled lumber ceiling is practical but less traditional.
Tongue and-groove decking provides extra insulation and eliminate shrinkage
gaps. Milled beams are even, so decking can span several beams. Beams are often
adzed by hand for texture.
Details of roof construction

Roof beams can be anchored to nailer or straps embedded on top of concrete bond beam. Use spikes or boils if bond beam is wooden.
Two-ply roof incorporates insulation and makes wiring easier. Interior surface is of standard decking. Use 1/2 in. plywood for exterior.

Parapet is traditional; fit and seal bricks carefully around vigas.
Triangular wooden strip along perimeter supports dished roofing.
Grade roof to drain off water line canales with rustproof metal. Seal roof seams and joints by hot-mopping with tar. Inspect frequently.
Your choice of roofing surfaces

Hot-mopped roof consists of three or more layers of treated felt mats sandwiched between coats of asphalt. Felt is dished upward at sides. Cover final tar layer with light colored gravel to reflect heat and protect asphalt from direct sunlight.

Packed earth of high clay content is traditional roofing
material. Recommended thickness of earth is 6 to 8 in. Install it over hot
mopped felt for best results. Foundation, walls, and vigas must be massive
to accept extra weight.

Peaked tile roofs are common where average rainfall is high.
Standard trussed-root building techniques are used. Trusses may be left exposed,
or a ceiling can be installed to create an attic. The cost of tile is high,
but permanence of roof offsets expense.
-----------
Interior and Exterior Plastering
Plastering protects and beautifies adobe walls. Mud with a high clay content is the traditional plastering material (it is still used by southwestern Indians), but it requires more frequent maintenance than modern stucco compounds and is more vulnerable to moisture damage.
The first step in exterior plastering is to nail galvanized chicken wire to the wall with rust-resistant 16-penny nails. Next, trowel on a primary, or scratch, coat, pressing it into joints and gaps for a strong bond. Just before the scratch coat hardens, roughen it with a rake so that the following coat (called the brown coat) will have something to grip. The brown coat is troweled on smooth and left to dry and cure at least 10 days before a finish coat of thin stucco—colored if desired—is applied.
Neither chicken wire nor a scratch coat is needed for interior plastering. Use fibered gypsum plaster mixed with sand for the first coat; un-fibered gypsum plaster and sand for the second. This finish will not rub off on clothes. Since plastering is messy, interior work is best accomplished before the floor is laid. If wood is to be plastered, first cover it with 15-pound asphalt felt and strips of metal lath to keep the wood dry and prevent the i luster from cracking as the wood swells and shrinks.
-----
Floors:

Adobe mud for floors should be 20 percent clay and have extra straw mixed in. Make floor at least 4 in. thick, built up of packed 2 in. layers. If cracks form, fill with adobe Traditional floor sealant is ox blood. A modern alternative is boiled linseed oil.
Brick floors are laid in 1-in. thick bed of sand atop surface of packed earth. Treat earth with insecticide, then cover it with plastic vapor barrier. Tamp bricks into place with mallet. Fill cracks by sweeping floor with fine sand. Finish with commercial scalers and wax.
-----

Frames of doors and windows are notched with 1/4. groove so that they overlap plaster rather than butt against it. This helps reduce cracking. Baseboard is similarly notched, Install felt and metal lath at wall openings to protect the edges.
Exterior walls require chicken-wire backing and three coals of plaster. Total thickness is about 4 in. Plaster should extend below grade level for even detail. Inside walls need only two coats of plaster and no wire.
-------------

Anita Rodriguez, Enjarradora
Maintaining an Adobe Tradition
Anita Rodriguez, of Taos, New Mexico, is an expert in enjarrando—the craft of plastering with adobe. Here she is shown working on an horno, an ancient type of oven.
‘When I was a child in Taos, where I was born, nearly all the buildings were adobe, Now they have been replaced by techno logical construction, but I have never forgotten the lovely soft shapes of earthen walls or the fireplaces that were in every home It is hard to exaggerate the beauty and harmony of that vanished town.
“In this part of the country for over 500 years the craft of finishing adobe has traditionally belonged to women. The Spanish word for such a woman is enjarradora. In English this means only “plasterer,” but enjarradoras also build fireplaces, lay mud Iloors, and paint walls with clays of various colors by an ancient method called alisando.
“A friend who knew my interest in adobe asked me to build her a fireplace. Someone else happened to see it and asked me to build another one, and that’s how I got started. Today I am a professional enjarradora. One can only learn enjarrando from enjarradoras. The techniques are passed on in a strictly oral tradition that has never been written down. I learned from Hispanic enjarradoras who were generous to me with their knowledge; and while I was teaching school at Taos Pueblo, I too passed my knowledge along to other women.
“With the interest in environment and the emphasis on energy saving, there is a revival of interest in adobe construction, It is particularly good for buildings with solar heating. Adobe walls are excellent insulators. They trap heat in winter and keep the interior cool in summer.
“Working with adobe is hard physical labor. Ten years of enjarrando have not made me look like Charles Atlas, but I work with men all day and know that women are much stronger than people think they are. The work has given me a sense of my roots. I identify with my culture and I don’t want it to die.”
------
Fireplaces

---- Adobe holds heat well, making it ideal for fireplaces. Fire place exterior can be anything imagination allows, Shape bricks with dull hatchet and masonry saw; finish with mud spread over chicken wire. (Technical aspects of fireplaces are discussed in Fireplace Construction and Design, pp.62 65.)