Almost every wooden fence is built on a framework of upright posts and connecting rails, or stringers. This simple skeleton can carry a range of fences that will meet practically any need. A fence of nothing more than posts and rails makes a clear boundary marker, adapts well to rough or rolling terrain and covers the most ground with the least lumber. Siding nailed to a post-and-stringer frame can take the shape of a low picket fence to decorate the border of a front yard or a tall board fence to insure privacy or keep children and pets within bounds.
In all of these fence styles, your first concern is the quality of the building materials. Use pressure-treated lumber or naturally decay- and insect-resistant woods, such as cedar or redwood. All are more expensive than construction-grade lumber, but they will last longer.
If you can't get pressure-treated lumber in the sizes you want, treat the wood yourself. Soak board ends in pentachloro phenol or copper naphthenate. The latter will stain the wood light green but, unlike some other preservatives, it will not harm garden plants. If you can't soak the lumber, paint it liberally with preservative, using especially heavy coats at sawn ends. While you .assemble the fence, daub additional coats of preservative on fresh cuts and adjoining surfaces. If you intend to paint the fence, paint all of the lumber before beginning to assemble it. Use stainless-steel, hot-dipped galvanized, or aluminum fasteners, which will not rust and stain the fence.
The basic post-and-board fence is made of 1-inch lumber, face-nailed to 4-by-4 posts. The posts — 36 to 42” high for a three-rail fence, 48 to 54” for a four-rail one — can be topped with metal post caps or with an angled cap rail to protect the ends, which rot easily, from moisture. Space the posts to use standard lengths of board lumber as much as possible.
Post-and-rail fences, with tapered rail ends that fit into mortised posts, are sturdier than post-and-board fences and al most as easy to install. Prefabricated mortised posts and tapered stringers are sold by lumber suppliers in a variety of styles. All are assembled like the split-rail fence illustrated on below.
Picket fences can also be built in a wide range of styles, though prefabricated pickets are becoming difficult to find in some areas. A picket fence can be any desired height but is usually 3 to 4 ft., with pickets projecting about 6” above the top stringer.
The Simplest Fence of All
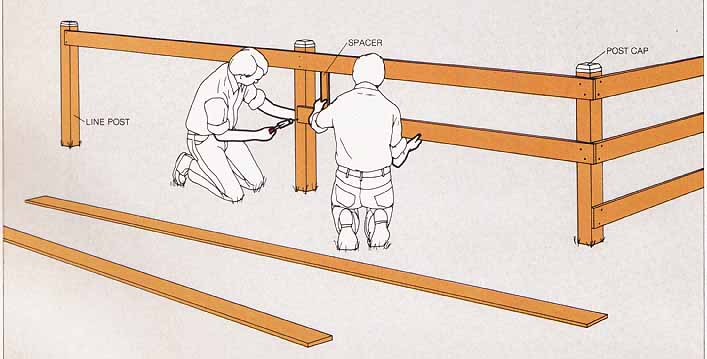
Building a post-and-board fence. To start from an end or corner, trim 1-by-4 or 1-by-6 boards to extend from a corner or end post to the center of the second line post, and stagger these long boards with others extending only to the center of the first line post. Nail on these boards Use a piece of scrap wood as a spacer to position the lower rails. Continue to add boards cut to the longer length until you need short pieces for ends. Nail metal caps onto the posts.
Desirable Extras: A Cap Rail and Battens
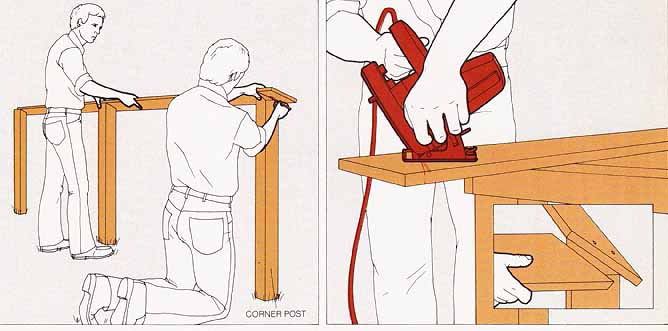
1. Beveling the posts. To prepare the posts for the cap, saw a 30-deg angle at their ends—you can start the cut with a power saw set to the angle, but it will not cut all the way through and you must finish with a handsaw. To prepare a corner post, make a second cut at a 30-degree angle across an adjacent side.
2. Marking the cap rail. With a helper, hold a 1-by-6 in position on top of a corner post and a line post. Have the helper set one end of the board at the center of the line post while you mark the underside of the board along the angle of the corner-post top. Then mark a second 1-by-6 cap-rail board to fit across the other angled face of the corner post. Use a carpenter’s square to transfer the marks to the other side of each board to facilitate sawing.
Nail the cap-rail sections to the corner and line posts, aligning the tops of the rails with the top edges of the beveled posts.
Set all posts, placing the corner ones so that their bevels slant to support mitered cap rails.
3. Cutting the cap rail. With a circular saw, cut the rails along the corner-post marks at 30-deg, beveling the ends of the boards so that they can be mitered flush.
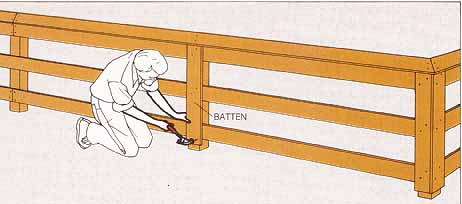
4. Installing the battens. When all the rails are fastened,
cut 1-inch-thick batten boards to reach from the underside of the cap rail
to an inch or two off the ground and nail them to the posts.
Fitting Together a Rail Fence
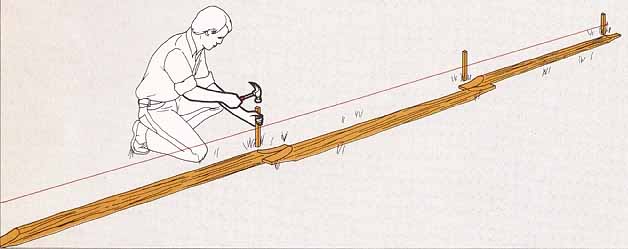
1. A dry run of rails. Drive stakes for the end posts and string a line between them. Lay precut rails on the ground along the
fence line, overlapped as they will be in the mortises of the posts—if
the rails do not fit evenly, move the end stakes if possible or cut short
rails for one or two sections of the fence. Drive additional stakes at
the centers of the overlaps. Dig holes for the posts at the stake locations.
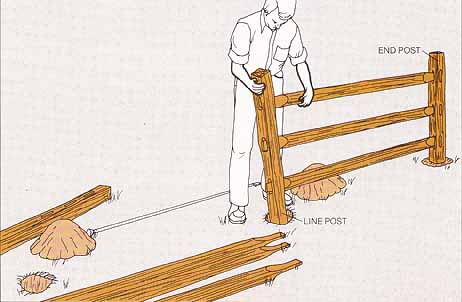
2. Fitting the rails in place. Set an end post in tamped
earth and lower the first line post into its hole; then insert the ends
of the rails into the slots of the end post and , as you lift the line post
upright, fit the other ends of the rails into the line-post mortises. Plumb
the line post, secure it with tamped earth and set succeeding sections
the same way.
Putting Up a Picket Fence
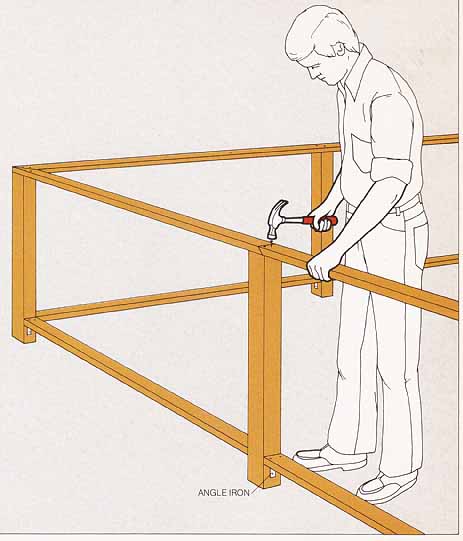
1. Installing the stringers. For the bottom stringers, trim 2-by-4s to fit between each pair of posts and nail galvanized 4-inch angle irons to their ends. Attach the stringers to the posts about 8” above the ground, nailing through the angle irons and then toenailing.
Use long 2-by-4s for top stringers to span as many posts as possible. Nail them on top of the posts, cutting them to meet in the centers of line and corner posts. At line posts, bevel the stringer ends at an angle of 45-degree so that they over lap; at corner posts, miter the stringer ends.
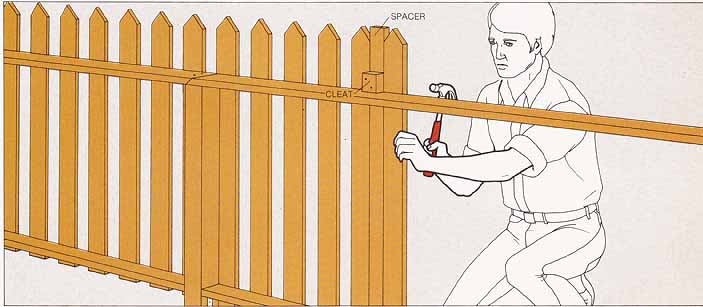
2. Attaching the pickets. Using a piece of scrap the
length of a picket, make a spacer as wide as the distance between pickets.
Nail a block of wood about 6” from one end of the spacer as a cleat; hang
the spacer on the fence by hooking the cleat over a top stringer. Set the
first picket at the edge of an end post, align its point with the top of
the spacer, plumb it with a level and nail it in place. Proceed along the
fence, using the spacer to locate each picket. Check with a level every
few pickets to be sure they are not drifting out of plumb. Stop a few ft.
from the end of the fence and check the fit of the remaining pickets; adjust
the spacing if necessary, so that the last picket will be flush with the
outside edge of the end post.
Pickets in Patterns
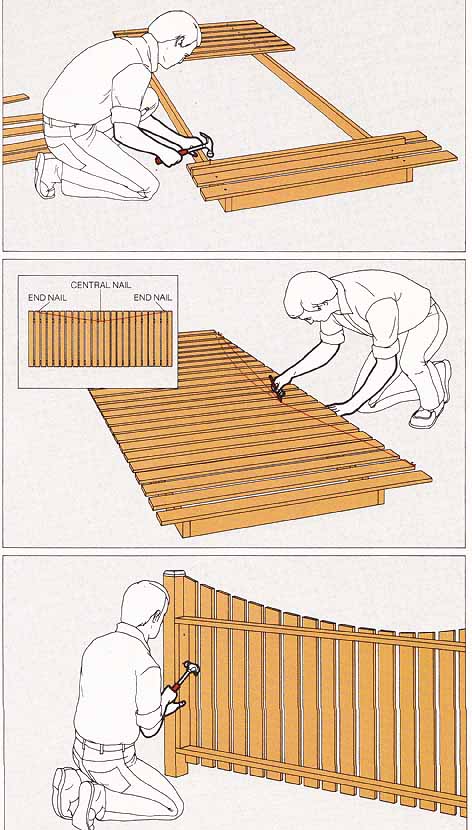
1. Building a panel. Build rectangular frames of 2-by-3s to fit between each pair of posts. Cut picket slats to the length of the longest picket in your pattern and , starting from the ends, nail several of them to the frame laid out on the ground. Align the pickets evenly along the bottom of the frame, using a spacer with a cleat that holds the spacer’s end about 4” below the frame bottom. In the center of the panel, lay the pickets on the frame without nailing, adjust their spacing, mark their positions on the stringers and nail them in place.
2. Marking a curved pattern. Measure down from the top center of the panel of pickets the full depth of the curve and drive a central nail. Drive two end nails at the top of the picket panel, each a distance from the central nail equal to half the panel length. Tie a cord to one end nail, pull it around the central nail and fasten it to the other end nail. Now remove the central nail, substituting for it the point of a pencil. Keeping the cord taut, use the pencil to draw a curve on the picket panel. Mark each panel in the same manner and cut along the curves.
3. Installing the panels. Have a helper hold each panel in position against the posts so that the post tops fit into the picket pattern. The bottom stringer should be about 8” above the ground. Nail the panels to the posts through the uprights and , for additional support, toenail through the bottom stringer from the side.
A Rack of Dowels
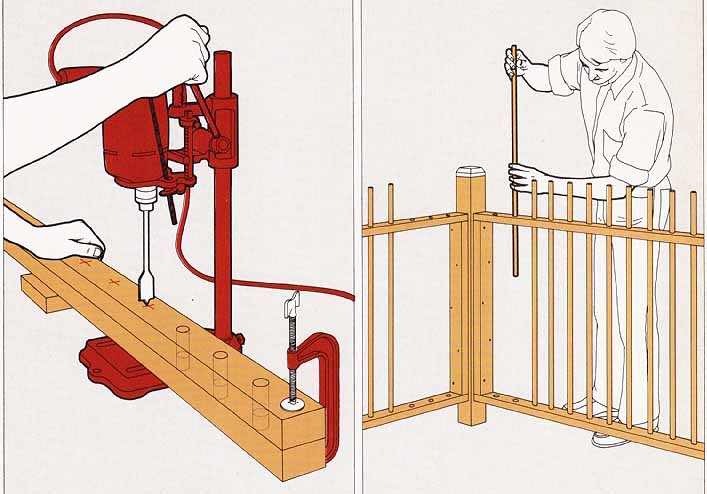
1. Preparing the stringers. Cut 2-by-3 stringers to fit between posts, clamp each pair together and mark the positions for the dowels. Bore ¾-inch holes through the top stringer and a third of the way into the bottom one at each marked point. The holes must be straight; use a drill-press stand or a jig made for guiding dowel holes.
2. Installing the panels. Build frames for a picket panel from the stringer pairs. In all but the last three or four holes at the ends of each panel, insert ¾-inch dowels through the top stringer, resting them in the depressions in the bottom stringer, and glue the dowels to the bottom stringer with exterior-grade carpenter’s glue. Finally, nail the fence panels to the posts, and insert and glue the remaining dowels.