Follow these Five Steps to Better Storage to improve your own system. Many illustrations show you a Potpourri of Project Ideas that will help you refine your scheme.
Planning a better storage system starts with an assessment of your existing space and how you’re using it. A tape measure, graph paper, a ruler, an eraser, and colored pencils can help you make diagram that shows traffic patterns and activity areas. Put a little time into the planning stage and have fun with it; your overall storage system will be the better for it.
Making your space work for you means setting aside all the old notions of what storage is “supposed” to be so that you can take a fresh perspective on your existing space resources—both living areas and storage space.
Even if your storage problem seems to be limited to one area, such as the garage or perhaps lust a closet, you’ll want to think of that area in relationship to the other storage facilities in your home. Often a problem in one area aggravates the situation in other, seemingly unrelated areas as well; on the other hand, an improvement in one spot can have a beneficial impact elsewhere. For example, it may seem that a front-hall closet is for storing outerwear, if for no other reason than the dictates of tradition and habit. But your lifestyle and living patterns might lead you to redesign your closet to serve a variety of functions, as the one shown on the front cover does. That closet serves as much more than a place for the usual coats and boots. It comfortably accommodates the picnic basket, blanket, and binoculars, out of the way but still easy to reach; a small wine assortment; household tools, gift wrap and knitting supplies, briefcases and umbrellas; and sports equipment, duffled and ready to go out the door. Storing these things here frees valuable space in other parts of the house.
The techniques described in this section constitute a process that will help you set up your own best storage system. The Five Steps to Better Storage start with an overview of your own home and its particular characteristics, so that you can arrange your furnishings to take advantage of them. The design guidelines we present later will help. Once this underlying structure is in place, the next step is to have a look at your storage methods and facilities, and the things you need to store. You may be able to accommodate your belongings simply by reorganizing them. Or you may find you need more storage space. If so, this process will guide you in determining how much space you need, where it’s needed, what it will hold, and how you’d like it to work for you. Then, for some practical examples of ways to cure storage headaches, browse through the illustrated Potpourri of Project Ideas. In this section, the process of exploring and assessing a storage situation and creating an attractive, functional system for it is applied to a single room. However, the approach is effective at any scale—from a tangle in a drawer to a whole house. You may want to start with a small, defined space such as a closet. When you discover how easy it is to create a smooth-functioning system, and see how it dissolves problems in other areas, you may well decide to tackle every storage problem in your home.
Five Steps to Better Storage
The five-step process described will help you solve the problem of clutter and overcrowding in any room in your house. The process entails:
1. Discovering your traffic patterns and the activity areas they shape.
2. Coordinating your furniture arrangement with the traffic pattern.
3. Designing activity areas.
4. Figuring out what goes where.
5. Putting it away.
Looking at traffic patterns and activity areas shows you how the room itself is set up to function smoothly and well. Arranging the furniture to coordinate with traffic patterns will eliminate bumping, tripping, and congestion and encourage an easy flow through your room. Designing activity areas helps you choose where to locate and how to organize your activities. Figuring out what goes where shows you how to create a flexible and sensible storage system, whether it be for a drawer, a room, or a whole house. Putting it away implements your plan.
1. Discovering Traffic Patterns and Activity Areas
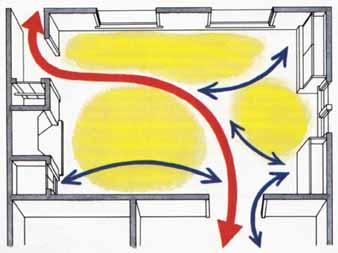
Traffic Patterns. First of all, see how the room itself is structured. The more you know about how your room works, the better you can make it work for you. Where are the doors—the entry and exit points? Where are the closets or built-in cabinetry? These elements are fixed; getting to and from them creates the natural traffic patterns in the room.
Even though you can’t see them, these pathways may cause storage problems just as much as overcrowding does. If the routes to your storage places are congested or awkward to use, it may be too much trouble to put things away. By contrast, when you recognize your room’s natural traffic patterns and arrange the furniture with respect to them, you create a harmony between the room itself and how you use it. And you may find that your storage problem isn’t a shortage of space after all. You might simply need to adjust your furniture so that uncongested pathways aid you in using the existing storage capacity.
Activity Areas. If traffic
patterns can be thought of as pathways, then activity areas are the dwelling
places they connect. These areas house people—at least temporarily—and belongings.
An activity area may be as small as a closet (the activity carried out there
being storage) or it may be a large portion of a room— the conversation
area around a fireplace, say, or a kitchen’s work triangle (refrigerator
to stove to sink). Storage takes place in activity areas, not where traffic
moves; defining activity areas is a first step to organizing a storage system.
Discovering your traffic patterns and activity areas is easy. All you do is map your space.
Mapping Your Space
— Measure the space; start at one corner and work your way around the room, wall by wall, and sketch it to scale. Use graph paper to capture its proportions. Include door openings, windows, closets, and other built-in features. Place a piece of tracing paper over your sketch and trace the walls and doors.
— Draw in the major traffic pathways—those you use most frequently—between entry and exit doors. With a lighter pencil line, draw the secondary traffic routes, such as those that go to built-in features. These are the room’s natural traffic pathways, which shape its activity areas.
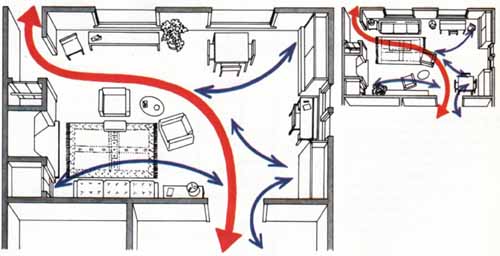
2. Coordinating Furniture with Traffic Patterns
Put a clean piece of tracing paper over your original sketch and retrace the walls and doors. Roughly sketch in the furniture as it is currently placed.
— Now put the furniture plan over your traffic map. Does your furniture arrangement harmonize with the room’s natural traffic patterns, or are there conflicts where traffic is blocked by furniture?
— Use fresh tracing paper over your graph paper plan to sketch out various rearrangement schemes—even minor adjustments in furniture placement can make a tremendous difference in how the room looks, feels, and works. Work freely and quickly; you’re just playing with ideas now.
Try to place furniture so that the major traffic path is obvious and easy to follow. For example, this might mean placing a table or work island in the kitchen in such a way that people walking from the back door to the hall naturally bypass the sink-stove-refrigerator work triangle.
Consider the characteristics of the furniture as well. You won’t want a frequently used cupboard adjacent to a traffic path if it causes congestion. A drop-leaf table will work well in even a fairly narrow hallway—unless you often need to use the leaf. Remember that a desk chair isn’t always snugged up against the desk; you should allow at least 2 feet (and preferably 3 feet) of clearance between the desk and a doorway. You may want to pull a piece of furniture into the middle of the room—that bookcase might make a great room divider—but check its back first. Sofa backs look fine, but wood pieces frequently have unfinished backs.
Don’t forget the utilitarian details. As you place the furniture, think about where the lighting will go. Is there an adjacent outlet or a safe and sensible path for an extension cord? Rewiring may not be in your budget. Can you place the phone where you need it? What about hooking up the television? If you have it on a movable stand, can it move smoothly between the places you’ll want it?
As you work out a floor plan that defines and serves traffic paths and activity areas, refer to the design guidelines below for help in making it attractive as well as functional. Let all of your ideas coalesce into one or two tentative layouts—but don’t actually move the furniture yet. First, design your activity areas, as described on below; this may call for some adjustments in your floor plan.
Five Steps to Better Storage
Guidelines on Design
These guidelines help you design your activity areas so that the room functions in an integrated way. The better your room works as a whole, the better the smaller systems—such as storage—will work within it. The three fundamental guidelines below apply to spatial design at every level of scale. Whether you’re adding new furniture, building in a storage component, or simply rearranging an area, these principles will help you create a room as full of harmony and beauty as it is functional and efficient.

Closure and Connection.
When you arrange furniture, you can position pieces to define a space that
traffic can flow around, not through. For instance, by placing a pair of
armchairs with their backs at the edge of a traffic pathway, you can create
an inviting conversation area. It seems special because the chairs create
a sense of closure, but it doesn’t feel walled off, since your line of sight
maintains a connection with the rest of the room.
Height Lines. As you arrange your room, consider the combined visual effect of the furniture’s height lines. Every hori2ontal surface creates a visual line. These lines needn’t be identical, but if furniture height lines rise and recede in a smooth, orderly way, you’ll create a spacious, calm quality. Arbitrary, abrupt changes in height can create a jumpy and uncomfortable effect.
Architectural Reference Points. Use vertical lines such as the edges of doors, windows, fireplaces, cabinetry, and nooks as reference points to help fine-tune your furniture arrangements. Imagine those edges projecting into the room to form a spatial grid, then see where you might be able to align furniture edges with that grid, or center pieces in areas formed by it. Chairs, tables, sofas, even area rugs knit securely with the space when you use the natural grid to create an underlying order in the room.
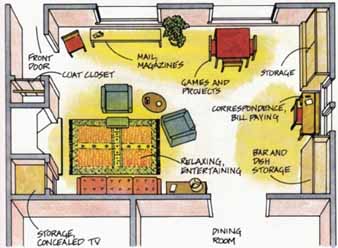
3. Designing Activity Areas
Often, what is perceived as a storage problem is actually an activity located in an inappropriate place. If you can resolve this conflict, chances are you’ll also improve your storage situation at the same time.
For instance, is your iron permanently in “temporary” residence in the family room because you always iron in front of the television? Go ahead and make a home for the appliance in the cabinet next to the TV. Bring the ironing board out of exile while you’re at it; at this point, don’t worry how you’ll accommodate it. Good storage puts things in the right place so they are accessible. This may not be the storage system the architect or your mother envisioned, but if you iron in front of the TV, why not make it easy to do so? You’ll want to arrange your storage setup to reflect your own idea of the right place for things.
A floor plan with uncongested traffic paths and newly defined activity areas is the basis for the next step: clarifying what activity belongs in each area.
— First, take a minute to analyze the room’s characteristics. Different areas have qualities you’ll want to take advantage of—natural light, a fireplace, a cozy nook, generous open space, a beautiful view—as well as some you’ll want to circumvent, like appliance noise or a draft. Perhaps a quiet corner of the bedroom is the perfect place for writing letters and paying bills. Can you fit your desk there?
— Now, list the different things you and your household members typically do in the room. Sort your list into categories—activities that are energetic or quiet, those that require some equipment versus those that don’t, things done seated or standing, for example. Choose categories that make the most sense for you. While you’re at it, take a moment to dream a little. For each area, add to your activities list anything you might like to do there if the space could be made appropriate. For instance, you might have on your kitchen list just the usual food-related activities. Now you might add menu planning, children’s homework, and flower arranging. Keep this “wish list” in mind as you continue the process. You may be surprised at how much of it you can move from dream to reality.
— Now look to see if your activities are currently located in appropriate areas of the room. Placing an activity in an appropriate area means respecting the nature of the room— both its structure, as revealed by its traffic pattern, and its ambience, as defined by the special characteristics of the space. Be sure as you decide what activity goes where that you are working with, not against, the structure of the area and its ambience, or you will be unhappy with the result.
— Compare your new floor plan with your list, and be prepared to adjust either the activities or the floor plan until they are harmonious. Do quiet activities share the same space as energetic ones? This is workable if they go on at separate times, but if they coincide, you have a conflict that you need to resolve. Is there sufficient space for group activities? If not, you need to relocate the activities or rework your scheme to expand that activity area. When you think your floor plan is the best one for your activities and your household, rearrange the furniture. Then suspend your planning process for a few days while you live with the new arrangement and see if it suits you. Fine-tune it if necessary.
4. Figuring Out What Goes Where
Now that you’ve thought through your activity areas, you’re ready to tackle the question of what you want to store in them. First, look at the types of storage spaces you have in your newly arranged room. Assess each piece of furniture; what type of storage space does it offer? Does it have drawers; are they deep or shallow? Does it have shelves; are they adjustable? Next, look at the things that are stored in your existing units. Does it make sense to store those things there? Use the guidelines on this page to create and implement a new storage plan that utilizes your existing storage spaces well and allocates your belongings among them in the most sensible way. If your plan calls for new storage facilities, use Sections 3 and 4 to select the appropriate ones.
Getting organized can actually be fun. History—both ancient and recent—replays itself before your eyes as your closet or storage units yield up those relics, old favorites, and forgotten items, many of which bear no relationship to your current life.
Take a visual inventory.
— Across the top of a sheet of paper, list the activities you plan for the area at hand.
— Under each activity, list everything you need or would like to have nearby.
— Draw a big, bold line across the page underneath your list.
— Open all the doors and drawers of the storage units in the area. What’s inside?
— Check off the things above the line that are already in the storage unit.
— Below the line, list all the other things you find in the unit.
— Whatever you don’t find but need, circle. Go get those things; you’ll want to have them there.
Take I6 at all the “stuff” on your list below the line. Are these the “right” things in the “wrong” place?
If so, put them where they belong. Or, are they simply no longer “right” things, things you no longer care to keep? To help you decide, answer the following questions and then make your choice: Is it damaged or broken—and not likely to get fixed? Can you remember when you last used it? Do you like it anymore? Do you have and use something else instead? Would someone else like to receive or buy it? Are you keeping it only in case someday you need it (or you get thin again, or it comes back into style)?
Trade your problem for a solution. When you’ve cornered the culprit— that mountain of things you needn’t store at all—consider your options, You could just throw it away, but you could also: — Convert it to cash through garage sales or a newspaper ad. If you’re disposing of furniture, or anything a bit old, or something you think might have value, offer it to an antique or second-hand store or auction house. Or let someone else do the selling for you: thrift shops run by charitable organizations will take many items and send you a receipt for your tax-deductible contribution.
— Give it away to someone in your family, to a friend, or to a neighbor. It’s surprising to discover how much value others place on our castoffs. For example, your old costume jewelry might be a real treasure, to a child. Religious and charitable organizations take donations, especially clean clothing. And don’t overlook theater groups—most will welcome materials that can be used as props and costumes.
5. Putting It Away
Now you’re ready to decide what is the right storage place for the things you want to store. As you consider the three aspects of putting things away, keep in mind the importance of good access.
What Kind of Space is It?
Obviously, small toy pieces don’t store well in a wide-mesh basket, and wet bath sponges shouldn’t be put in a closed drawer. You might be able to take advantage of otherwise wasted space on high shelves by storing large items, such as serving pieces, there. This also frees the most accessible space for the things you use most frequently. It’s difficult to reach much beyond the first row of an assortment of small items, such as cups and bowls, if you store them on the higher shelves. Try to match the type of storage space to the sizes and shapes of the items you’d like to store. If the type of space you have available doesn’t meet your needs, see Sections 3 and 4 to help you custom-tailor it.
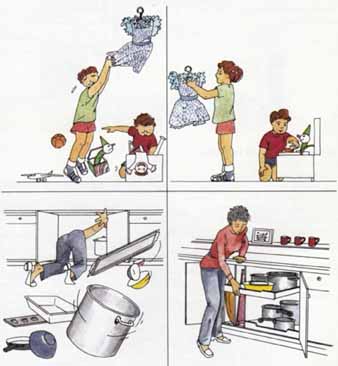
Who Uses It?
People come in a variety of sizes and shapes. Children, for instance, are shorter than adults. Storage for them needs to be low—clothes-closet rods hung at child’s-eye level—and compartmentalized to help them develop organizational skills. A toy chest, then, will work best if its large interior space is divided by a horizontal tray, or if it holds boxes that in turn house small toy parts. Grown-ups may need the same help if organization doesn’t come easily to them. Look above to orient your storage plans to eye level and reach.
How Frequently is It Used?
Categorize things by your need to get at them.
- Very often. Give an item easy access by putting it in front or on top. Consider hooks on door backs, small drawers or drawer dividers, and eye-level shelves to keep frequently used items visible and close at hand.
- Often. It can be behind, above, or below the frequently used items. Consider the back of an easy-access drawer, the shelf just above the closet rod, or middle shelves in an upper cupboard.
- Not very often. The backs of bottom drawers or deep shelves; high shelves; low shelves; under the bed and at the back of the closet— put infrequently used things in these less-accessible spaces.
- Almost never. This is dead storage—tax records, old school yearbooks, and family portraits. Before you consign anything to dead storage, give it a hard-eyed look: are you sure you want to keep it? If so, then off with it to the attic, the basement, the garage—places it takes an effort to reach.
What Makes Good Access?
— Can you see it? Visual access is important. Memory plays tricks on us; we often forget what we own when we can’t see it. Thus, tucking a set of soufflé dishes under the brushed-steel cake cover may be bad storage.
— Can you reach it? Not everything has to be right at your fingertips, but put the things you use most often in the easiest-to-reach places.
— Can you get it out? The closer you pack things together or the higher you stack them, the harder they are to use. Packing and stacking also tend to produce breakage; it’s very easy to nudge a glass or a toy off a crowded shelf.
Structure and Style
A Word on Style
The process you have just completed—analyzing an area and conforming your storage to its characteristics and to the activities being carried out there—is a means of developing structure. You now know what goes where, and you either have or have planned to acquire the storage facilities you need, whether they be well-organized closets and drawers, new shelves, or a wall of cabinets. You know how your redesigned area works. But how does it look? That’s a question of style.
Style individualizes structure, gives the bare bones of shelving and cabinetry a dress to wear. You’ll want any additions to your home to harmonize with what’s already there and to reflect your personal style. The overall effect will be most pleasing if you give some thought to just what your personal style is and design any changes to be consistent with it. In dealing with storage, you’ll have such choices as:
— open or covered shelving. Some people like the cozy workshop look of a room with things clustered on open shelves; others are not tidy enough to keep open shelves looking nice. Open shelving also invites dust and grease to settle on the stored items, so its owner should be a vigilant cleaner.
Style Punctuates Structure
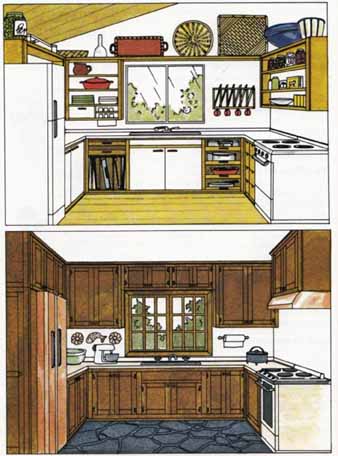
In the open-shelf kitchen, what you store, you see. The look of your wares and equipment and your arrangement of them determine the visual effect. The uncomplicated structure forms the backdrop for a colorful someone-really-lives-here environment.
In the traditional kitchen, the cabinet faces are the most prominent feature. Because you conceal the things you store, how they look is not so important. Behind the doors is a wealth of storage components incorporating a variety of shelf and drawer designs.
— cabinet fronts. In kitchens, especially, and on cupboards and other pieces of wood furniture, style is strongly expressed by the kind of detailing on the doors. Consider a door with an inset molding-trimmed panel and an untrimmed door set flush to the cabinet frame—quite apart from the amount of dusting they require, they differ strongly in the style they create.
— color scheme. A very simple room can handle an elaborate pattern or a multihued color scheme, but if you’re cleverly maneuvering a large number of objects into a small space, or if you incline to keeping your belongings out where you can see them, your room probably has enough visual variety in it already. You’d be well advised to choose a quiet palette, perhaps even a monochromatic color scheme.
The four kitchens shown on these pages illustrate some style choices. What you see at first glance are the obvious differences: functional, open shelves; a cozy, traditional look; sleek contemporary lines; a no-nonsense work place. While each makes a completely different impression, you’re not fooled. A kitchen is still a kitchen, no matter how it looks. All of them have the same storage spaces that kitchens normally provide—essentially, different forms of drawers and shelves. These components form your kitchen’s structure, and they carry out their functions regardless of their style.
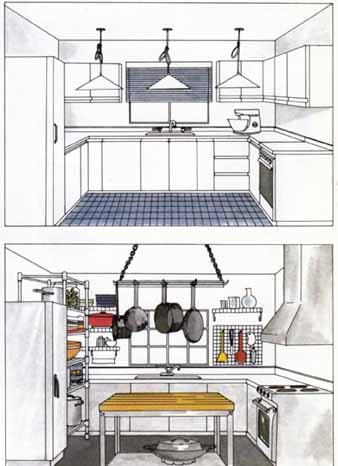
In the contemporary kitchen,
“less is more.” All you see are clean, simple lines. Crisp, square edges
and continuous flush fronts are the details of its style. All equipment
is tucked away in cabinets fitted out with rollouts, lazy Susans, swing-out
shelves—everything is at your fingertips.
In the high-tech kitchen, convenience is king. Surfaces and materials are chosen for their function rather than their decorative effect. The tools and equipment are the style. See it, reach it, use it, clean it, and put it away. That’s instant access, pure simple.
Learn to look first for the type of storage space you need; recognize storage components by the jobs they do. Structure underlies style every time. Once you know what you’re after functionally, you can add the ingredient of style, whether you build it or buy it.