The living areas in your home are not confined to the living, family, or dining rooms. We spend much of our free time on hobbies, such as crafts, woodworking, sewing, painting or other arts, or rebuilding that favorite ‘48 coupe.
While these activities have particular storage requirements suited to each, there are a lot of commonalities. Here are some things to keep in mind while organizing hobby rooms and associated storage.
• If you don’t have a separate room to devote to hobby space, look for space in the spare bedroom, basement, attic, or garage. If you don’t have a large space to devote to a hobby area, don’t give up. Many times you can use a corner with great effectiveness. Make use of mobile storage units that you can roll out when you want to pursue your interests—a table on wheels can serve as a craft bench, a sewing table, or even a workbench in the shop.
• Most hobbies require good lighting. Make sure the room or spot you choose is well lit; try to use natural light effectively.
• Develop your storage plans to make it easy to put things away. A Phillips-head screwdriver or that spool of light blue thread is not useful if you can’t find it the next time you need it.
• Make sure you have ample surface area to spread out projects on which you’re working.
• Make sure there are enough electrical outlets and that the circuits can carry the amperage load of all equipment you might plug in and have running at the same time.
• If your craft requires water, locate the activity in a room that has existing plumbing into which you can tie a new sink.
• Use enclosed storage spaces to protect valuable tools, to keep fabrics clean and dry, or to keep Kitty out of your yarn.
• Organize tools or supplies in relation to each other, blades with saws, nuts with bolts, needles with thread. Use pullout bins or compartmentalized drawer storage cabinets to sort and store such small items as nuts and bolts or beads and other craft supplies.
• Think safety. Store hazardous materials or dangerous power tools where children or pets cannot get to them.
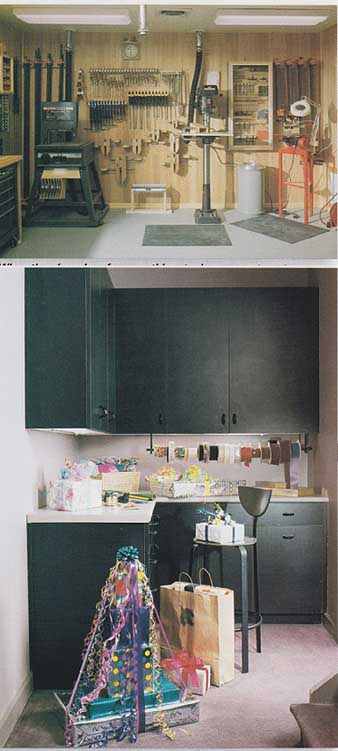
(top) When there’s a place for everything, tools are easy to put away—
and to find the next time you need them. This woodworker’s shop allows the
owner to focus on woodwork, not on hunting for tools. (bottom) Kitchen cabinetry
makes a hobbyist’s craft area look like a professional’s workshop. Cabinets
pack all the essentials: storage, work surface, and lighting. When using
cabinets, be sure to design the countertop surface at the correct height
for the work you’ll be doing.
BUILDING A WORKBENCH
Every workshop requires some kind of workbench. If you don’t have room for an extensive shop, your bench can be as simple as a flush panel door placed across a set of sawhorses; they can go back in a corner when you’ve finished a project. At the other extreme, you can purchase complex benches designed for professional woodwork. Here’s a bench that falls in between.
You easily can make this bench in a day, and you can make it as complex as you want. Use the dimensions given here or adapt them to your needs. Benches generally range from 6 to 8 feet long and 24 to 36 inches deep. The height of the benchtop should be 30 to 40 inches, whatever is a comfortable working level for you.
Assembling this bench is a matter of cutting stock materials and screwing or nailing them together. In this design, the rear legs extend 3 feet above the bench to serve as a framework on which to mount perforated hardboard, so you can store your tools right in front of you. Connect all the leg supports with 2½-inch lag screws for added support. Also, if you make the bench more than 6 feet wide, use 4x4s instead of 2x4s for the legs.
Make the top out of a double layer of ¾” plywood, covered with ¼-inch tempered hardboard. The plywood makes a stable surface that won’t warp and the hardboard provides a smooth surface you can replace when it wears out. If you want to make the bench fancier, you can build a cabinet or drawer unit into the area under the bench. Then you would have enclosed storage for expensive or delicate tools. A locking cabinet would protect your treasured tools from your curious kids and mooching neighbor.
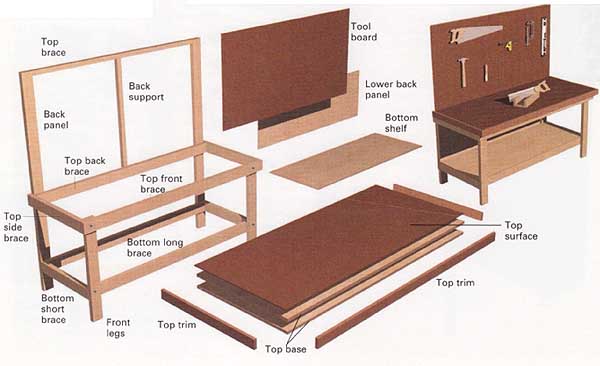
Workbench, exploded view.
MATERIALS LIST |
|||
Item |
Material |
Length |
Qty |
Top trim Top trim Rear legs Front legs Top front brace Top back brace Top side braces Bottom long braces Bottom short braces Bottom shelf Lower back Top, base Top, surface Top brace Back support Tool board |
2x4 pine 2x4 pine 2x4 pine 2x4 pine 2x4 pine 2x4 pine 2x4 pine ½” plywood ½” plywood ¾” plywood ¼” hardboard 2x2 pine 2x2 pine 1/8” perforated hardboard 1x3 hardwood 1x3 hardwood |
72” 33” 72” 69” 28½” 66” 25½” 25½x69” 22½x69” 30x72” 30x72” 62” 39” 36x73½” 73½” 30¾” |
2 2 1 1 2 2 2 1 1 2 1 1 1 1 1 2 |
2½” lag screws; 3d and 6d finish nails; white carpenter’s glue |
|||
BUILDING A FOLD-DOWN SEWING TABLE
Storing your sewing machine in its own convenient center will make using it more pleasurable. This sewing center not only puts the machine at your fingertips, it also provides a handy work surface.
The heart of this project is the fold-down sewing machine shelf. The materials list and drawing show everything you need if you’re going to build the entire cabinet. Or you can build the fold-down sewing shelf into an existing bookcase.
Most sewing machines require a space 9 to 10 inches deep, so a common 12-inch-deep bookcase would be an ideal home for the sewing shelf. The plans here are for a 3-foot- wide unit, which is also a common bookcase size. Another option: Build the unit into a spare closet for a true hideaway system.
If you’re starting from scratch, build the cabinet as you would any bookcase, using the dimensions in the material list. Use rabbet joints at the corners and install the one fixed shelf (the highest one) by cutting dadoes into the sides of the cabinet.
The fold-down work surface opens to reveal the sewing machine in its stored position on a fixed shelf. Other supplies can be stored in cabinets under and above the work surface.
Before installing the sewing table, determine the most comfortable working height—usually between 26 and 28 inches from the floor, Test the height with your machine placed on a trial surface. Make the table wide enough to hold your machine comfortably; here we use 30 inches.
The flat, fold-down work surface can be marked with a grid that is convenient for layout and pattern work. Using this design requires that you lift the sewing machine from its storage shelf onto the fold-down work area when you want to use it, then lift it back to its storage area when you’re done.
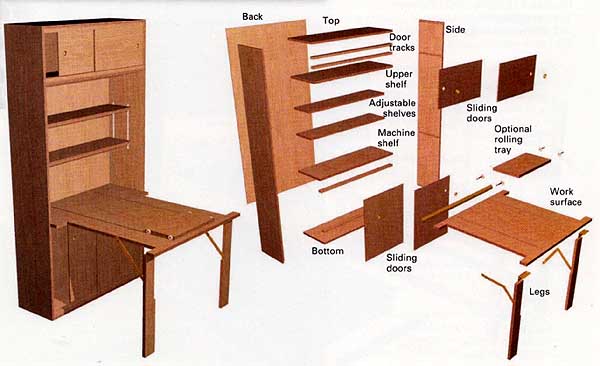
Sewing Table, exploded construction view
--
EASY ALTERNATIVE
Incorporating a movable tray will allow you to glide the machine out to its work position. The tray rolls along grooves routed into the surface of the shelf and the worktable. It eliminates the lifting, but this system has a small drawback: The tabletop then is not a smooth workplace. But if you use the machine frequently and have to put it away after each session, the added convenience may make routing the grooves and doing the extra construction worthwhile.
Make the rolling tray from ¾-inch plywood cut slightly larger than the base of your sewing machine. Purchase four small wheels and attach them to the sides of the tray so they project down below the bottom of the tray. Attach the wheels with screws.
--
PLYWOOD BASE: Measure the width and height of the bay that will house the sewing table, then subtract 1/8 inch from the width and Y4 inch from the height. Using these dimensions, cut the table from ¾” cabinet-grade plywood that matches the material from which the case is made.
Cut 3½-inch-wide cutouts to accommodate the legs. The length of these cutouts depends on the length of the legs, which depends on the height you have calculated for the work surface, Using the same 3 plywood, or matching 1x4 solid wood stock, make the legs to fit in the notches.
Cut a piece of cabinet-grade plywood for the storage shelf inside the cabinet. Cut the plywood ¾-inch narrower than the width of the case because, when folded up, the worktable lies flush with the front face of the case. Note also that any shelves above the storage shelf that will be covered by the worktable when it is folded up should be ¾-inch narrower than the case.
If you intend to install the rolling tray, now is the time to lay out and rout ¼-inch (or the width of the wheels) grooves in both the table and the storage shelf. Also cut 3 dado grooves in the sides of the cabinet at the height of the storage shelf.
ASSEMBLY: Before assembly, check that pieces fit, then sand and finish them to match the cabinet. Fasten the legs to the worktable using a pair of 3½-inch butt hinges. Install the storage shelf in the cabinet, gluing and nailing it in the dadoes.
Attach the fold-up worktable to the storage shelf by screwing one flange of a piano hinge, cut to the full length of the shelf, to the back edge of the worktable, then to the front edge of the shelf.
With the table flat, position the legs vertically. Hold an open, locking brace at a 45-degree angle to mark the screw locations on the edges of the table and legs. Drill pilot holes and install the braces. For a more finished appearance, mark the position of the locking braces with the legs folded up, then remove the legs and braces and rout a mortise channel in the edge of each leg for the brace. Then reinstall the braces.
Apply veneer tape to all the exposed plywood edges. Sand and finish to match the rest of the unit. Install barrel-bolt or other more attractive latches of your choice to secure each leg and the worktable in place when it is in the up position.
ADDING SHELVES AND DOORS: If you’ve installed the fold-down table in a premade cabinet with adjustable shelves, you may have to rip a portion off the shelves above the fold-down worktable so it will close in a flush position.
If you are building your own cabinet, plan ahead by using adjustable shelf supports on the sides of the cabinet (or drill a series of evenly spaced holes for shelf pins) so the shelves will be movable.
You easily can add doors to the shelf sections at the top and bottom of the cabinet (see illustration). You can also attach prefabricated sliding door track to the front of the shelf edges. Then cut doors from ¼-inch plywood that matches the rest of the unit. The bottom prefabricated track should be shallow, 1/8 - 1/16-inch. The top track should be deep enough to allow clearance for the door panels to be lifted into place. Prefabricated tracks are available in wood, plastic, and metal versions. In this case, however, the tracks stick above the wood surface and may catch items that you move in and out of the shelves.
Alternatively, you can rout grooves into the shelves before you install them in the book case. This requires a little more woodworking skill to make sure the grooves align in the lower and upper shelves. Cut doors out of the same 3 cabinet-grade plywood stock, finish them to match the unit, and install them with your choice of hinges.
MATERIALS LIST |
|||
Item |
Material |
Length |
Qty |
Sides Top Bottom Back Upper shelf Machine shelf Adj. shelves Work surface Legs Movable tray Door tracks Sliding doors Sliding doors |
¾” plywood ¾” plywood ¾” plywood ¼” plywood ¾” plywood ¾” plywood ¾” plywood ¾” plywood ¾” plywood ¾” plywood oak ¼” plywood ¼” plywood |
12x68 12x35 12x35 35¼x77¼ 12x35” 11¾x35 8x35” 34 3½x26” 8 16” ¾”x1½”x34½” 18x10” 18x22” |
2 1 1 1 1 1 2 1 2 1 4 2 2 |
screws and nails as needed; four casters; one 1½x34” brass piano hinge; two 1½x3½ butt hinges; two locking folding braces; three latches; veneer tape; white carpenter’s glue; wood putty; paint, stain, or varnish as needed |
|||